
7 Tested Ways to Fix Remote Desktop Slow on Windows 10, 11
If you're grappling with a sluggish Remote Desktop experience, fret not. This post outlines seven proven strategies to address Remote Desktop slow on Windows 10 and 11, ensuring a smoother, more responsive user experience.
By Ellie / Updated on December 13, 2024
Why is my Remote Desktop running so slow?
I always use an HP Windows 10 Pro PC to remotely access a Dell Windows 10 PC via RDP. But recently, the two PCs became extremely slow to log in with RDP. The screen display and response of mouse click were both delayed, which drove me crazy, especially when I needed RDP urgently. Does anyone know why this happens and how to make Remote Desktop faster on Windows 10?”
- Question from Reddit

Remote Desktop is a commonly utilized tool for remote computer control, yet users may encounter issues with laggy performance. Slow Remote Desktop performance can be caused by various factors. For example:
- Network issues: An unstable or unreliable internet connection can impact performance.
- Computer resources: High CPU or RAM usage on either the local or remote machine can result in sluggish Remote Desktop performance.
- Graphics settings: High color depth and resolution settings in the Remote Desktop Connection can consume more bandwidth and slow down the connection.
How to fix Remote Desktop slow on Windows 10 and 11 [7 solutions]
Here are seven solutions that may help fix the issue of Remote Desktop slow on Windows 10 and 11.
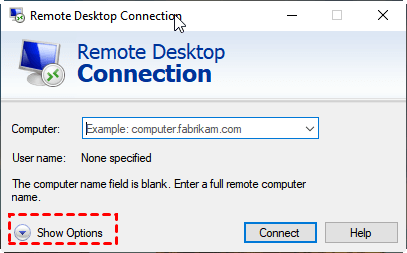
Solution 1. Change RDP display settings
Optimizing display settings can significantly enhance the speed of Remote Desktop. Adjusting parameters such as display size and screen color depth proves effective in addressing the issue of Remote Desktop slow on Windows 10 and 11.
Step 1. Search for Remote Desktop Connection in the search box and then open it. Then find and click Show Options.
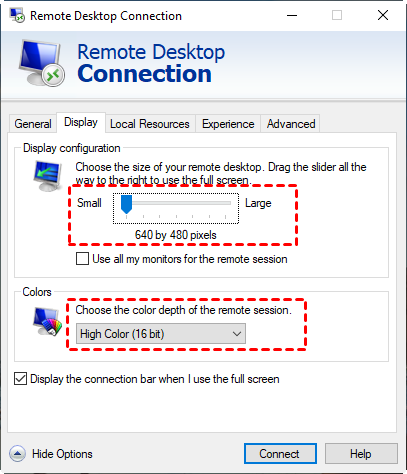
Step 2. Switch to the Display tab, and change the size of the remote desktop to smaller ones. In the Colors column, choose High Color (16 bit).
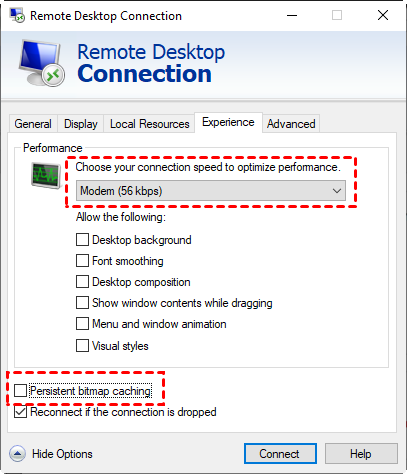
Step 3. Switch to the Experience tab, and change the connection speed to Modern (56 kbps). Then un-tick Persistence bitmap caching.
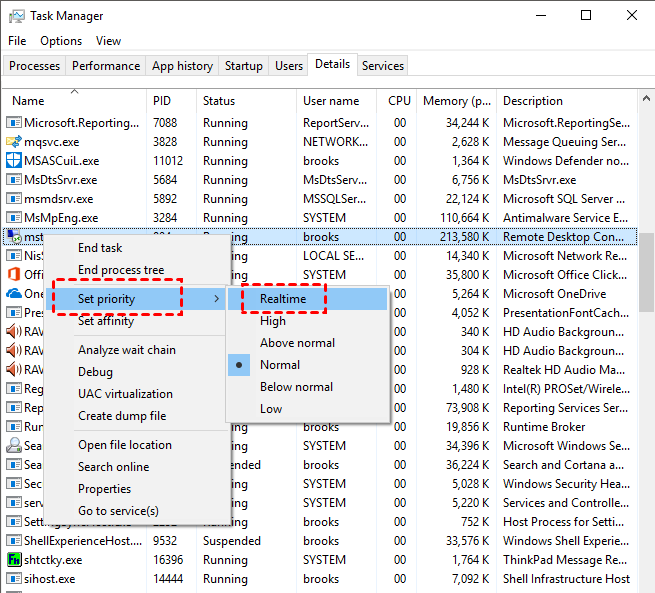
Solution 2. Set the priority of RDP to Realtime
To enhance the speed of Remote Desktop on Windows 10 and 11, addressing elevated CPU or RAM usage is pivotal. One effective strategy involves adjusting the priority of RDP on the client machine, elevating it to Realtime. By doing so, Remote Desktop is allocated the utmost preference for CPU time, contributing to an overall improvement in performance.
Step 1. Press Ctrl + Shift + Esc to open the Task Manager. Then find and right-click Remote Desktop Connection, then click Go to details.

Step 2. Find “mstcsc.exe” in the Task Manager and set priority to Realtime.
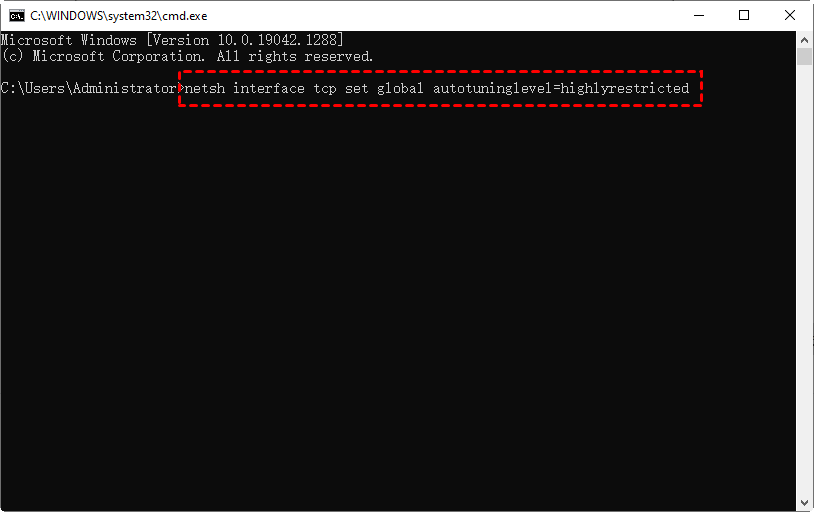
Solution 3. Run specified command on CMD
Users can also run the specified command on Command Prompt to fix the Remote Desktop slow on Windows 10 and 11.
Step 1. Press Win + R and then type in “cmd” to open the Command Prompt.

Step 2. Run the following command: “netsh interface tcp set global autotuninglevel=highlyrestricted”. After this, close the Command Prompt.
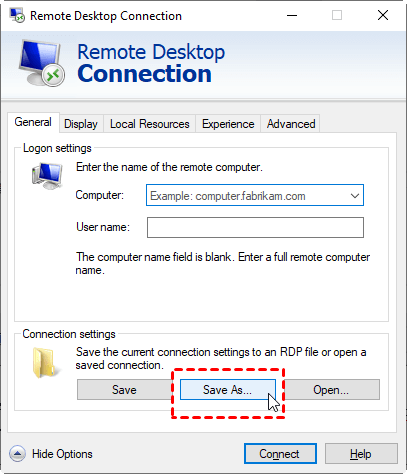
Solution 4. Use notepad to edit the .rdp file
According to the feedback from some users, using notepad to edit the .rdp file and adding a specified command also helps to fix Remote Desktop Connection very slow on Windows 10, 11.
Step 1. Open Remote Desktop Connection. On the General tab, find Connection settings and click Save As.
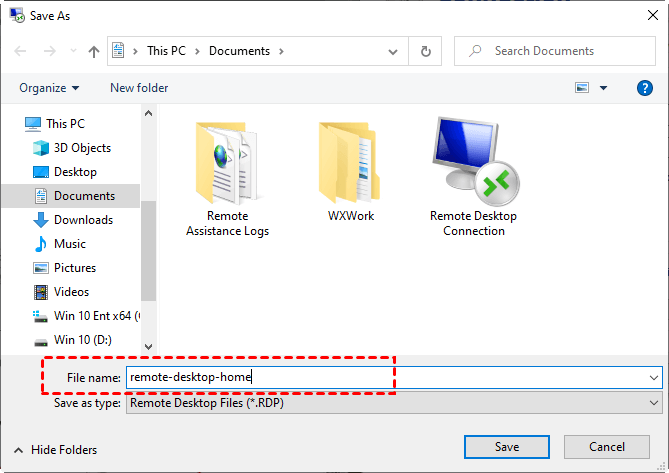
Step 2. Enter the file name you want for the file and then click Save. For example, I save it as “remote-desktop-home” here. Please remember the file location.
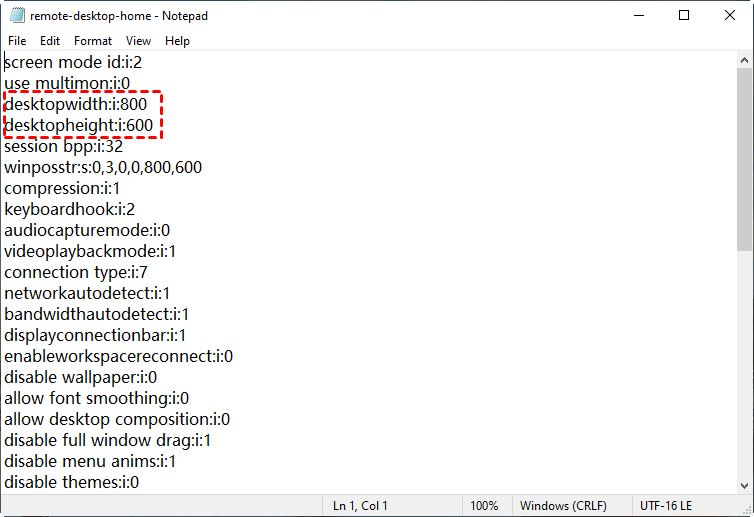
Step 3. Find the file you just saved and right-click it. Then open it with Notepad.

Step 4. Add “enablecredsspsupport:i:0” into the file and then save the file.
Solution 5. Configure the Group Policy setting
Some users also reflected that this problem lies in the root certificates. Therefore, you can follow the steps below to enable the automatic root certificate update.
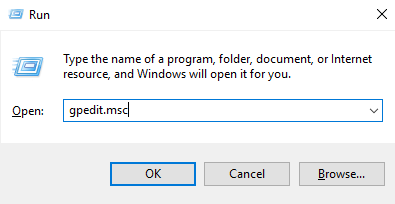
Step 1. Press Win + R and then type in “gpedit.msc” to open the Local Group Policy Editor.
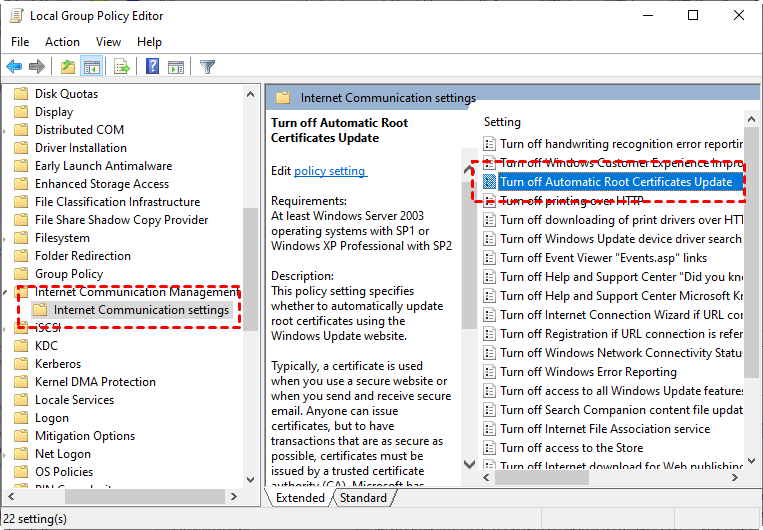
Step 2. Navigate here: Computer Configuration > Administrative Templates > System > Internet Communication Management > Internet Communication settings. On the right pane, find and double-click Turn off Automatic Root Certificates Update.
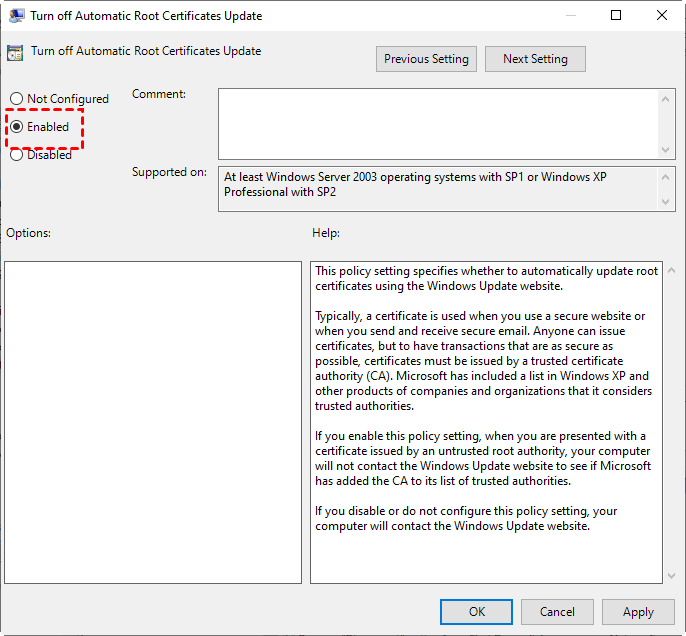
Step 3. Set it to Enabled and then click OK.
Solution 6. Disable VPN
When confronted with sluggish Remote Desktop connection speeds, consider another crucial step to address the issue. If your computer employs a VPN that experiences server-related problems, it can lead to interruptions in your internet connection, consequently impacting Remote Desktop performance negatively. To rectify this, it becomes imperative to disable the VPN temporarily, mitigating potential hindrances to the connection speed.
Solution 7. Change internet connection
Exploring solutions beyond VPNs or proxies, consider altering the internet source for your computer if you encounter a sluggish Remote Desktop connection. A valid and stable internet connection is paramount for optimal Remote Desktop performance. Instances of ping loss or other connectivity issues with your current internet source may be the culprit behind the slow connection problem. Swiftly transitioning to an alternate internet source is highly advisable to address and alleviate these potential impediments.
AnyViewer: Best free Remote Desktop alternative for fast remote access
Should the previous suggestions fail to address the speed concerns, consider exploring Remote Desktop alternative options. A recommended choice is the user-friendly and swift third-party remote access software, AnyViewer. Crafted by a proficient technical team, it ensures a dependable and rapid remote connection with minimal delays. Best of all, it comes free of charge.
Besides, it has the following advantages over Remote Desktop:
▪ ✍AnyViewer ensures comprehensive accessibility for users utilizing Windows Home and Standard editions, free from any restrictive limitations—an advantage not shared by Remote Desktop, which lacks support for these editions.
▪ ✍Users can relish a diverse set of features with AnyViewer, including multiple simultaneous sessions, screen sharing, mobile control, mirroring, and more—features notably absent in Remote Desktop.
▪ ✍AnyViewer stands out for its user-friendly interface and straightforward setup, providing a seamless experience. Even for those less tech-savvy, establishing remote connections is a breeze without the complexities associated with Remote Desktop setup.
Step 1. Download, install and launch AnyViewer on both computers. Go to Log in, and then click Sign up. (If you already have signed up on its official website, you can log in directly.)

Step 2. Fill in the signup information.

Step 3. Then you can see you successfully logged in to AnyViewer. Your device will automatically be assigned to the account you've logged in to.

Step 4. Log in to the same AnyViewer account on the two devices, then click One-click control to achieve unattended remote access.

- Notes:✎...
- It is recommended to upgrade your account to a Professional or Enterprise plan. What can a professional or enterprise plan bring to you:
- More devices will be allowed to be assigned to the same account for unattended access.
- More connection channels for more devices to be able to start remote connection at the same time.
- Black the remote PC screen and disable the remote keyboard & mouse click to protect privacy.
- Faster and larger file transfer.
- Create groups for enterprise devices to manage large numbers of devices conveniently.
Conclusion
This post focuses on addressing the issue of Remote Desktop slow on Windows 10 and 11 with seven suggested solutions. Additionally, an alternative option is presented—consider switching to the fast and free AnyViewer remote desktop software, hailed as the top Remote Desktop alternative. AnyViewer performs swiftly, particularly in optimal network conditions. For those seeking rapid remote desktop solutions, it's worth exploring.
