
Answered: Why Is RDP File Transfer Slow
Are you feeling RDP file transfer slow? Here in this post, we analyze the reasons of RDP file transfer slow and provide you with an RDP alternative to help you transfer files between remote devices easily.
By Ellie / Updated on December 13, 2024
Why is RDP file transfer so slow?
“I’m using RDP to create a remote session. So far everything is working well, with the exception of transferring files back to the client PC. I have a 4 GB text file, compressed to a 1.4 GB zip file. I managed to transfer it from the remote computer to the local. It takes 15 minutes and then shows an error. It is painfully slow. Have any of you used RDP and come up with the reasons why is RDP file transfer so slow?”
Reasons for RDP file transfer slow
There are two reasons why is RDP file transfer slow:
- RDP protocol uses a lot of its bandwidth for screen data and instruction transfer. It is not designed for file transfer originally. This is the primary reason why it is slow.
- If you’re connecting remotely, you probably are running a VPN connection, which takes its own connection overhead with encryption and other protocol requirements, making RDP file transfer slow.
RDP alternative: Fast file transfer tool AnyViewer
If you feel file transfer over RDP is slow, our advice here is to choose an RDP alternative that allows you to transfer files between remote devices quickly. Here we recommend the more reliable and easier remote desktop software AnyViewer. It allows you to transfer files freely between two remote devices without effort.
- Compatibility. It’s compatible with various kinds of Windows systems from Windows 7 to the latest Windows 11.
- Security. It’s encrypted with Elliptic Curve Cryptography (ECC), which keeps your files safe from prying eyes.
- Fast speed. It allows you to transfer a batch of files at a really fast speed. For example, it only costs about 20 seconds to transfer a 2 GB zip file from local to the remote computer via AnyViewer.
Note: The file transfer function requires version 3.0 and above. If your version is lower, please upgrade first.
Download, install and launch AnyViewer on both computers. The whole process is divided into two parts.
Part 1. Sign up for AnyViewer for file transfer
To use the file transfer feature, you need to sign up for AnyViewer and log in to the account on the Controller computer.
Step 1. On the Controller computer, go to Log in, and then click Sign up. (If you already have signed up on its official website, you can log in directly.)

Step 2. Fill in the signup information.

Step 3. Then you can see you successfully logged in to AnyViewer. Your device will automatically be assigned to the account you’ve logged in to.

Part 2. Transfer files with AnyViewer
After signing up for an AnyViewer account and logging in to AnyViewer on the Controller computer, you can start to transfer files. Depending on different situations, you can choose different ways to achieve file transfer.
Option 1. Transfer files without controlling the remote computer
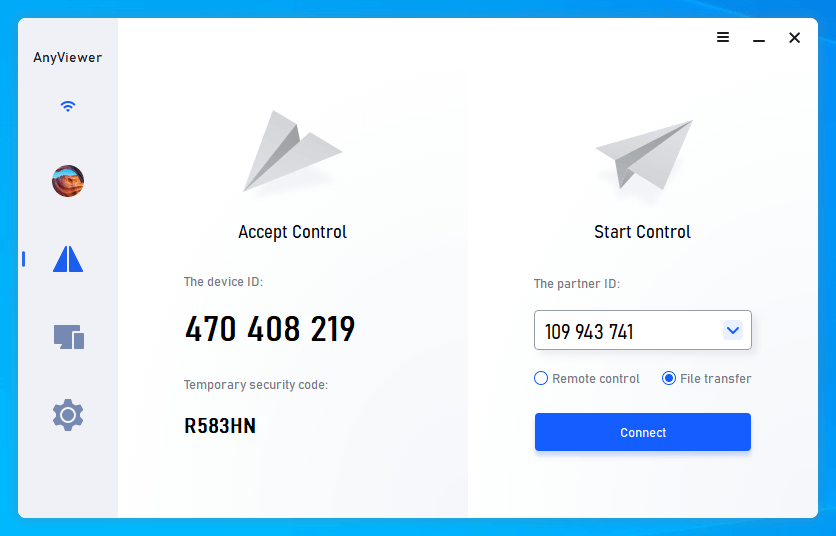
Step 1. Enter the device ID of the recipient on the blank box, and then choose File Transfer.
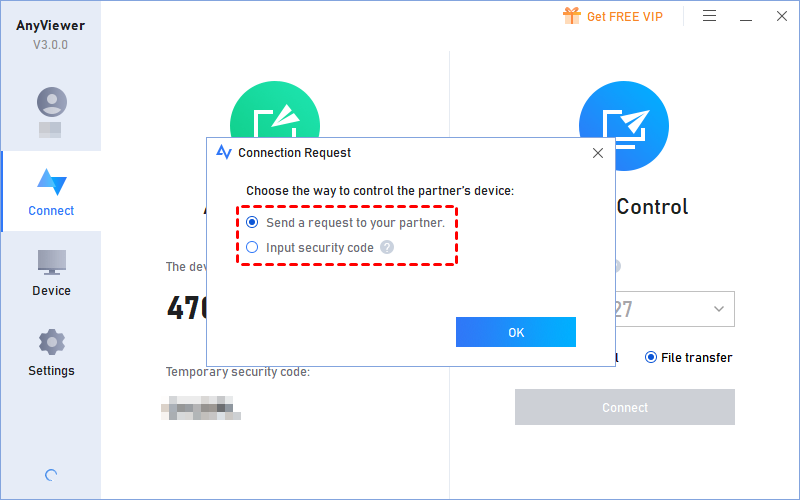
Step 2. Then you’ll be asked whether to Send a request to your partner or Input security code.
- Send a request to your partner: The Recipient computer will receive a pop-up window asking whether he/she allows you to control his/her computer.
- Input security code: You can input the security code set by the Recipient in advance and achieve a direct connection.
Tips: This option is suitable for users who need to transfer files to a stranger or anyone that you do not completely trust, ensuring security during file transfer.
Option 2. Transfer files during a remote connection session
Step 1. On the Recipient computer, log in to the same account as you’ve logged in to on the Controller computer.
Step 2. On the Controller computer, go to the Device tab, choose your target computer, and click File Transfer to start transferring files.

Tips: This option is suitable for users who need to frequently access their own remote computers and transfer files, ensuring convenience during transfer.
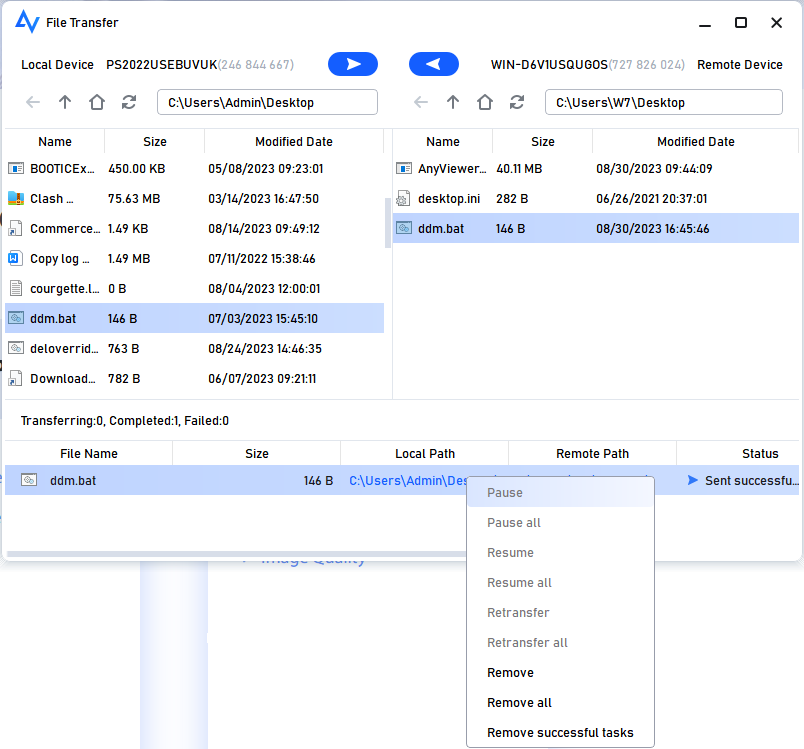
Whatever options you select, a File Transfer dialog box will appear. The path of the Controller computer is shown on the left of the box, and the path of the Recipient computer is shown on the right. You’re able to transfer files between devices (from the Controller computer to the Recipient computer or from the Recipient computer to the Controller computer) freely by clicking the arrows after choosing the target files.

You can see the transfer status at the bottom of the File Transfer dialog box. Right-click to pause or remove the transfer task. The dialog can be closed when the transfer is complete.
- Notes:✎...
-
The maximum size of a single file that can be transferred for the free account is 100 MB. If you want to transfer larger files, please upgrade to a Professional or Enterprise plan.
What can a professional or enterprise plan brings to you:
- Faster transmission speed. Transfer speed for a free account is 500 KB/s, and for a paid account is up to10 MB/s.
- Increasing number of files transferred in bulk.
- Larger size of a single file that can be transferred.
- More devices can be assigned to the same account for unattended remote access.
- More Currently connected devices are displayed for management.
- Connect in privacy mode to protect privacy.
Conclusion
This post primarily explains the reasons why RDP file transfer is slow. To help you transfer files between remote devices with a faster speed, we introduce AnyViewer in this post. If you’re looking for a way to transfer files faster, try AnyViewer right away.
