
Quickly & Safely Use Windows 10 Remote Desktop for File Transfer
Read the post to know the ways for Windows 10 Remote Desktop file transfer as well as learn the solution for copy and paste not working.
By Ellie / Updated on December 13, 2024
Urgently need to use Windows 10 Remote Desktop for file transfer!
"I've been using Remote Desktop for a few days now, but I'm still learning how to use it. Now I urgently need to use Remote Desktop to transfer files from my friend's PC (2 PCs are Windows 10 on the same LAN). But I have no idea how to achieve it. Can anybody show me some concrete steps?"

How to transfer files with Remote Desktop on Windows 10
Remote Desktop is a Windows built-in feature offered by Microsoft that allows us to remotely access or control a PC from another PC on the same LAN. Using Remote Desktop Connection to transfer files remotely on Windows 10 is not hard actually. And the feature "file transfer" has even become a popular function that is appraised by many users. In this part, I’ll show you step-by-step guides to do it.
Step 1. On the host PC, press Win + I to open "Settings", and then go to "System" > "Remote Desktop", and tick the "Enable Remote Desktop".
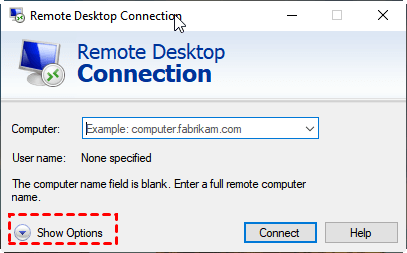
Step 2. Open Remote Desktop Connection by pressing Windows + R simultaneously, inputting “mstsc.exe” and clicking “OK”.
Step 3. Click the Show Options button on the bottom of the left side.
Step 4. Locate the "Local Resources" tab, then choose the last section “Local devices and resources” and click the button “More”.
Step 5. The choice “Drive” is on the list. Click “+” beside “Drive” and then choose the specific files you need to transfer. When you are done you can click OK.
Step 6. Return to the main interface, input the IP address and the username of the remote PC, and then click on "Connect". (If you don't know the IP address and the username of the remote PC, pay attention to the bonus tip.)
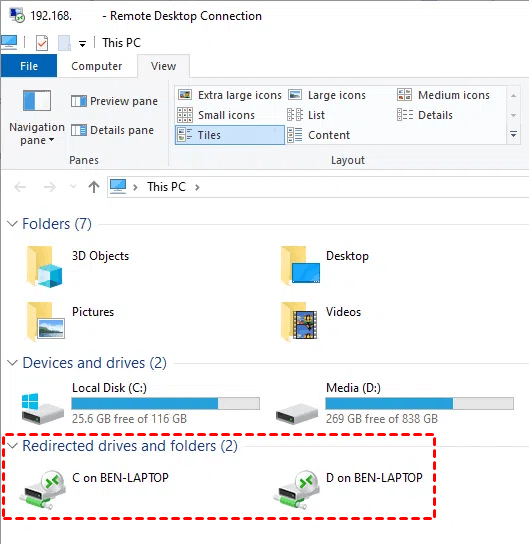
Step 7. After the connection is successfully established, click This Computer on the host computer desktop, and find the previously checked disk.
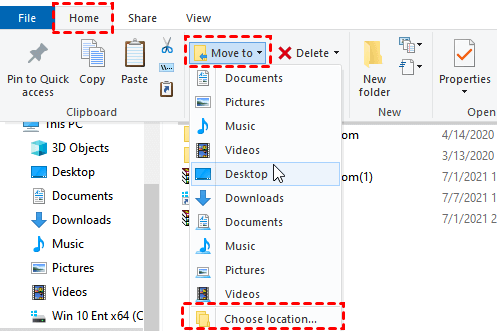
Step 8. Find the disk that stores the files you need and selects the file you want to transfer, click the Home tab above, and then click Move to. Click Choose Location in the drop-down menu to realize Remote Desktop transfer files on Windows 10.
Pay attention: You can also use copy and paste function with RDP. But it needs to mention that RDP cannot copy files larger than 2GB and the speed is fairly slow.
Bonus tip: How to find the username and the IP address of the remote PC
Step 1. Search "cmd" in the search box and then right-click the option, choose "Run as Administrator".
Step 2. Input "ip config" and then press the "Enter" key. Then you can see the IP address and the username.
Free alternative to Windows Remote Desktop for file transfer
To get Windows 10 Remote Desktop file transfer is not too much difficult. However, if 2 PCs are not on the same LAN or you run into some errors like copy and paste not working in the course of remote connection, then why not choose an easier remote access software that not only allows you to remotely access a PC but also transfer files without time and place limitation, like AnyViewer?
AnyViewer is a professional remote access tool appraised by many users for its easy operation and fast connection and file transfer speed. And it is compatible with multiple Windows versions, including the Windows Home edition. Now follow me to act.
Step 1. To transfer files remotely, there will be 2 ways illustrated to you. By choosing the first option, you can get file transfer without the need to remotely access a PC. With option 2, you could transfer files in the course of remote access.
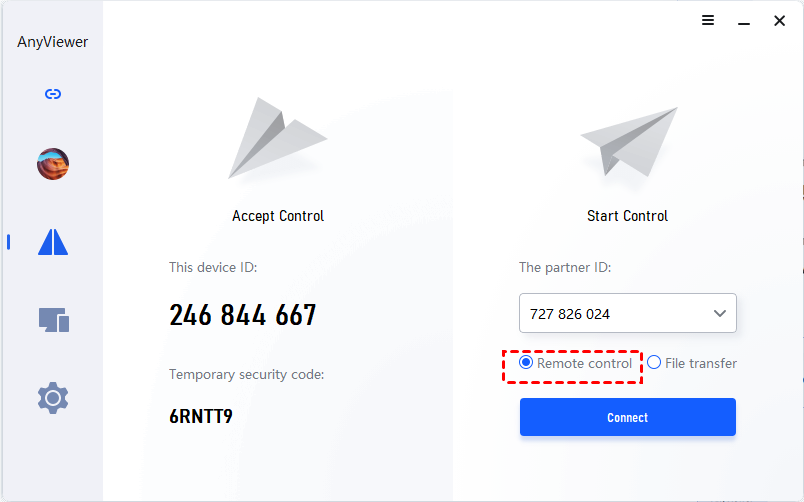
Option 1. Select the "File transfer" option after entering the Recipient ID and then click on "Connect".
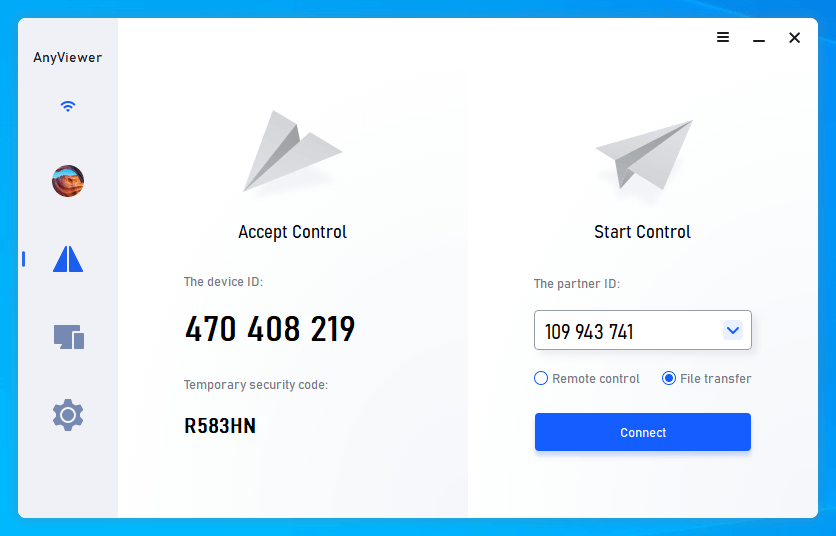
Option 2. Select the "Remote control" option. After the connection is successful, click the "Files" button in the menu bar.

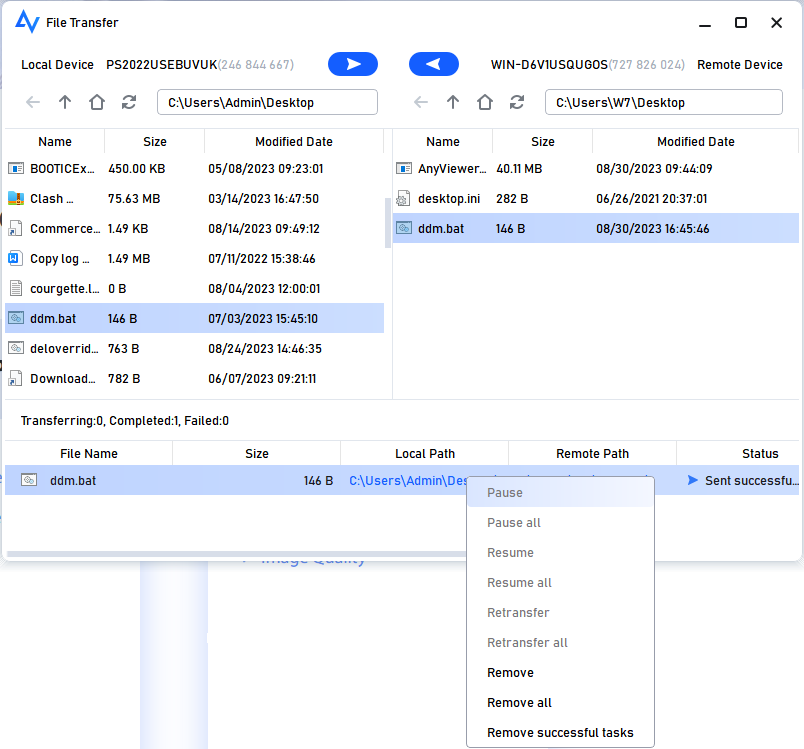
Step 2. In the "File Transfer" dialog box, the path of the client computer is displayed on the left, and the path of the host computer is displayed on the right.
If you want to transfer a file from the Controller to the Recipient, please select the file to send on the left by clicking the blue triangle button, and specify the location to save the file on the right. If transferring from Recipient to Controller, please click the left triangle button.

Step 3. You can see the transfer status at the bottom of the "File Transfer" dialog box. Right-click to pause or remove the transfer task. The dialog can be closed when the transfer is completed.
Note: If you want to transfer a single file larger than 300 MB, you are recommended to upgrade to a higher version so that you can be given more benefits. For instance:
- Faster transmission speed. Transfer speed for a free account is 500 KB/s, and for a paid account is up to 10 MB/s.
- The larger size of a single file, such as 1TB can be transferred.
- Enjoyment of Privacy Mode. With Privacy Mode, the screen of the remote PC would be blackened to safeguard your privacy.
- Much more devices would be assigned to the same account, making the remote connection more convenient.
- ...
Conclusion
Now, you must have known how to use Windows 10 Remote Desktop for file transfer. If the copy and paste are not working for you, try the solution shown above. But in case you run into RDP errors again, we recommend you to use the third-party software, like AnyViewer, to get you out of the trouble and transfer files with little effort.
