
[How-To] 3 Ways to Open Multiple Remote Desktop Connections on Windows 10, 11
Explore methods to open multiple Remote Desktop connections in Windows 10/11. This guide delves into three approaches: RDP Wrapper for flexibility, direct modification of termsrv.dll for purists, and Windows Enterprise Multi-Session for official support.
By Ellie / Updated on January 20, 2025
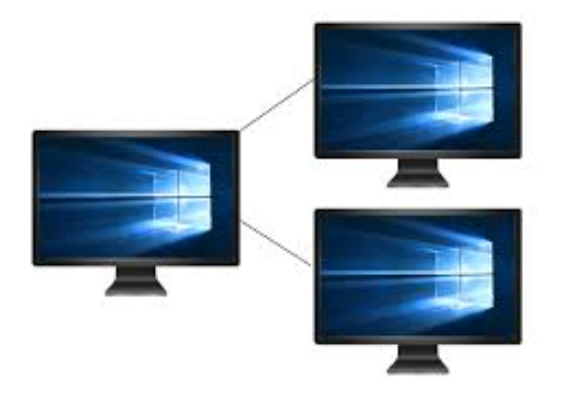
How to allow multiple Remote Desktop connections in Windows 11?
Establishing a connection with a Windows 11/10 computer via Remote Desktop is a common practice. However, encountering an obstacle when another user is already connected prompts an error message, cautioning that proceeding would disconnect the current user. This situation might lead to inquiries such as, "How to allow multiple Remote Desktop connections in Windows 10 and 11?"
3 ways to open multiple remote desktop sessions on Windows 10/11
Within this piece, we will elucidate three methods for eliminating the restriction on the quantity of simultaneous Remote Desktop Protocol (RDP) connections in both Windows 10 and 11:
- RDP Wrapper
- Modification of the termsrv.dll File
- Upgrade to Windows Enterprise Multi-Session
- ★Note:
- Making changes to your operating system as detailed in this article goes against the Windows License Agreement. It's crucial to understand that these modifications come with risks, and you undertake them at your peril.
Way 1. RDP Wrapper
The RDP Wrapper Library OpenSource project simplifies enabling multiple Remote Desktop Protocol (RDP) sessions on Windows 10/11, without tinkering with the termsrv.dll file. Acting as a middleman between the Service Control Manager and Remote Desktop Services, it loads termsrv with modified settings without directly altering the file.
Crucially, RDP Wrapper remains effective even after termsrv.dll updates, ensuring compatibility with Windows updates. However, it's important to check that you're using the original termsrv.dll file before installing RDP Wrapper to avoid potential instability or startup issues.
Step 1. Download the latest available version of the RDP Wrapper Library from GitHub.
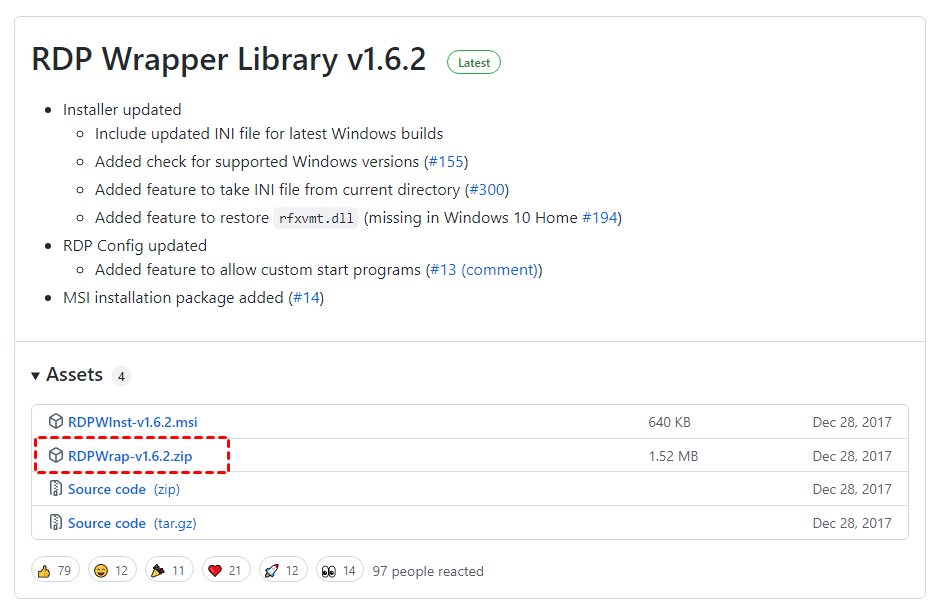
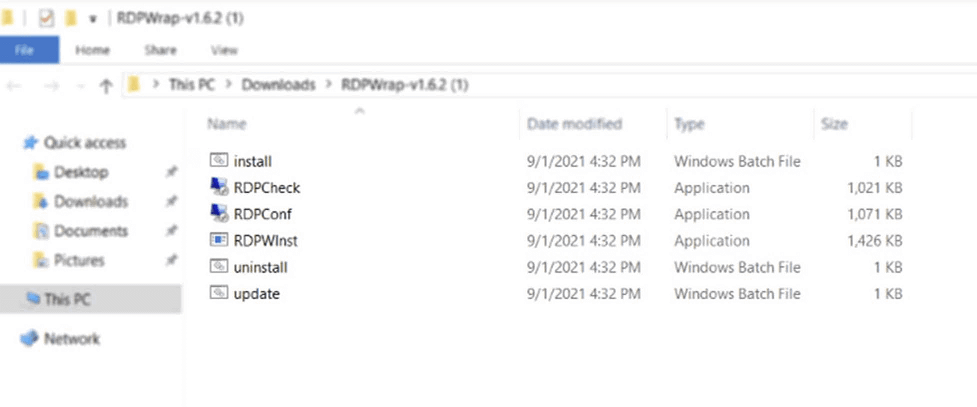
Step 2. Extract the RDPWrap-v1.6.2.zip archive and then you can find the following files:
- RDPWinst.exe(RDP Wrapper Library installation/uninstallation program).
- RDPConf.exe(RDP Wrapper configuration utility).
- RDPCheck.exe(Local RDP Checker and RDP check utility).
- install.bat, uninstall.bat, update.bat(batch files for install, uninstall, and updates for RDP Wrapper).
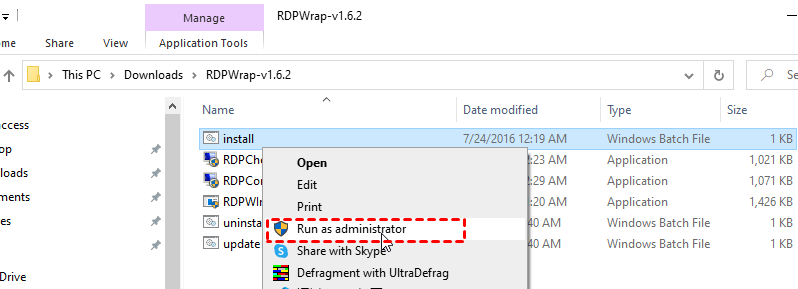
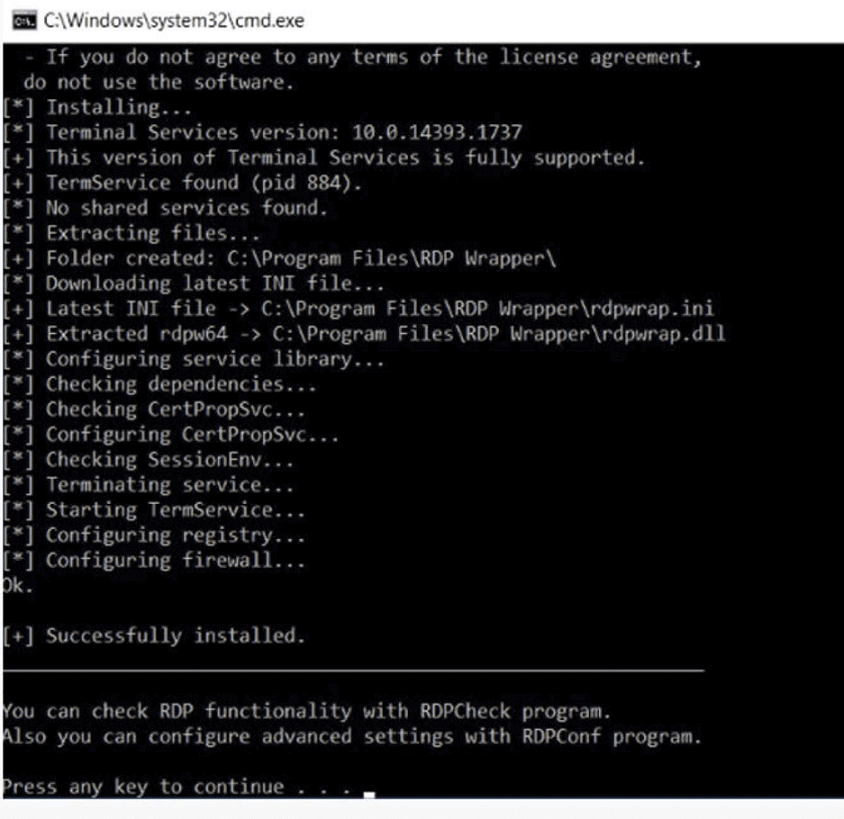
Step 3. Find and right-click the install bat, and select Run as administrator to install RDPWrap.
Step 4. The program will be installed to the C:\Program Files\RDP Wrapper directly, once the installation is complete, you can see the successfully installed information below.
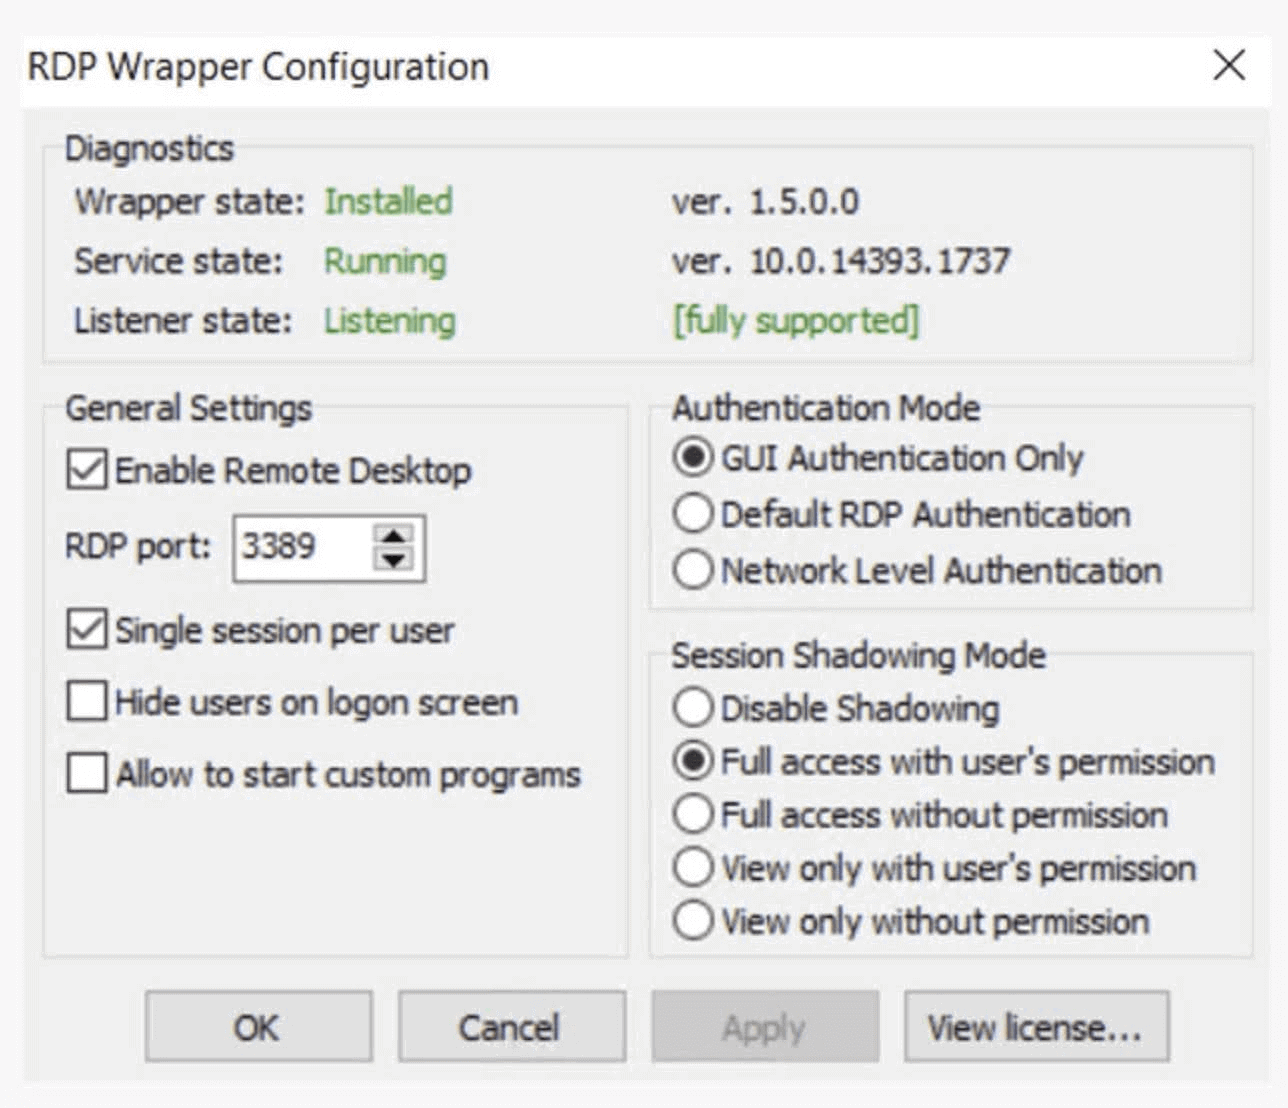
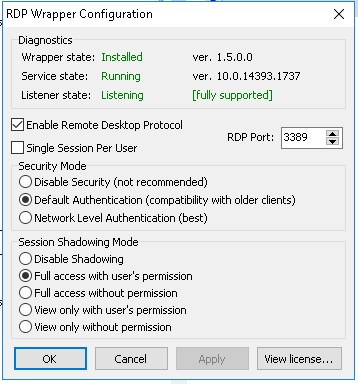
Step 5. Open the RDPConfig.exe to check whether the RDP Wrapper is running, and make sure all elements are green in the Diagnostics section.
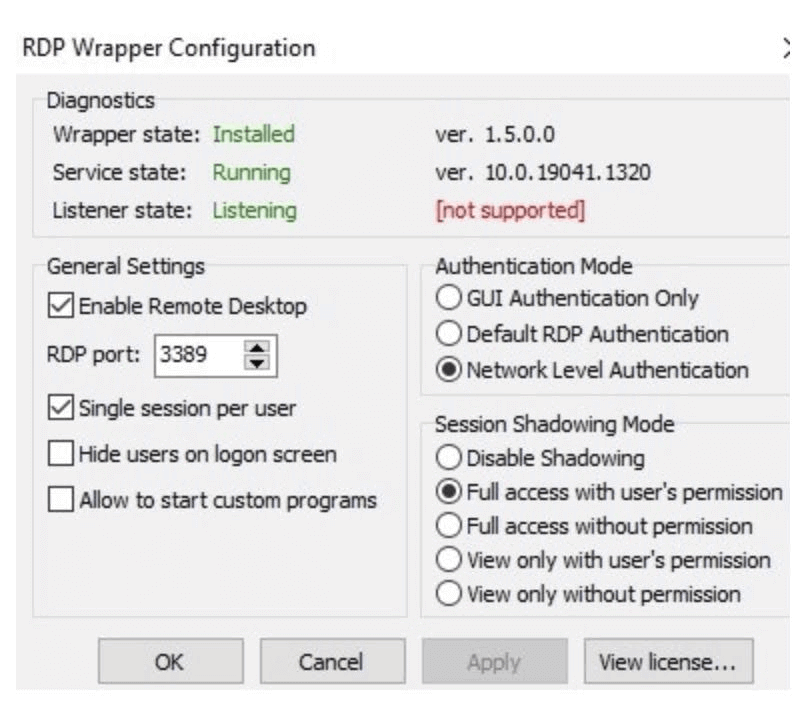
Note: Most likely, immediately after installation, the tool will show that the RDP wrapper is running (Installed, Running, Listening), but not working, which is reported by the red warning [not supported].
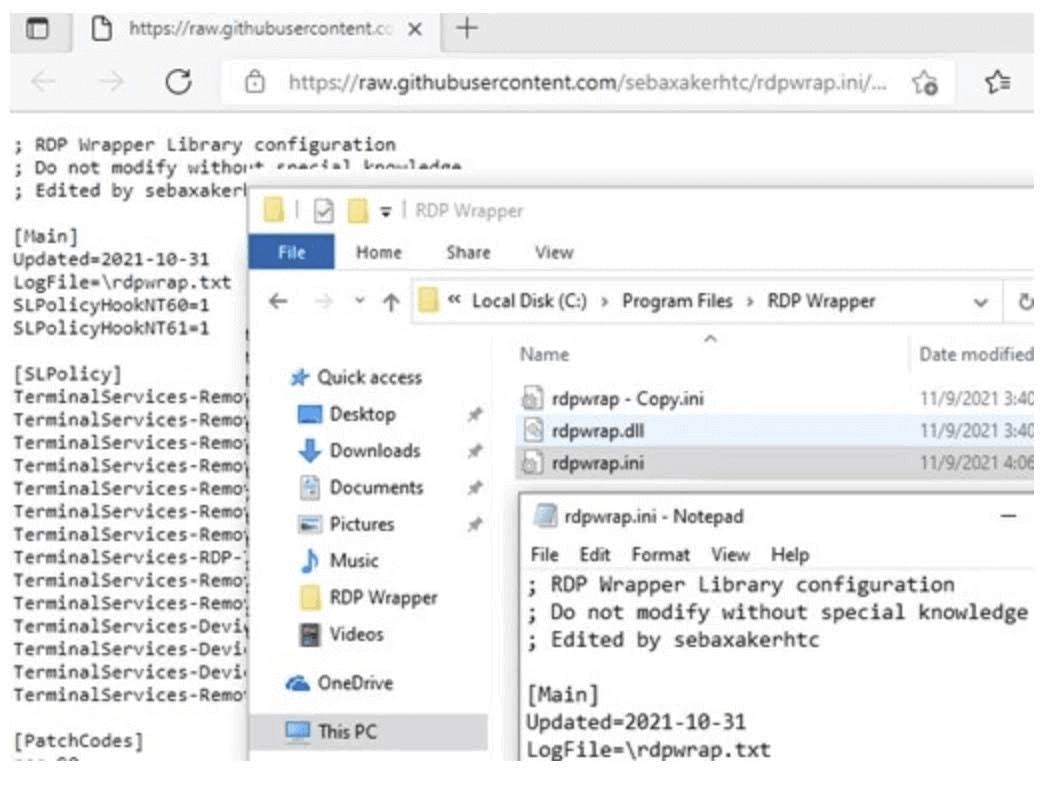
Step 6. Copy and paste the contents of the following page to the C:\Program Files\RDP Wrapper\rdpwrap.ini file.
- https://raw.githubusercontent.com/sebaxakerhtc/rdpwrap.ini/master/rdpwrap.ini
Step 7. Restart your computer. Run the RDPConfig.exe tool to check all the items are green in the Diagnostics section and the caption [fully supported] appears.
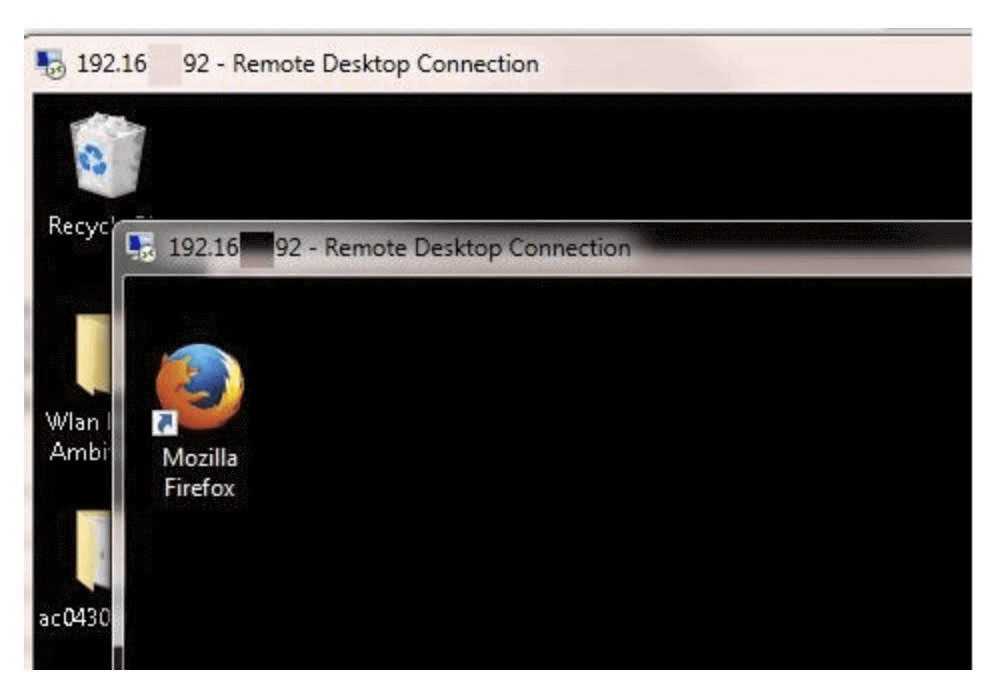
Step 8. Run the RDPCheck.exe and try to establish multiple RDP sessions on your computer. Now you are able to perform Windows 10 Pro Remote Desktop for multiple users.
Way 2. Modification of the termsrv.dll File
To eliminate the restriction on concurrent Remote Desktop Protocol (RDP) user connections in Windows, bypassing the use of RDP Wrapper, you can opt to substitute the original termsrv.dll file. This critical library file is integral to the functioning of the Remote Desktop Service and is situated in the C:\Windows\System32 directory.
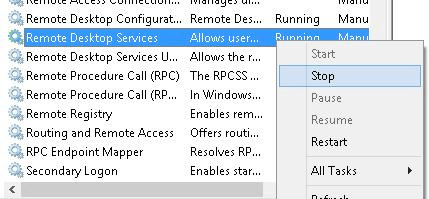
Step 1. To launch the Services management interface, press Win + R and enter "services.msc". Find and right-click Remote Desktop Services in the context menu and then click Stop.
Step 2. We recommend you open Command Prompt as administrator and enter the following command to back up the original termsrv.dll file.
copy c:\Windows\System32\termsrv.dll termsrv.dll_old

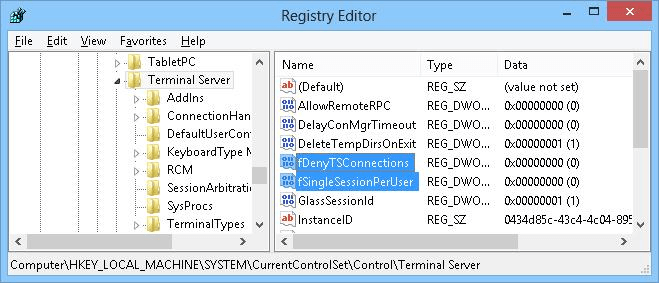
Step 3. Change the values of the following keys in HKLM > System > CurrentControlSet > Control > Terminal Server:
- fDenyTSConnections (DWORD) — 0
- fSingleSessionPerUser (DWORD) — 0
You can also do it quickly by entering the following two command lines in the Command Prompt:
- REG ADD “HKLM\SYSTEM\CurrentControlSet\Control\Terminal Server” /v fDenyTSConnections /t REG_DWORD /d 0 /f
- REG ADD “HKLM\SYSTEM\CurrentControlSet\Control\Terminal Server” /v fSingleSessionPerUser /t REG_DWORD /d 0 /f
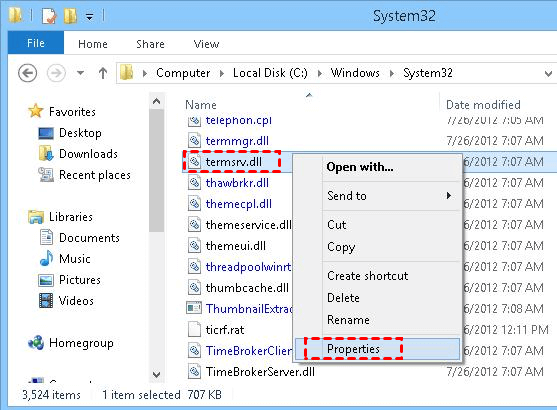
Step 4. Navigate to C:\Windows\System32 to find and right-click the termsrv.dll file, and then select Properties.
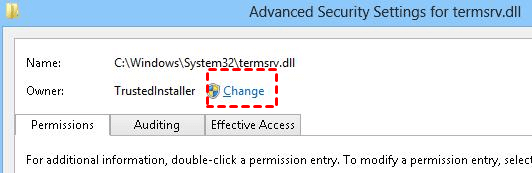
Step 5. Click Change to change the file owner from “TrustedInstaller” to a local administrators group.
Step 6. Click Edit on the Security tab. Select the local administrators group and give it Full control over this file and then click OK.

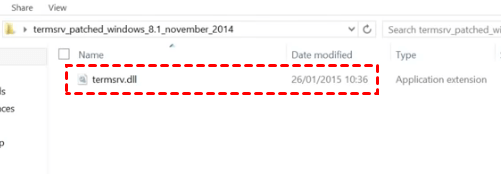
Step 7. Copy the termsrv.dll file from the archive downloaded before operations and replace it with the original one in %SystemRoot%\System32\.
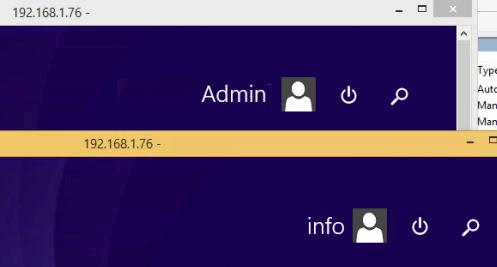
Step 8. Open the Services management console again to start the Remote Desktop Services. And now you can establish two multiple RDP sessions.
Way 3. Upgrade to Windows Enterprise Multi-Session
Microsoft has recently introduced a specialized version of the operating system known as Windows Enterprise Multi-Session (previously identified as Windows 10 Enterprise for Remote Sessions and Windows 10 Enterprise for Virtual Desktops).
The standout feature of this edition lies in its inherent support for multiple simultaneous Remote Desktop Protocol (RDP) user sessions. Although officially designated for use exclusively in Azure Virtual Machines, it is technically feasible to install this edition on an on-premises network, allowing the computer to function as a terminal server—despite contravening Microsoft's licensing policies.
Note: The Enterprise Multi-Session edition applies to both Windows 10 and Windows 11 operating systems.
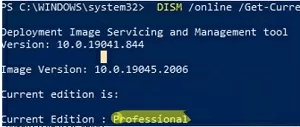
Step 1. Open a command prompt and check your current edition of Windows (Professional in this example):
- DISM /online /Get-CurrentEdition
Step 2. Upgrade your edition of Windows 10 from Pro to Enterprise with the command:
- changepk.exe /ProductKey NPPR9-FWDCX-D2C8J-H872K-2YT43
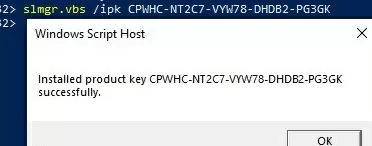
Step 3. Now install the GVLK key for Windows 10 Enterprise for Remote Sessions:
- slmgr.vbs /ipk CPWHC-NT2C7-VYW78-DHDB2-PG3GK
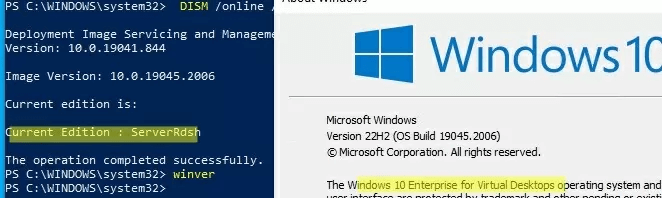
Step 4. Check that your edition of Windows 10 has now changed to ServerRdsh (Windows 10 Enterprise for Virtual Desktops).
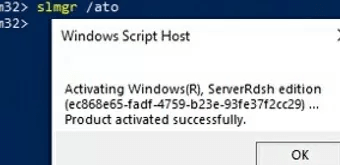
Step 5. Activate your copy of Windows 10 Enterprise Multi-Session edition on your KMS server:
- slmgr /skms kms-srv.woshub.local:1688
- slmgr /ato

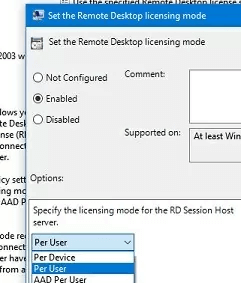
Step 6. Open the Local GPO Editor (gpedit.msc) and enable Per-User licensing mode in the Set the Remote Desktop licensing mode (Computer Configuration > Policies > Administrative Templates > Windows Components > Remote Desktop Services > Remote Desktop Session Host > Licensing).
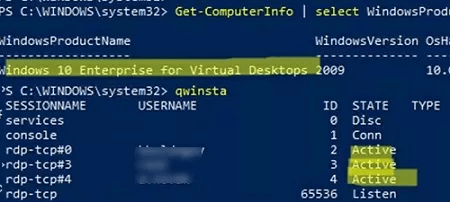
Step 7. You must restart Windows after activation. Now try connecting to the computer using RDP with different user accounts. As you can see, Windows 10 Enterprise multi-session supports simultaneous RDP connections right out of the box.
- Get-ComputerInfo | select WindowsProductName, WindowsVersion, OsHardwareAbstractionLayer
- qwinsta
Bonus tip: An easier way to open multiple remote sessions
AnyViewer is a highly recommended remote desktop software for connecting to multiple computers simultaneously. Here are some reasons why it stands out in this regard:
- Multi-connection capability: AnyViewer allows users to connect to and control multiple remote computers simultaneously. This is particularly useful for IT professionals, support teams, or anyone managing multiple devices at once.
- Easy switching between sessions: The interface of AnyViewer is designed for efficient navigation between multiple connected devices. Users can easily switch between different remote sessions with a few clicks.
- Unattended access: AnyViewer offers unattended access, allowing users to set up and access remote computers without requiring someone at the remote location to grant permission. This is beneficial for managing multiple computers without constant user interaction.
- Secure connections: Security is a priority for AnyViewer. The software employs strong encryption protocols to ensure the safety of data during remote connections, which is crucial when managing multiple computers simultaneously.
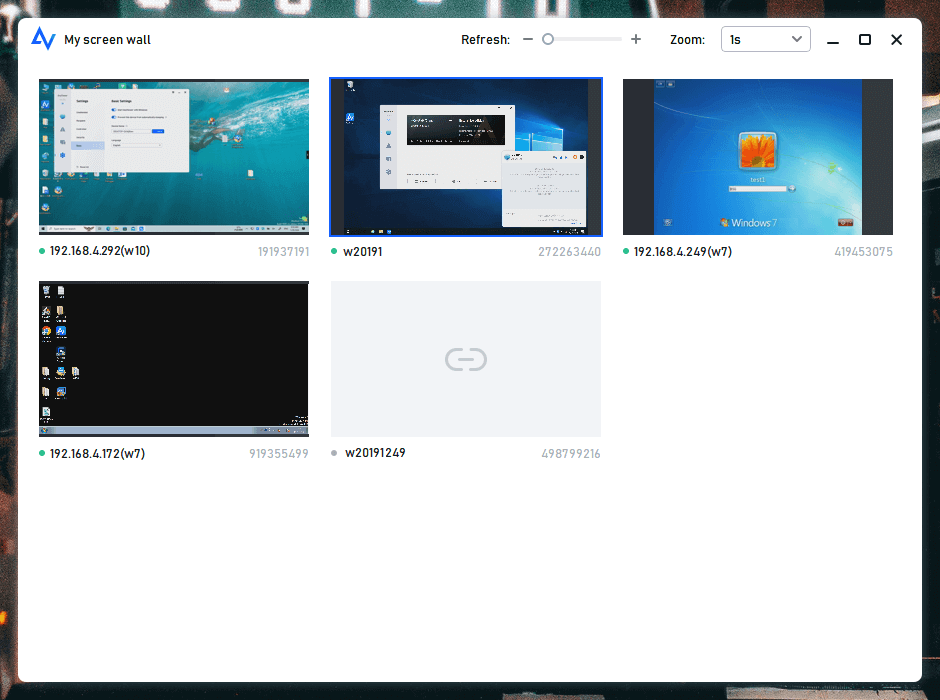
- Easy management with screen walls: AnyViewer empowers you to establish a screen wall, simplifying the management of multiple devices by allowing you to effortlessly add the ones you wish to control simultaneously.
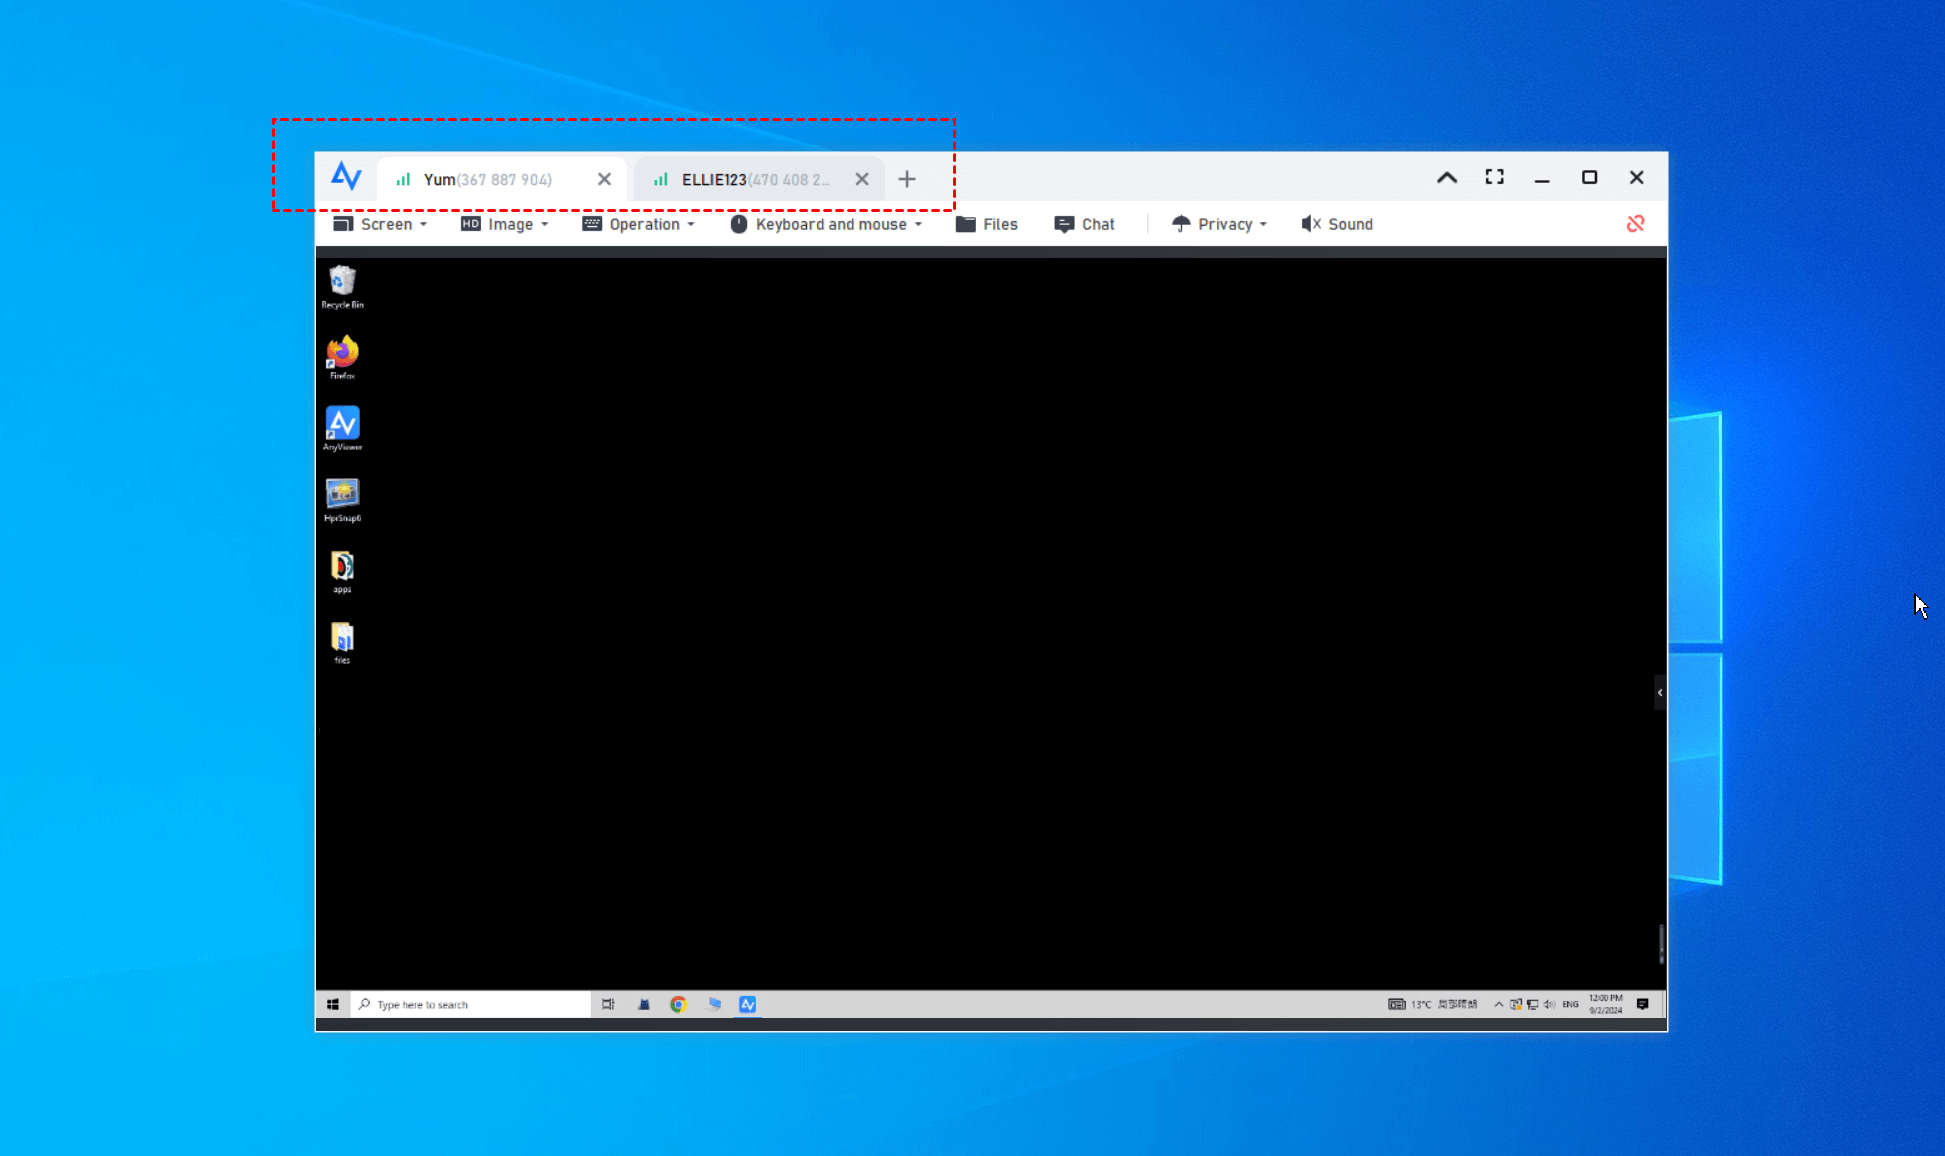
- Multi-screen display: After connecting, the multiple screens of the remote device appear as tabs. You can drag a tab to view it in a separate window and move it to your monitors for dual-screen control.
Get one and let’s start operation now.
Step 1. Download, install, and launch AnyViewer on all computers. Go to Log in, and then click Sign up to create an AnyViewer account.
Step 2. Then you can see you successfully logged in to AnyViewer. Your device will automatically be assigned to the account you've logged in to.

Step 3. Log in to the same AnyViewer account on the other devices, then choose one of the remote PCs. Click "One-click control" to achieve remote access.
Step 4. Then on another computer, you can repeat the steps to open multiple sessions on the Windows 10/11 computer.
Alternatively, you can create a screen wall and add all the devices you want to control. Click Screen wall and follow the on-screen instructions to create your screen wall.
![]()
Now, you can observe the screens of all the added devices within a single window and exert control over them according to your preferences.
- ★Note:
- The screen wall feature is for Enterprise users only.
Conclusion
In summary, opening multiple remote desktop connections in Windows 10/11 can be achieved through RDP Wrapper, modifying termsrv.dll, or upgrading to Windows Enterprise Multi-Session. Caution is advised as these alterations violate the Windows License Agreement.
Additionally, the guide introduces AnyViewer as a secure remote desktop software for managing multiple computers simultaneously. Users should be mindful of potential risks and licensing implications.
