
Top Four Ways for Windows 10 RDP Clipboard Not Working
This article posted on AnyViewer introduces four methods to help you work out Windows 10 RDP clipboard not working issue. If you are facing the problem right now, try the methods and troubleshoot it immediately.
By Ellie / Updated on December 26, 2025
Windows 10 RDP clipboard not working
When I was using RDP to remotely control my office computer from home on Windows 10 this morning, I was unable to copy and paste to a remote desktop session. I've tried to copy folders, text files, words, and excels, but none of those work. Can anyone tell me how to fix this problem? It has really affected my work efficiency."
- Question from Emily
RDP has greatly facilitated our work life by allowing us to remotely access files and data from anywhere. But sometimes, we may get into trouble when Windows 10 RDP clipboard not working, for example, we're unable to copy and paste files in a remote session.
Four solutions to fix Windows 10 RDP clipboard not working
When RDP clipboard not working, the first thing we can think of is to restart the program or even restart our computer. This may work sometimes, but not every time. Thus, in this post, we offer you four effective ways to help you fix Windows 10 RDP clipboard not working issue.
Solution 1. Change Group Policy setting on the host computer
Clipboard redirection not working may cause the user to fail to use the clipboard to transfer files on the host computer in RDP. Drive redirection allows a user to get access to their local drives in an RDP session. It is also used when copying files. Thus, when copy and paste not working on Windows 10, you need to check whether you’ve enabled the use of the RDP clipboard on the Windows host for copy and paste operations or not.
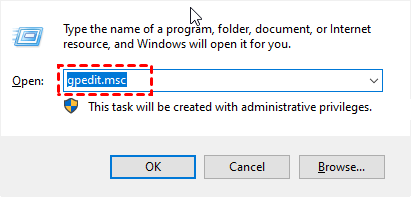
Step 1. Press Win + R to invoke the Run dialog box, then type in “gpedit.msc” and press OK to open up the Local Group Policy Editor.
Step 2. Navigate here: Computer Configuration > Administrative Templates > Windows Components > Remote Desktop Services > Remote Desktop Session Host > Device and Resource Redirection.
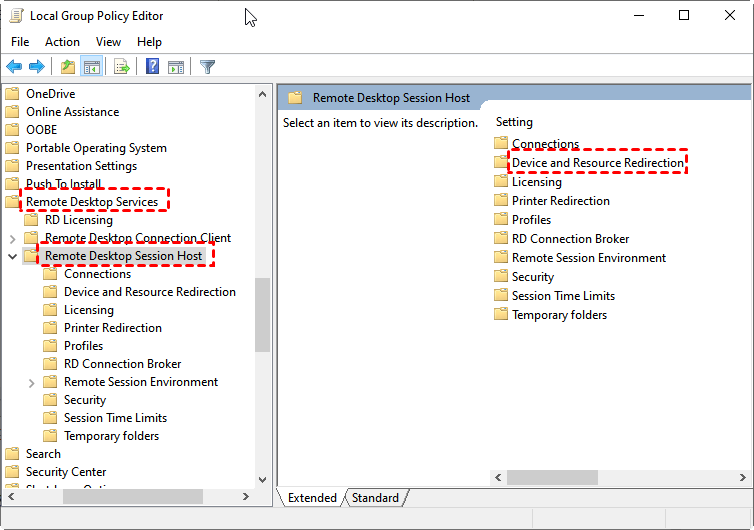
Step 3. Double-click Device and Resource Redirection, find Do not allow Clipboard redirection and Do not allow drive redirection in the right pane.

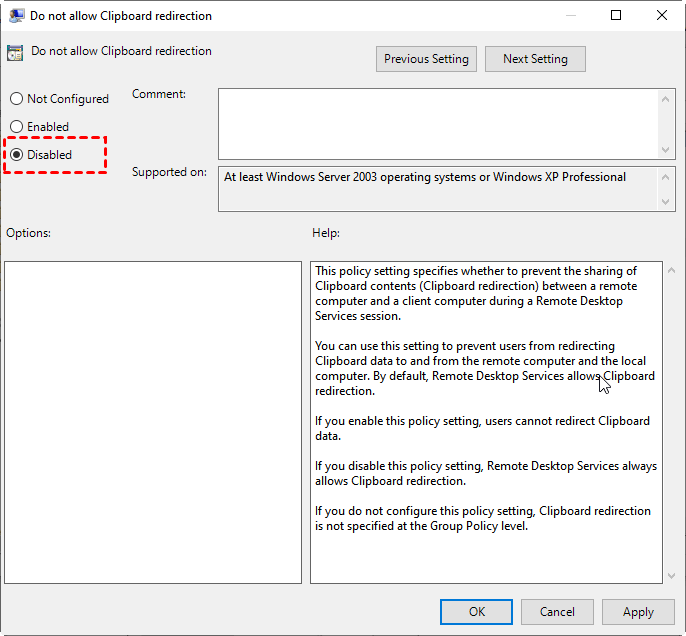
Step 4. First, double-click Do not allow Clipboard redirection, then change the state of it from Not configured or Enable to Disable. Click OK to save the change.
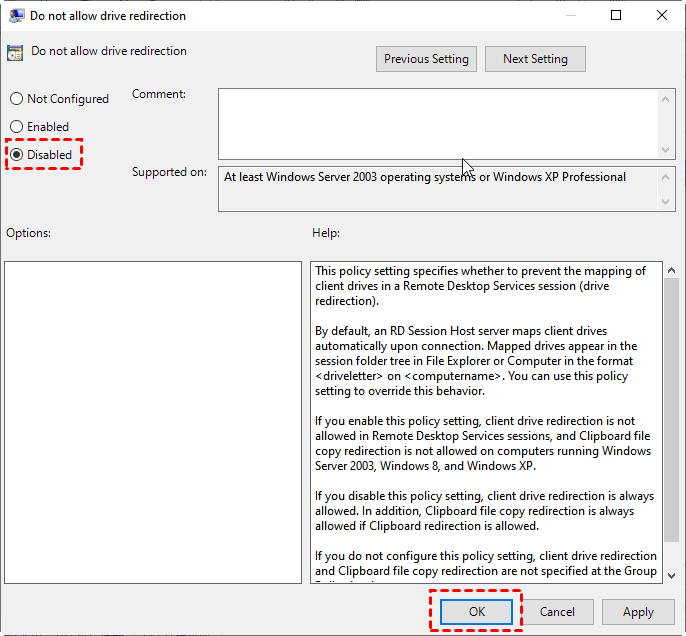
Step 5. Then follow the same direction in step 4 to change the state of Do not allow drive redirection to Disabled.
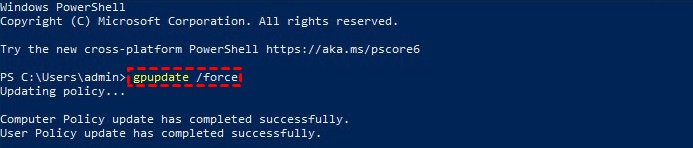
Step 6. After you’ve changed both states, open Windows PowerShell and run gpupdate /force to update your computer to the latest group policy settings.
Step 7. Restart your computer to see if the problem is fixed or not.
Solution 2. Enable clipboard and drives on the client computer
We’ve discussed how to enable clipboard and drive redirection on the host computer above. The remote clipboard and drives must also be enabled in the settings of the RDP client you are using to connect to a remote computer to ensure you can transfer files easily and copy-paste texts freely between the local computer and the remote computer.
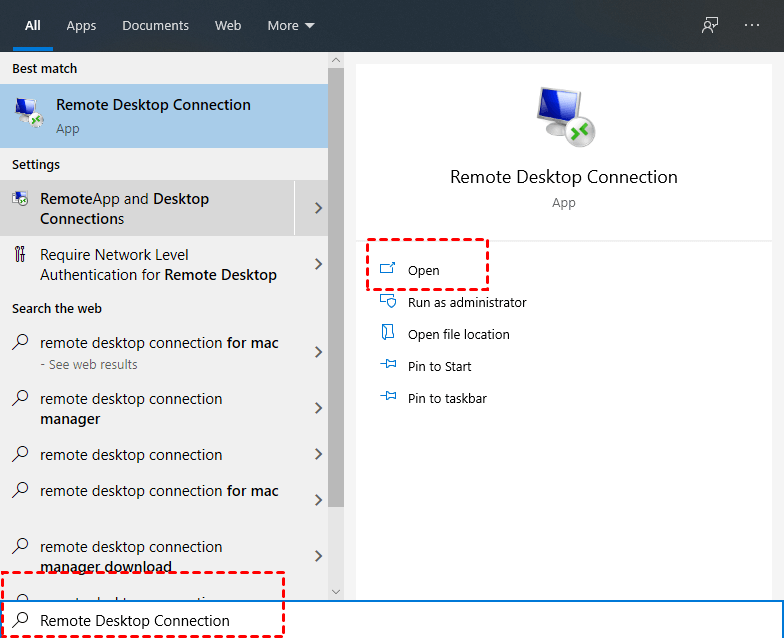
Step 1. Search for Remote Desktop Connection in the Search box. And then open it.
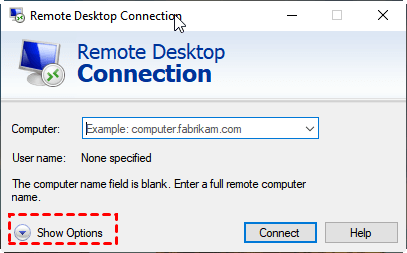
Step 2. In the Remote Desktop Connection dialog box, click Show Options.
Step 3. Click the Local Resources tab, check Clipboard. Then click More.
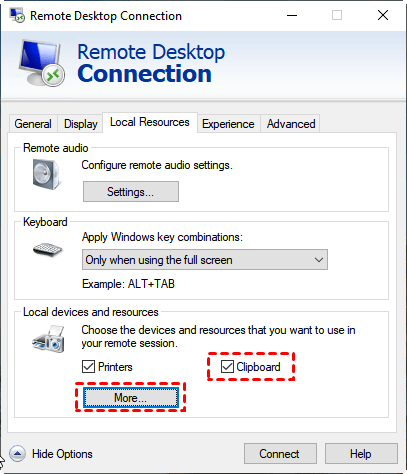
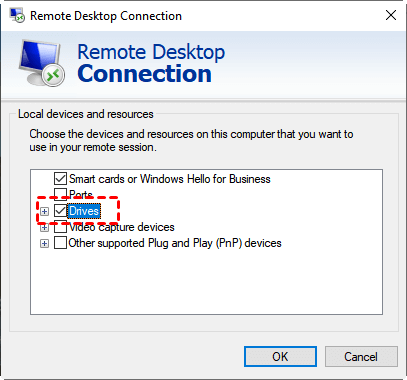
Step 4. On the Local devices and resources window, check Drives. Click OK to finish the setting
Solution 3. Restart rdpclip.exe on the host computer
Rdpclip.exe is the task that decides whether the clipboard function is processing well between two computers. So when RDPClip not working, you could restart the task on your host computer to see if this method works out.
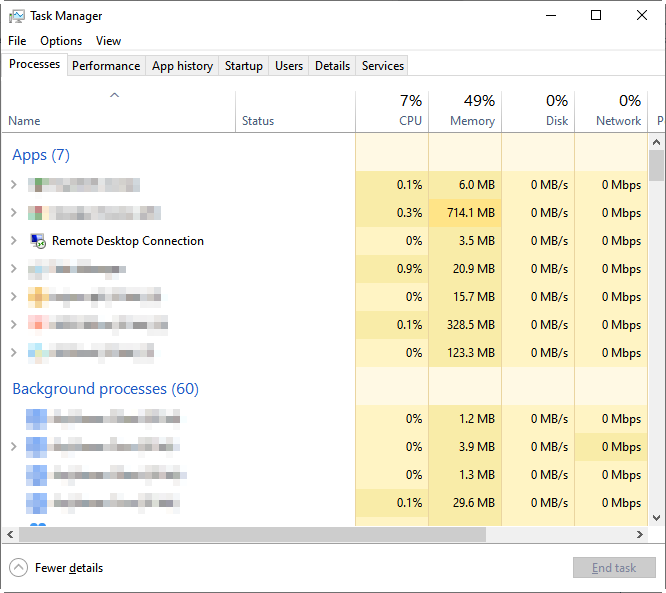
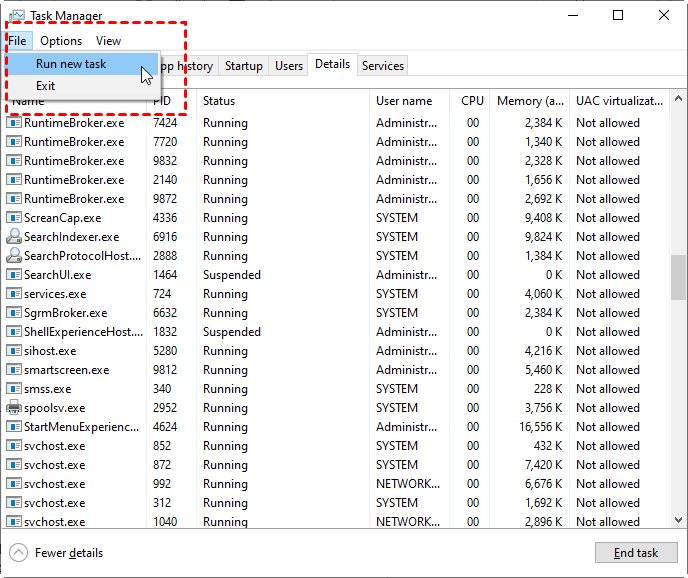
Step 1. Press Ctrl + Shift + Esc to invoke the Task Manager window.
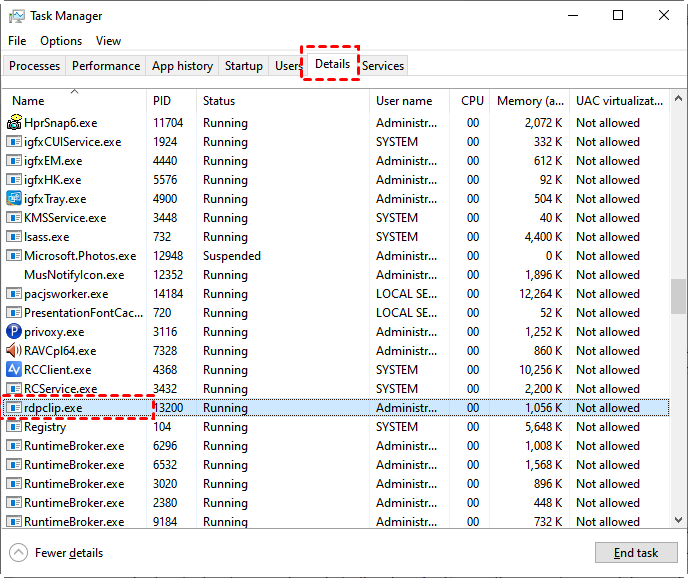
Step 2. Go into the Details tab and find the task named “rdpclip.exe”.
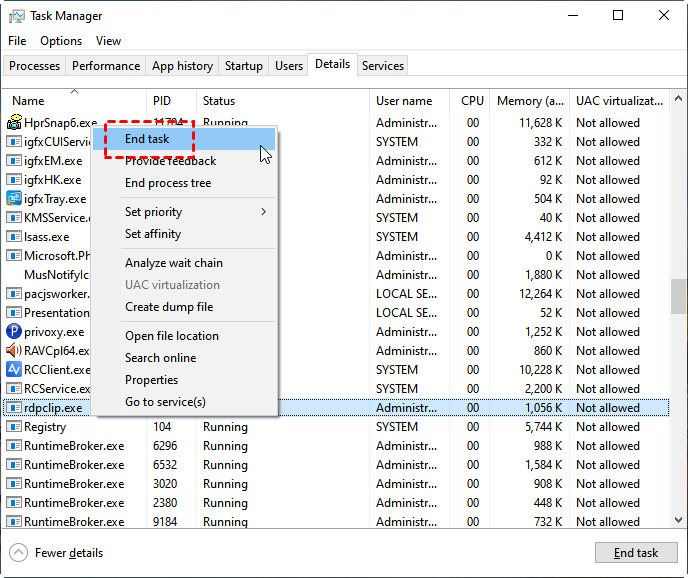
Step 3. Right-click “rdpclip.exe” task and then click “End task”.
Step 4. Go to File and then click Run new task.
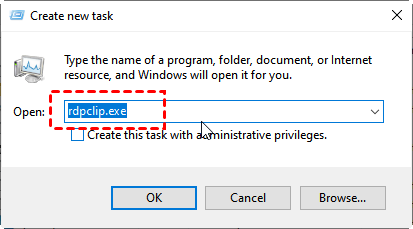
Step 5. A Create new task window will pop up. Type in “rdpclip.exe” in the box and then click OK to restart Remote Desktop Clipboard
Solution 4. Remove antivirus programs
According to some users’ feedback, sometimes, the use of antivirus programs with Remote Desktop causes the RDP clipboard not working on Windows 10, 11. Therefore if you have your antivirus program running, it is recommended that you quit it or just remove it first, and then try to use Remote Desktop copy and paste again.
Bonus tips: Free remote desktop and file transfer tool AnyViewer
If you want to try another remote desktop tool that allows you to transfer files between remote computers, you can use AnyViewer. It is a free, fast, and secure remote access and file transfer software. Once you assigned devices to the same account, you can easily achieve unattended remote access and file transfer with one click. Besides, it is not technically demanding for users. Even if you are a computer novice, you can get started easily and quickly.
- Fast speed. It allows you to transfer a batch of files at a really fast speed. For example, it only costs about 20 seconds to transfer a 2 GB zip file from the local to the remote computer.
- High security. The file transfer process is secured by Elliptic Curve Cryptography (ECC) encryption, protecting your data from leakage.
- Multiple features. As a remote desktop tool as well, it also allows you to easily control and manage office computer remotely.
Step 1. Download, install, and launch AnyViewer 3.0 on both Windows computers. If your version is lower, please upgrade first.
Step 2. On the Controller computer, go to Log in, and then click Sign up. (If you already have signed up on its official website, you can log in directly.)

Step 3. Fill in the signup information.

Step 4. Then you can see you successfully logged in to AnyViewer. Your device will automatically be assigned to the account you’ve logged in to.

Step 5. Choose your target computer, and then click File Transfer.


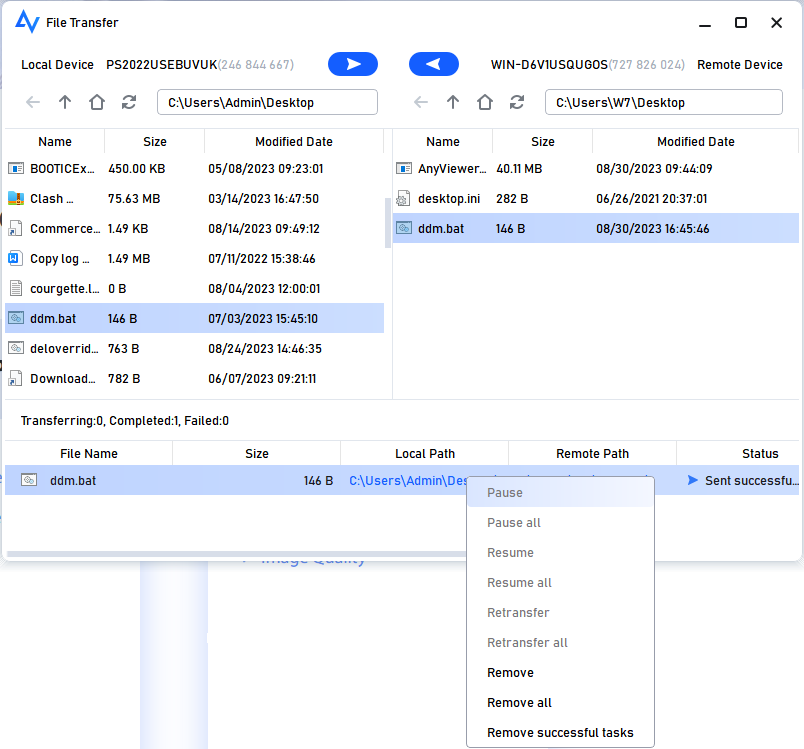
Step 6. Then a File Transfer dialog box will appear. The path of the Controller computer is shown on the left of the box, and the path of the Recipient computer is shown on the right. You’re able to transfer files between devices freely by clicking the arrows after choosing the target files.

Step 7. You can see the transfer status at the bottom of the File Transfer dialog box. Right-click to pause or remove the transfer task. The dialog can be closed when the transfer is complete.
- Notes:✎...
- You can also upgrade your account to a professional or enterprise plan. Here are what a professional or enterprise plan can bring to you:
- Faster transfer speed. Transfer speed for a free account is 500 KB/s, and for a paid account is up to 10 MB/s.
- Increasing number of files transferred in a single time. The maximum number of files that can be transferred per time for a free account is 100.
- Larger size of a single file that can be transferred. The maximum size of a single file that can be transferred for the free account is 100 MB.
- More devices can be assigned to the same account for unattended remote access.
- More Currently connected devices are displayed for management.
- Connect in privacy mode to protect privacy.
Conclusion
Generally speaking, it’s not easy to perform RDP copy and paste. When something is wrong, it always takes tedious procedures to fix it. If you’re unfortunately facing the problem right now, the above-mentioned four possible causes of and respective solutions to the Windows 10 RDP clipboard not working problem may give you some help.
