
How to Transfer Data from Old Laptop to MacBook Air: 6 Easy Ways
Just got a new MacBook Air? This guide shows you how to transfer data from your old laptop quickly and easily. From remote tools to local sharing and cloud storage, we cover six simple methods that work for everyone—no tech skills needed.
By Ellie / Updated on April 11, 2025
How do I transfer data from old laptop to MacBook Air?
So, you've finally made the leap from an old Windows laptop to the sleek, powerful MacBook Air. Nice move! But now you're facing that one annoying hurdle—how to transfer data from your old laptop to your new MacBook Air without losing your sanity (or your files). Whether you're tech-savvy or a first-time Mac user, this guide has got your back.
How to transfer data from old laptop to MacBook Air [6 ways]
In this ultimate guide, we'll explore six tried-and-true methods for moving everything—documents, photos, videos, even system files—from your old laptop to your MacBook Air, safely and efficiently. Let's make this transition smooth and stress-free.
Way 1. Use AnyViewer – Best for remote & encrypted file transfers
If your old laptop and MacBook Air aren't on the same network, AnyViewer is your best bet. This remote desktop tool allows secure, high-speed file transfers across the internet, perfect for when your devices are in different locations.
Why Choose AnyViewer:
- No need for both devices to be on the same Wi-Fi.
- User-friendly interface—no tech skills needed.
- End-to-end encryption ensures your files stay secure.
- Bonus: Offers remote desktop control and real-time troubleshooting.
How to transfer data from old laptop to MacBook Air using AnyViewer:
Step 1. Install AnyViewer on both your Windows laptop and MacBook Air.
Step 2. Sign in to your account or create a new one.

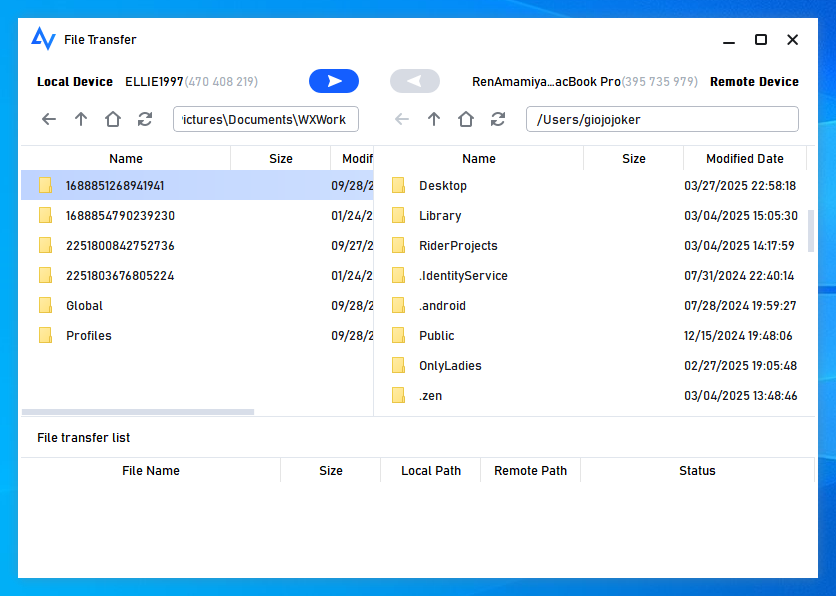
Step 3. Open AnyViewer on your Windows laptop, go to the "Device" tab, find your Mac under "My Devices," and click "File Transfer" to open the file manager.
- If you want full remote access, click "One-click Control" to connect to your Mac from Windows and use the file manager from there.
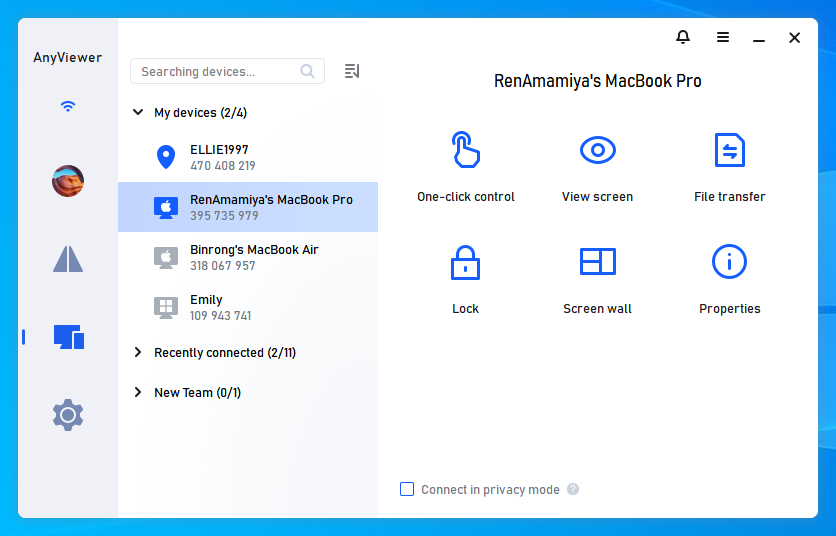
Step 4. Choose the files you want to move and click the arrow to start the transfer. You can send files from Windows to Mac or the other way around.
Pros:
- Works over different networks.
- High-speed file transfer.
- Robust remote access features.
Cons:
- Requires internet connection.
- Needs app installation on both devices.
Way 2. Use Migration Assistant – Best for full system transfer
Apple's Migration Assistant is tailor-made for moving from Windows to Mac. It transfers not just files, but also contacts, calendars, and email accounts—organizing everything automatically.
Why Choose Migration Assistant:
- Excellent for complete migration of user profiles.
- Seamless integration with macOS.
- Data lands in the right places—no messy reorganization needed.
How to transfer data from PC to Mac using Migration Assistant:
Step 1. Download and install "Windows Migration Assistant" on your Windows laptop.
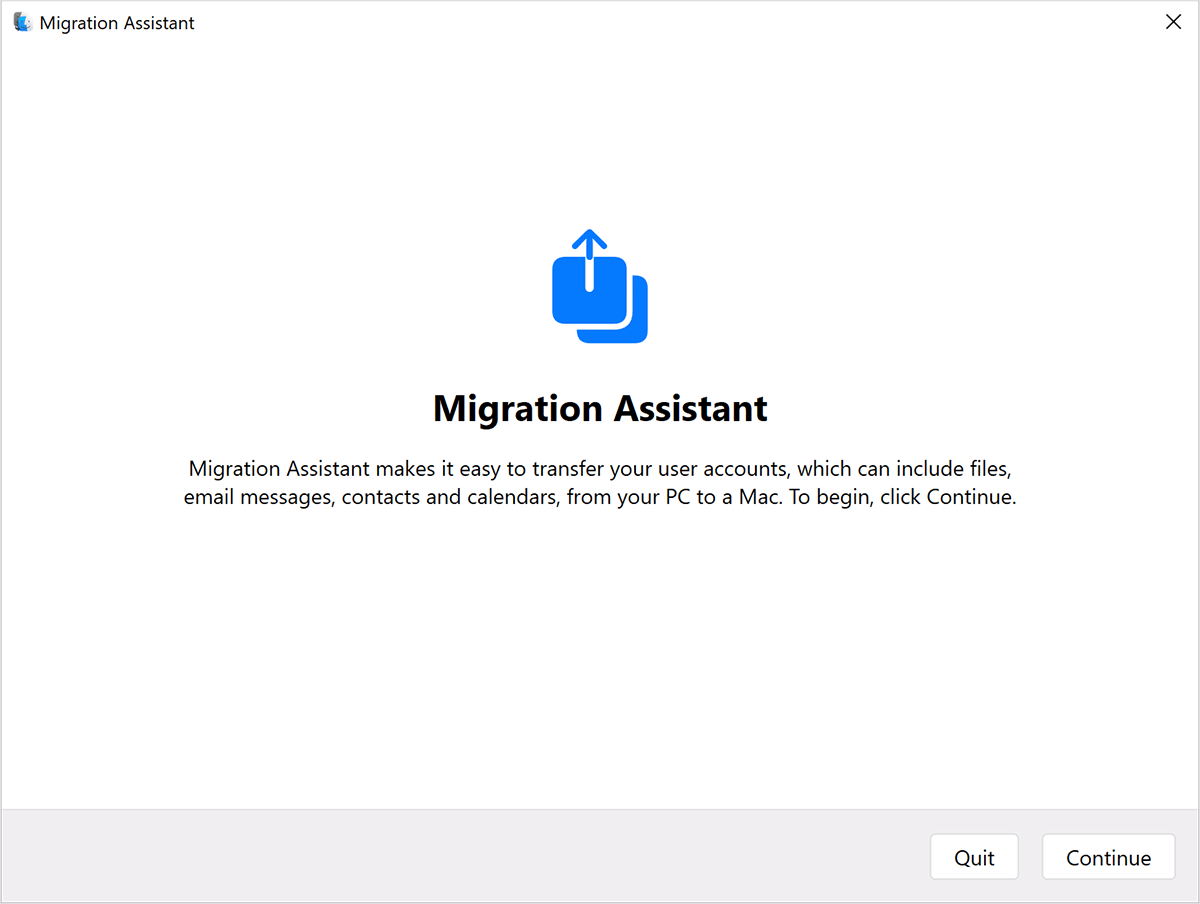
Step 2. On your Mac, open "Migration Assistant" (found in "Applications > Utilities" or search with "Spotlight").
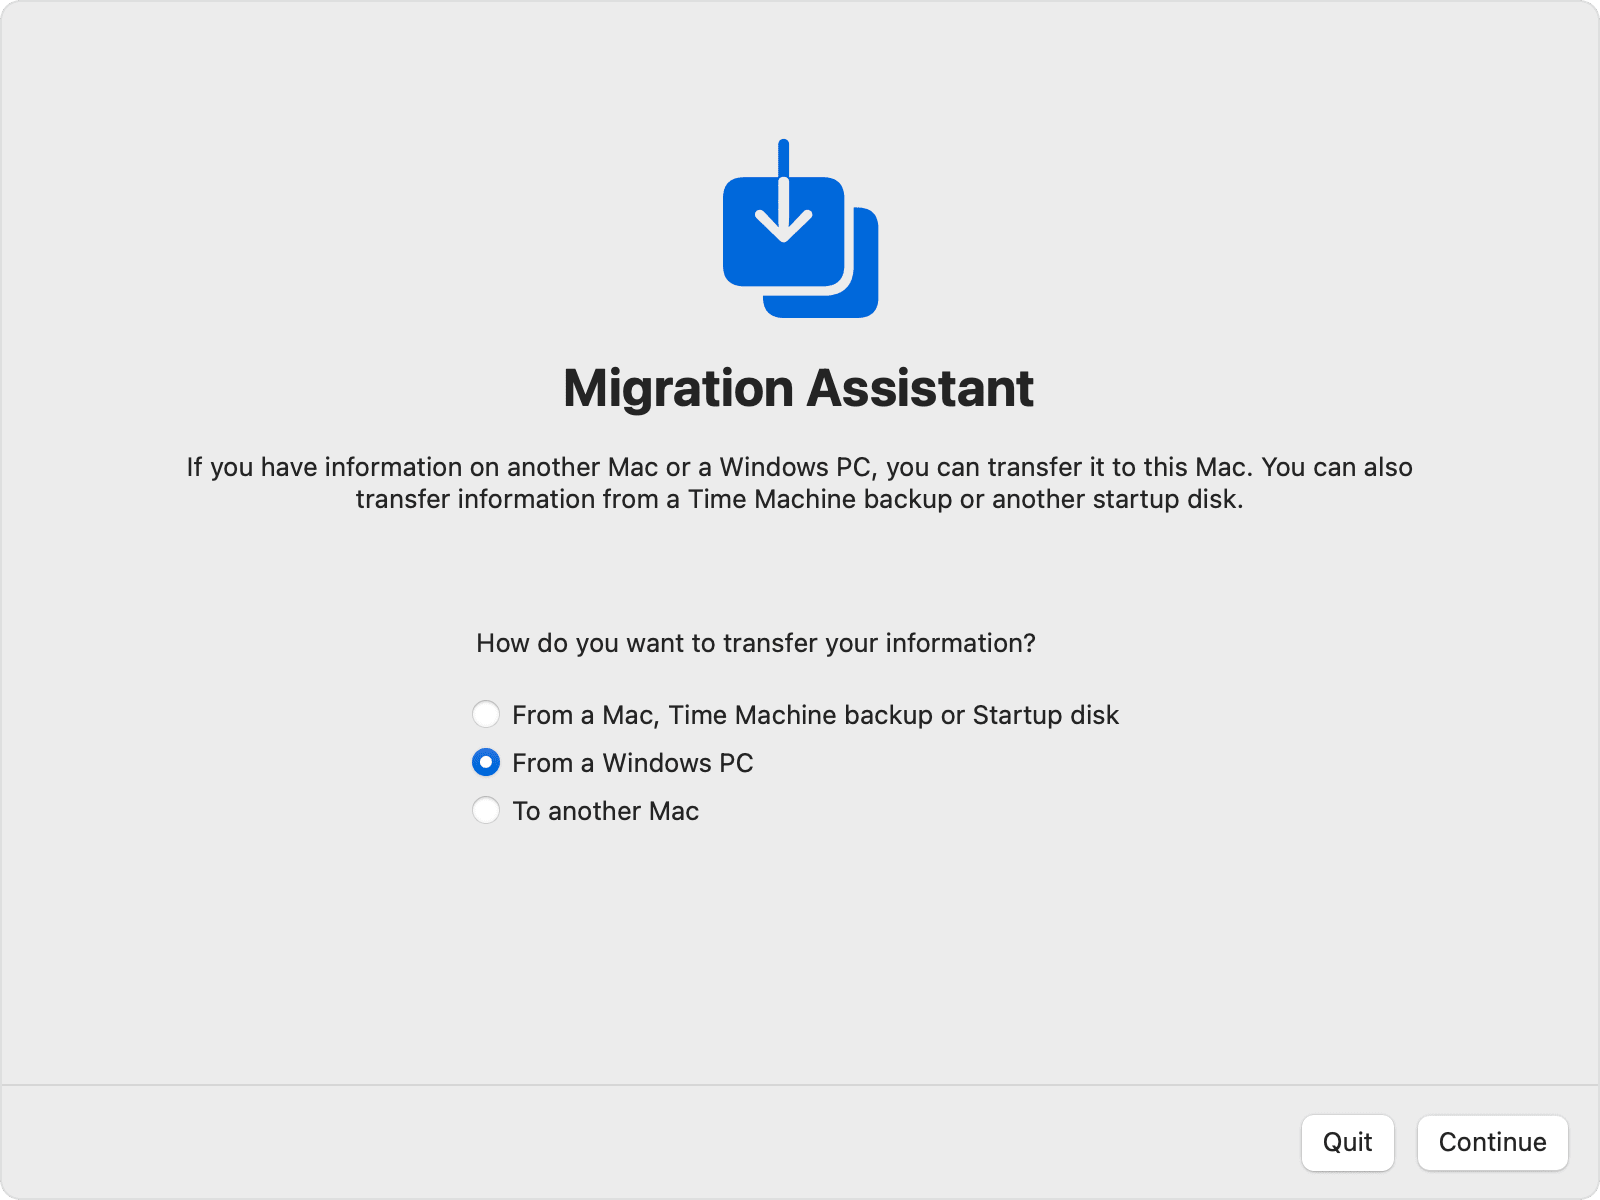
Step 3. Follow the prompts and select "From a Windows PC" when asked, then click "Continue".
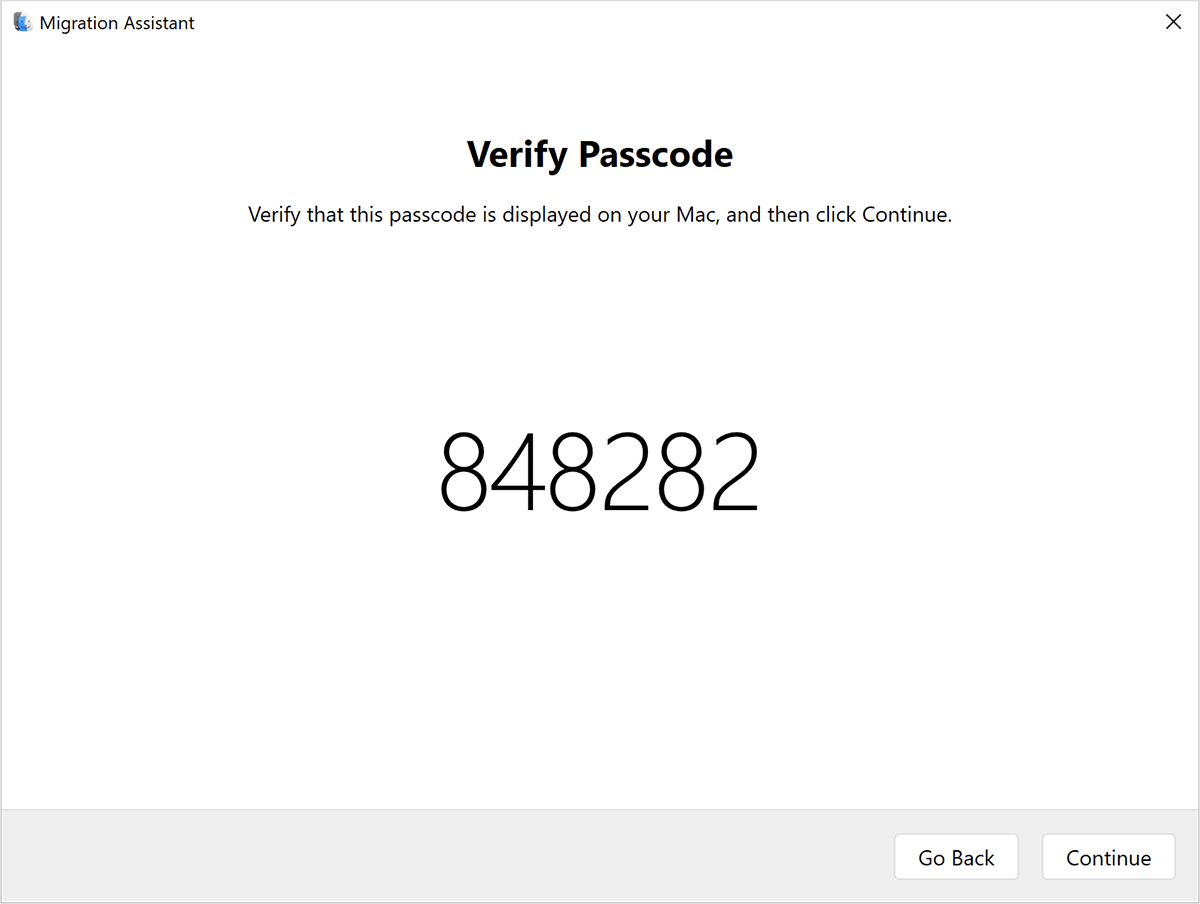
Step 4. A security code will appear on your Mac—enter this code on your Windows laptop to connect both devices.
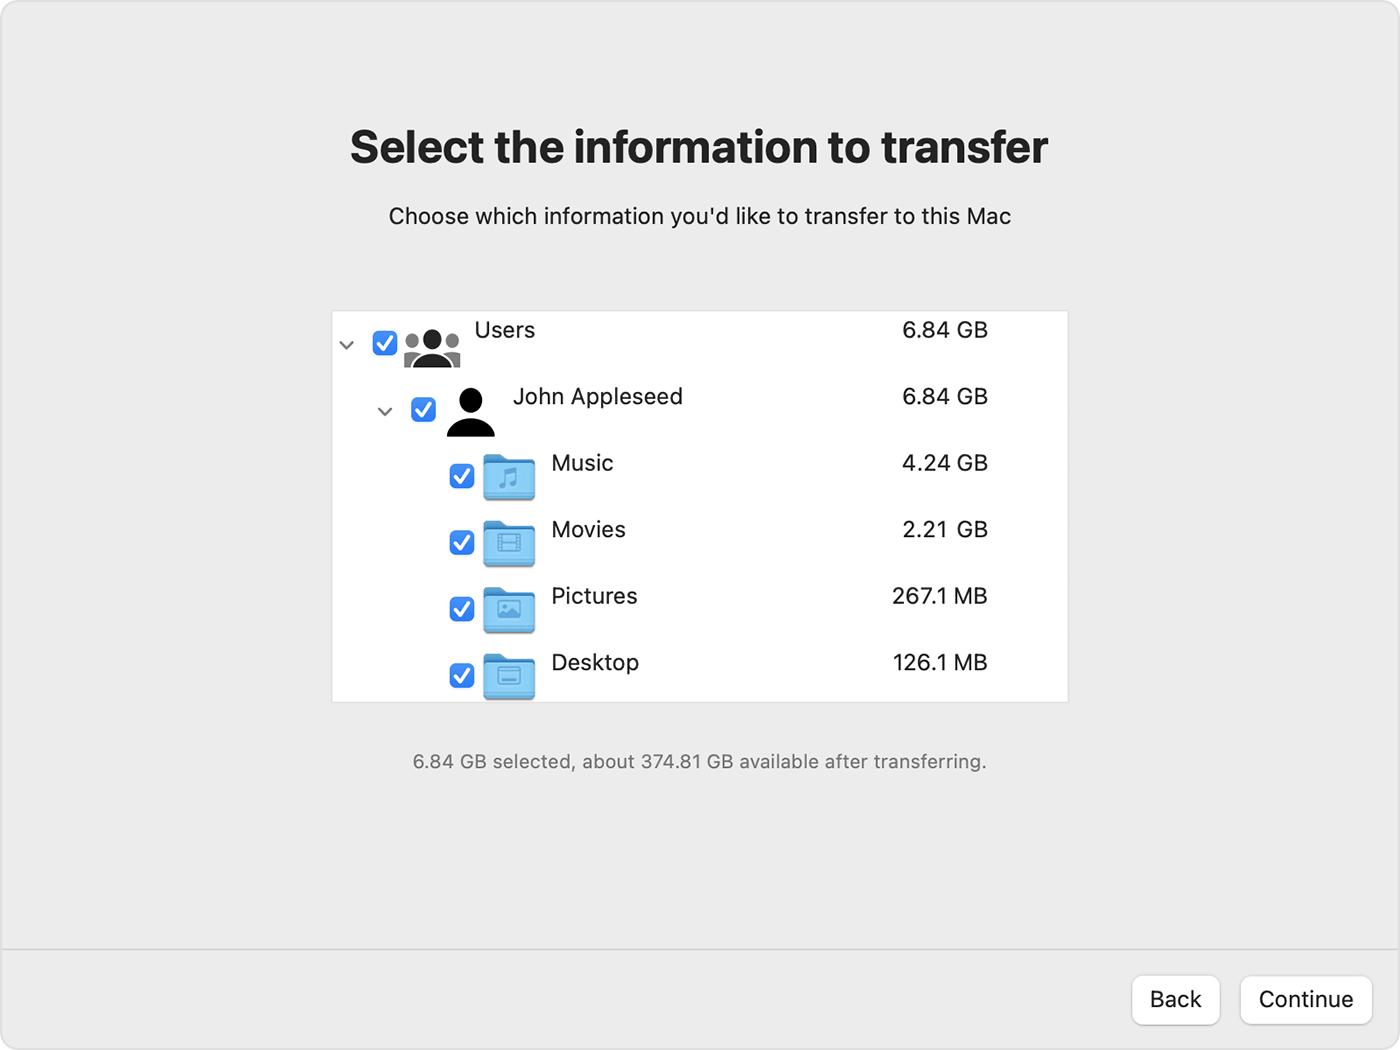
Step 5. Once connected, your Mac will scan and list the files on your Windows laptop. This may take a few minutes.
Step 6. Choose the files you want to move, then click "Continue" to start the transfer. Large files may take longer.
Step 7. After the transfer is complete, log into your Mac account to view and use the files.
Step 8. Don't forget to authorize your Mac for Apple services if you plan to make purchases or use certain apps.
Pros:
- Apple-supported official tool.
- Great for structured data (emails, calendars, contacts).
- Automates the entire process.
Cons:
- Both devices must be on the same local network.
- Firewall, antivirus, or VPN might block connection.
- Doesn't support selective transfers of folders.
Way 3. Enable File Sharing – Best for local transfers on the same Wi-Fi
This method leverages SMB protocol to let your Mac and Windows PC communicate directly over your Wi-Fi network—no extra software needed.
Why Choose File Sharing:
- No app installation required.
- Works entirely over local network.
- Good for occasional file transfers.
How to transfer data from old laptop to MacBook Pro or MacBook Air using File Sharing:
Part 1: Turn On File Sharing on Your Windows Laptop
Step 1. Open "File Explorer", right-click the folder you want to share, and click "Properties".
Step 2. Go to the "Sharing" tab and hit the "Share…" button.
Step 3. Choose "Everyone" or a specific user from the list, then click "Add".
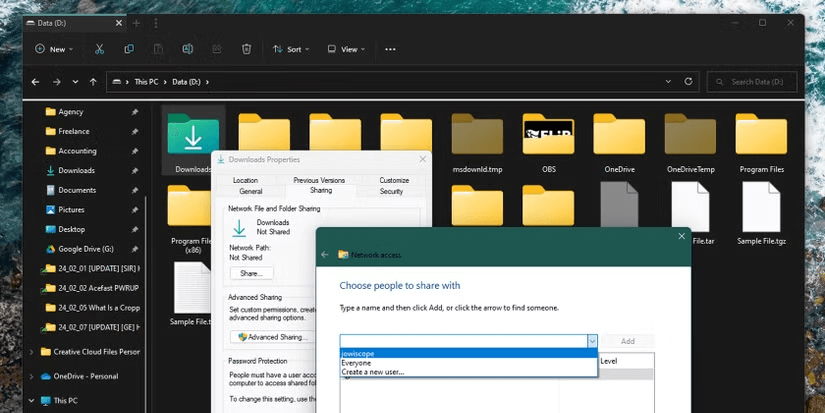
Step 4. Set the permission to either "Read" (view only) or "Read/Write" (full access).
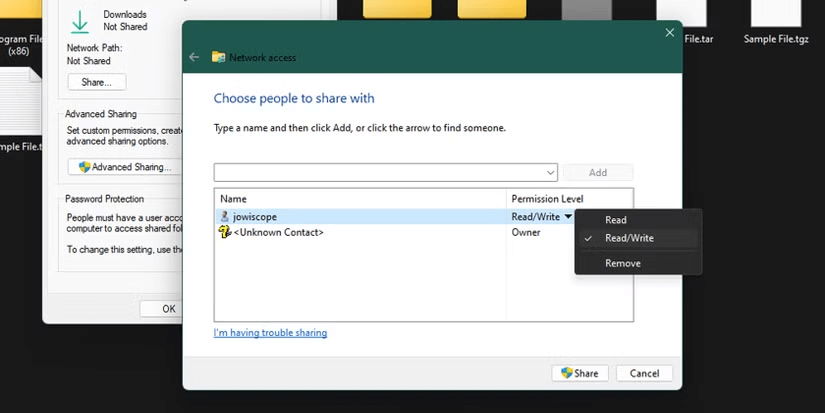
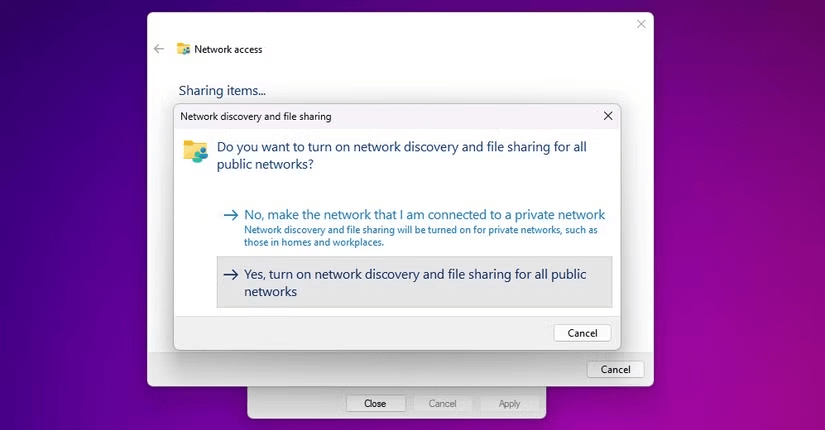
Step 5. Click "Share". If a pop-up asks, click "Yes" to turn on network sharing.
Step 6. Open "Command Prompt" or "PowerShell", type "ipconfig", and press "Enter".
Step 7. Find and write down your "IPv4 address" (it looks like 192.168.x.x).
Part 2: Connect to the Shared Folder from Your Mac
Step 1. Open "Finder" on your Mac.
Step 2. In the top menu, click "Go", then choose "Connect to Server".
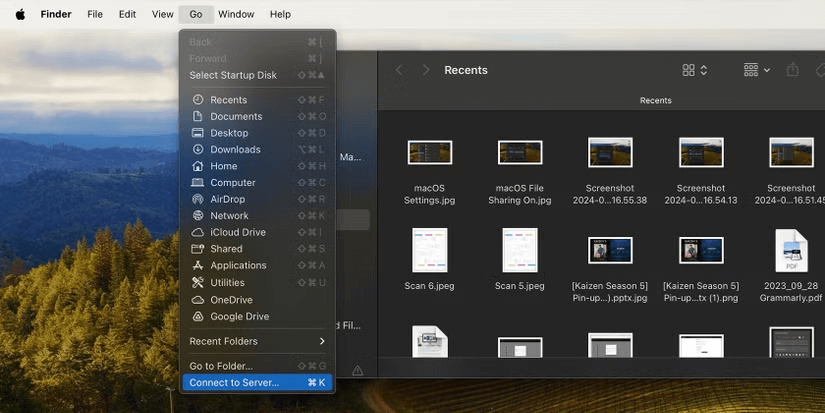
Step 3. Type "smb://" followed by the IP address from your Windows laptop (e.g., "smb://192.168.1.5"), then click "Connect".
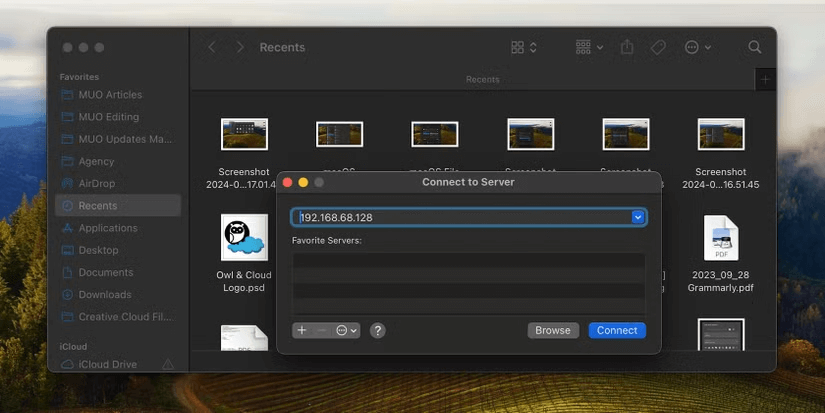
Step 4. Enter your Windows login info and press "Return".
Step 5. Select the shared folder and click "OK".
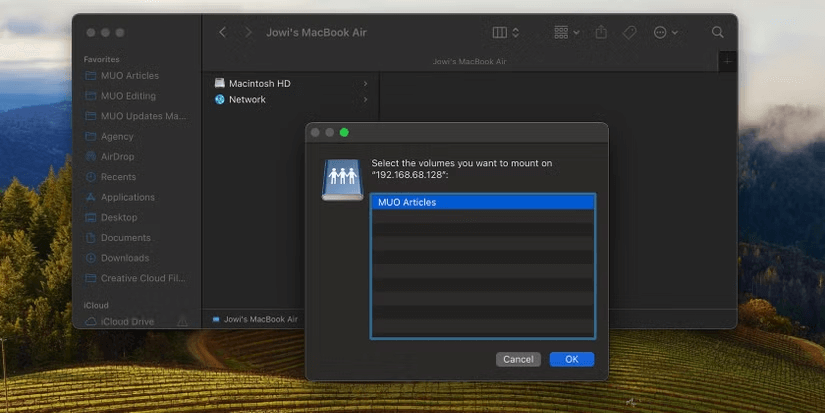
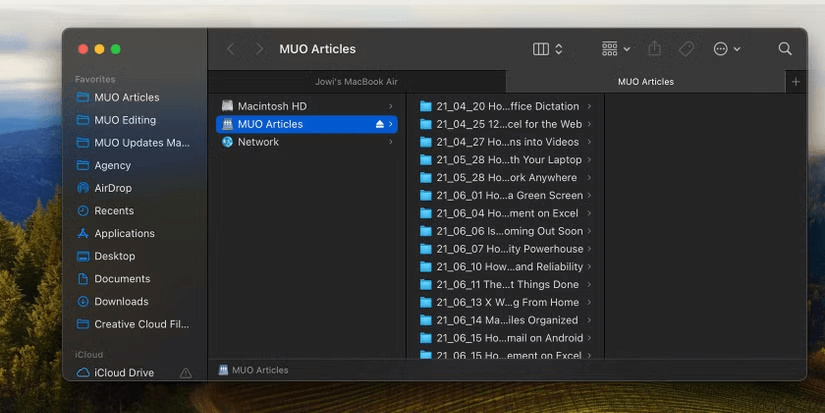
Step 6. The folder will now show up in the "Finder sidebar" for quick access.
Pros:
- Free and built-in to both systems.
- Great for one-time or small-scale transfers.
Cons:
- Requires devices to share the same Wi-Fi.
- File access can be slow if Wi-Fi signal is weak.
- Manual setup can be tricky for non-tech users.
Way 4. Use email – Best for sending small files quickly
Sometimes the simplest way is still effective. If you're just sending a few documents or images, emailing them to yourself is fast and straightforward.
Why Choose Email:
- No extra tools needed.
- Works on any internet-connected device.
- Great for sending files on the go.
How to Use:
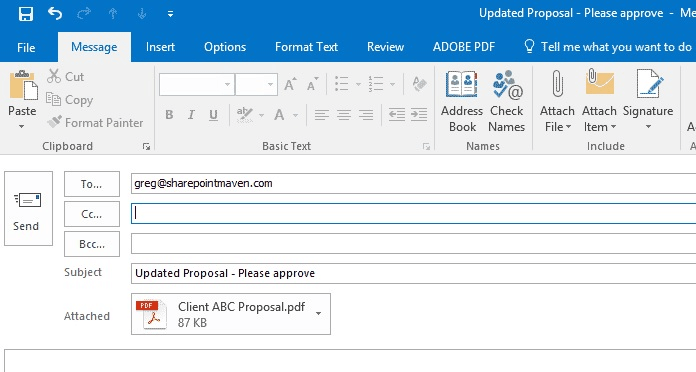
Step 1. Open your email client (like Outlook or Gmail) on your Windows laptop.
Step 2. Create a new email and attach the files you want to transfer.
Step 3. Send the email to yourself or another email address you can access on your Mac.
Step 4. On your Mac, open the email and download the attached files.
Step 5. Save the files to a location on your Mac for easy access.
Pros:
- Quick and simple.
- No network setup or software installs required.
Cons:
- Email attachments often limited to 25MB.
- Not ideal for folders or large multimedia files.
- Cumbersome for multiple or large file batches.
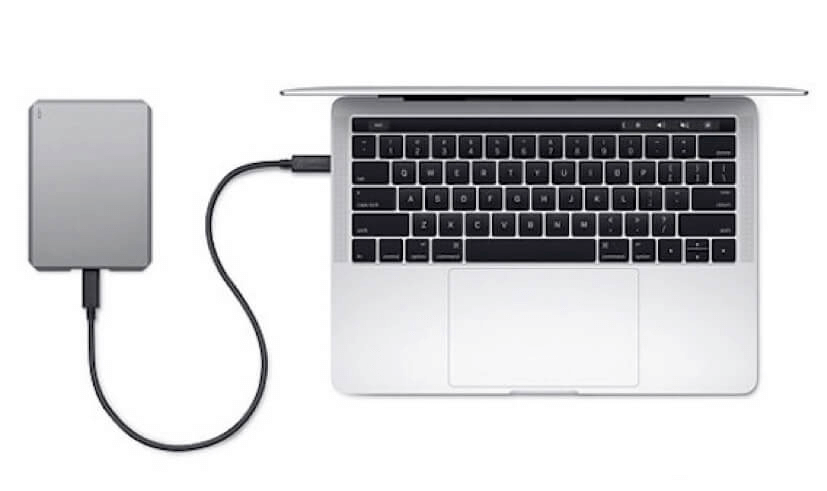
Way 5. Use external hard drive – Best for large offline transfers
Have no internet or don't want to rely on the cloud? An external hard drive or USB stick can help you move large files easily, especially when switching devices physically.
Why Choose External Drive:
- No internet or network required.
- Perfect for large data migrations like video libraries or backups.
- High-speed USB 3.0 transfers make the process fast.
How to Use:
Step 1. Connect the drive to your old laptop and copy the desired files.
Step 2. Safely eject the drive and connect it to your MacBook Air.
Step 3. Use Finder to browse and drag the files to your Mac's storage.
Pros:
- Reliable, especially for multi-GB transfers.
- Completely offline and secure.
- Can be reused for backups.
Cons:
- Requires physical access to both devices.
- Need to format drive in ExFAT to be compatible with both OSs.
- No automation—you handle folder organization manually.
Way 6. Use iCloud – Seamless transfer with Apple's ecosystem
If you're moving to a MacBook Air, the cloud storage and file sharing service iCloud is one of the easiest ways to transfer files from your old laptop—especially if you're already part of the Apple ecosystem. By uploading files to iCloud from your Windows laptop and accessing them on your Mac, you can move data wirelessly, securely, and effortlessly.
Why Use iCloud for File Transfer:
- Fully integrated into macOS and iOS.
- Accessible on Windows via browser or iCloud for Windows.
- Automatically syncs files across all Apple devices.
How to Transfer Data Using iCloud:
Step 1. On your Windows laptop, open a browser and go to iCloud.com, then sign in with your Apple ID.
Step 2. Click iCloud Drive and upload the files or folders you want to transfer.
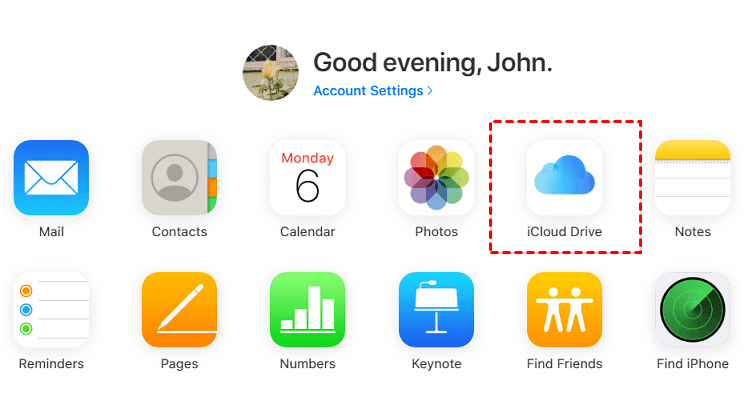
Step 3. On your MacBook Air, open Finder, then select iCloud Drive from the sidebar.
Step 4. Download or drag files to your local storage as needed.

Tip: You can also install the "iCloud for Windows" app to sync files directly from File Explorer.
Pros:
- Built into macOS; super smooth on MacBook Air.
- Files stay backed up and accessible from all Apple devices.
- No physical connection or additional app installation required.
Cons:
- Only 5GB of free storage—larger files may require a paid iCloud+ plan.
- Slower transfers for large files depending on internet speed.
- Must use Apple ID; may not suit users outside Apple's ecosystem.
Conclusion
In summary, knowing how to transfer data from old laptop to MacBook Air can save you time and frustration. Whether you prefer remote tools like AnyViewer, Apple's built-in Migration Assistant, or simple methods like email and external drives, there's a solution for every need and tech level. Choose the method that fits your setup, and you'll be up and running on your Mac in no time—no stress, no lost files, just a smooth transition to your new digital home.
