
[Best Tips] How to Secure Remote Desktop on Windows 10, 11
Are you worried about privacy leakage when using Remote Desktop Connection to remotely control another computer? Don’t worry, here in this post, we’ll guide you through how to secure Remote Desktop on Windows 10, 11.
By Ellie / Updated on December 13, 2024
How do I make sure my remote desktop is secure?
My company decided to let 80% of its employees handle official business long-distance and I am one of them. We’re recommended to use Remote Desktop to remotely access our office computers and get the resources we need. I didn’t know much about Remote Desktop before, but remote control sounds a little scary to me. How can I configure Remote Desktop on Windows 10 to achieve maximum security?”
- Question from Reddit

Remote Desktop (also known as RDP) is a tool developed by Microsoft that enables remote access and management for virtual and remote desktops. It creates a network channel for data exchange, including displays, keystrokes, and mouse movements. With RDP, users can access company servers, log into desktop machines, and collaborate with employees from any location.
How secure is Windows Remote Desktop?
Remote Desktop sessions are protected by encryption, which prevents unauthorized viewing of your session by monitoring the network. However, despite its security features, there are still vulnerabilities to be aware of. Let's explore some examples of RDP attack vectors:
-
Unrestricted port access: The RDP connections use port 3389 by default. Cybercriminals often exploit open ports to launch sophisticated attacks, bypassing system defenses.
-
Brute-force credential attacks: Threat actors frequently target weak or insecure user credentials to gain unauthorized access to systems. They employ brute-force attacks to crack passwords and gain entry, potentially compromising sensitive data or deploying malware and ransomware.
-
Vulnerabilities for remote code execution: Attackers exploit vulnerabilities within RDP, such as the BlueKeep vulnerability discovered in 2019, which allowed for remote code execution. These vulnerabilities provide opportunities for attackers to compromise systems and gain control remotely.
How to secure Remote Desktop on Windows 10, 11
Though security challenges exist, adopting preventive measures can help minimize these risks. After configuring Remote Desktop correctly, you can follow the tips below to learn how to secure Remote Desktop on Windows 10 and 11.
Basic security tips for Remote Desktop [4 tips]
Here are some basic tips for secure Remote Desktop:
Tip 1. Use strong passwords
Ensure that accounts with Remote Desktop access have strong passwords, adhering to campus password complexity guidelines. Robust passwords are crucial for preventing unauthorized access.
Tip 2. Implement two-factor authentication
Consider employing two-factor authentication for an added layer of security. RD Gateways can integrate with the Campus instance of DUO for enhanced authentication. Alternatively, explore options like certificate-based smartcards for authentication using Remote Desktop.
Tip 3. Keep Remote Desktop updated
Take advantage of automatic updates for Remote Desktop components to ensure you have the latest security fixes. Enable and audit automatic Microsoft Updates to keep both the client and server software up-to-date. Verify that Remote Desktop clients on other platforms are supported and updated to mitigate security flaws.
Tip 4. Restrict access with firewalls
Utilize firewalls, both software and hardware, to limit access to remote desktop listening ports (typically TCP 3389). Implement an RDP Gateway for controlled access to desktops and servers. For off-campus connectivity, consider using the campus VPN software to obtain a campus IP address and add the campus VPN network address pool to your RDP firewall exception rule.
Best practices for additional security [3 tips]
Here are some tips for additional security:
Tip 1. Delete the default accounts and add new users manually
You’re recommended to remove the existing users and groups that have permission to log on as a Remote Desktop Services client and manually add the users you’d like to grant Remote Desktop access to. This isn’t an essential step, but it gives you more power over which accounts get to use Remote Desktop.
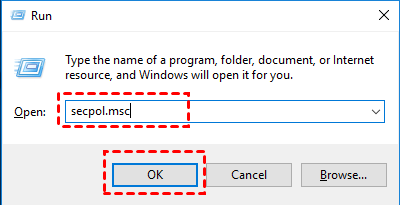
Step 1. Press Win + R to open the Run dialog box, type in “secpol.msc” and click OK.
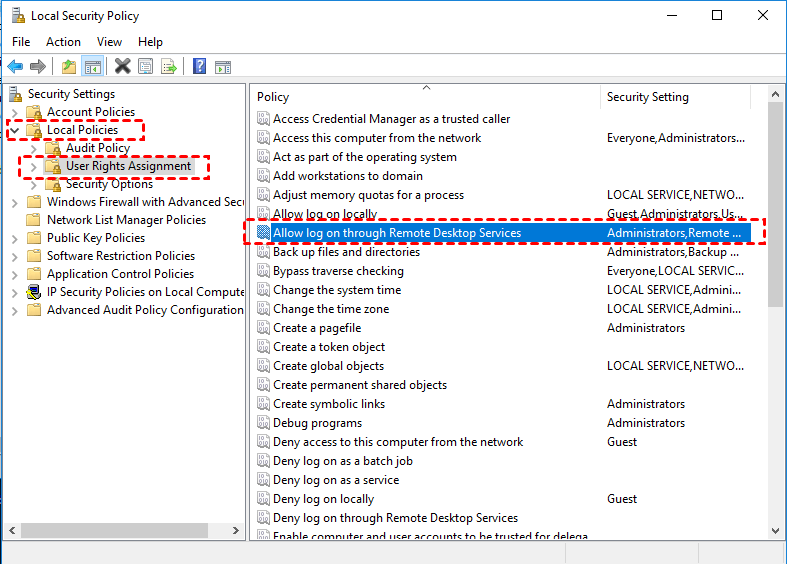
Step 2. Navigate here: Local Policies > User Rights Assignment > Allow log on through Remote Desktop Services.
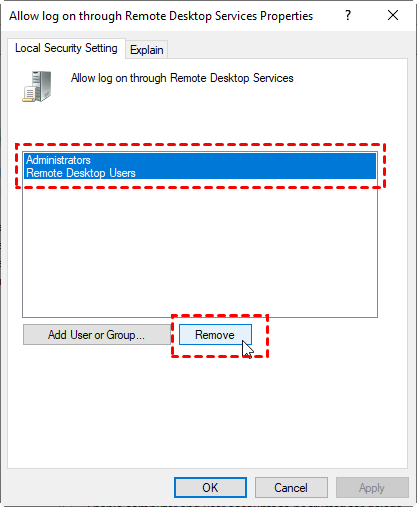
Step 3. Remove Administrators and Remote Desktop Users (or any other users or groups on your own computer) listed in this window.
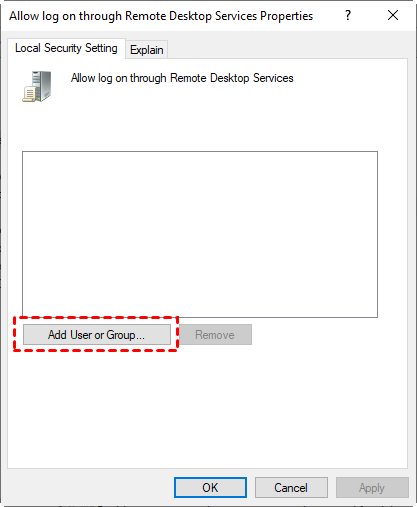
Step 4. After that, click Add User or Group and manually add the users you’d like to grant Remote Desktop access to.
Tip 2. Change the default Security settings
You may also need to change some default Remote Desktop security settings to achieve maximum security.
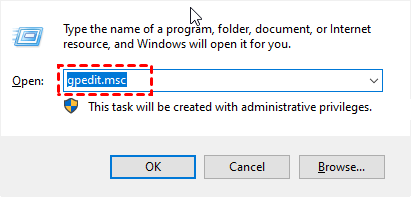
Step 1. Open the Run dialog box, type in “gpedit.msc” and click OK.
Step 2. Navigate here: Computer Configuration > Administrative Templates > Windows Components > Remote Desktop Services > Remote Desktop Session Host > Security. On the right pane, you’ll see multiple settings.
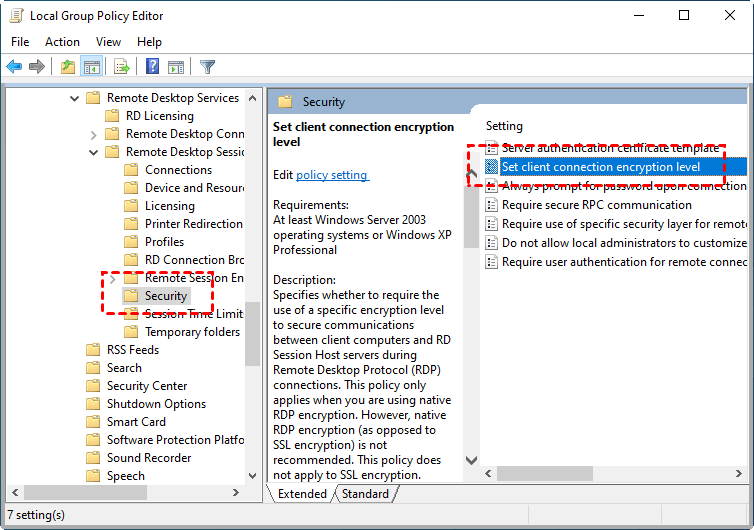
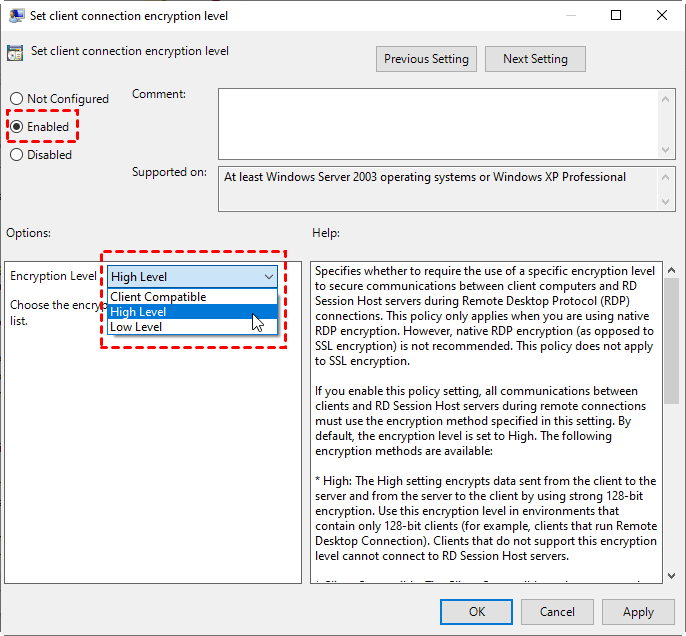
Step 3. Find Set client connection encryption level on the right pane. Change its status to Enabled. Then set the Encryption level from the drop-down list to High Level.
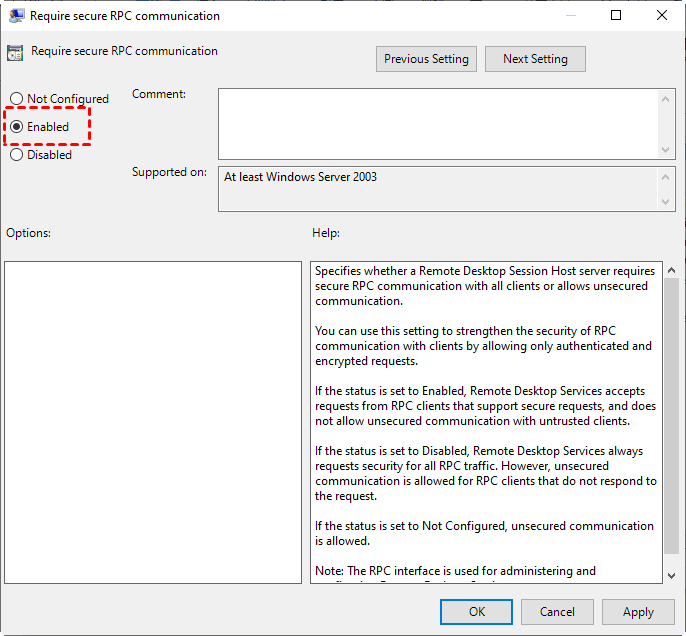
Step 4. Find Require secure RPC communication on the right pane. Change its status to Enabled.
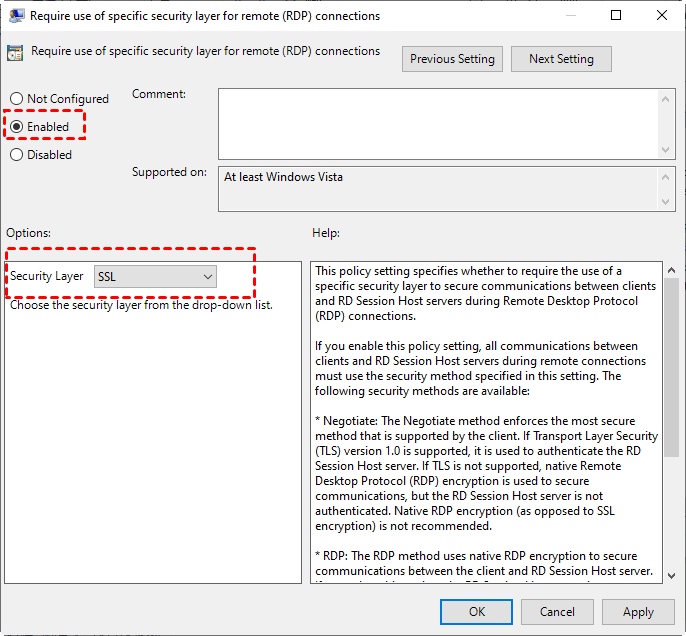
Step 5. Find Require use of specific security layer for remote (RDP) connections on the right pane. Change its status to Enabled. Set the RDP security layer to SSL from the drop-down list.
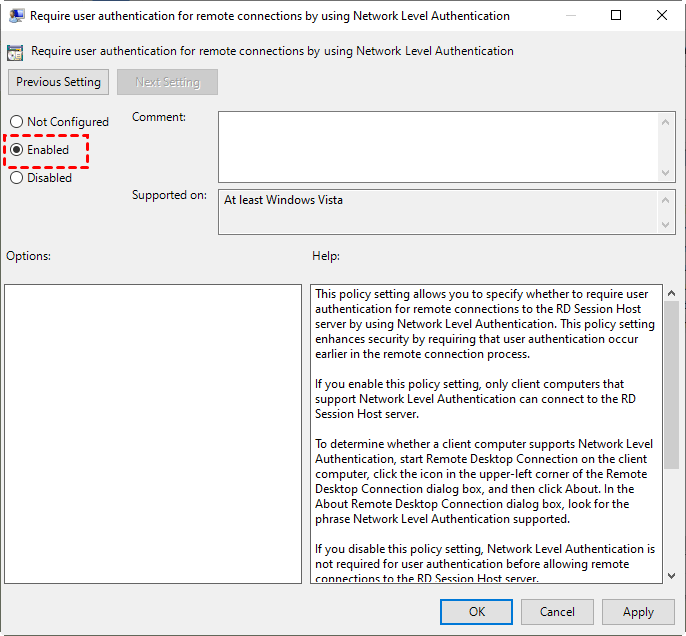
Step 6. Find Require user authentication for remote connections by using Network Level Authentication on the right pane. Change its status to Enabled.
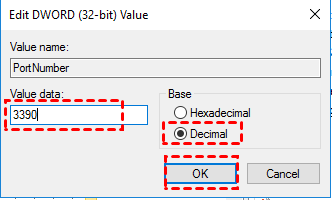
Tip 3. Change the default RDP port number
By default, Remote Desktop listens on port 3389. But the default port number can be hacked anytime. Therefore, changing the default RDP port number can be a good way to safeguard the Remote Desktop.
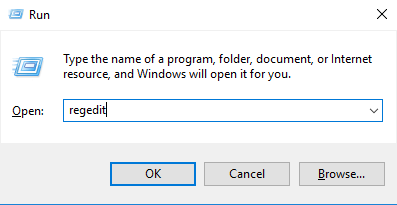
Step 1. Open the Run dialog box, type in “regedit” and click OK.
Step 2. Navigate here: HKEY_LOCAL_MACHINE > System > CurrentControlSet > Control > Terminal Server > WinStations > RDP-Tcp. Scroll down and find PortNumber and then double click on it.
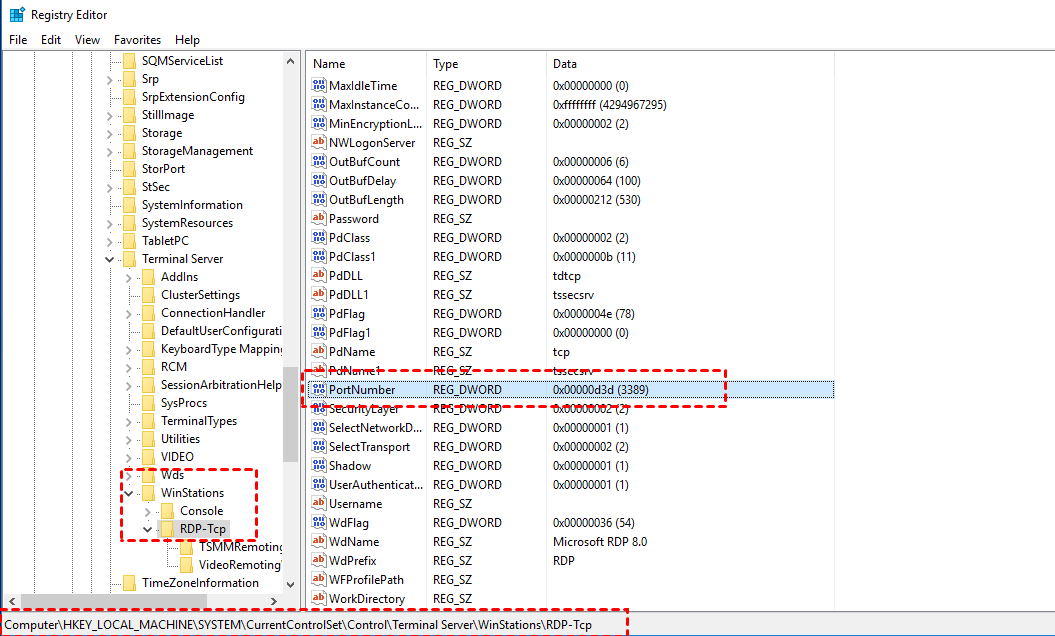
Step 3. Change the port number you like, such as 3390, and then select Decimal. Click on OK.
Secure alternative to RDP for remote access: AnyViewer
For fortified protection against RDP vulnerabilities, users seek a comprehensive solution for remote access. Enter AnyViewer, a resilient remote desktop software that stands as the free, secure alternative to RDP. Its security measures encompass:
- Encrypted remote connections: Securing remote connections through advanced encryption is paramount to AnyViewer's approach, implementing a stalwart 256-bit Elliptic Curve Cryptography (ECC) algorithm.
- Two-factor authentication: Prior to access, AnyViewer mandates a stringent two-factor authentication process, a safeguard ensuring that only authorized individuals gain entry to your remote desktop.
- Device authentication. For added security during breaks or shared usage scenarios, AnyViewer facilitates device authentication. With a simple interface lock, unwanted alterations to your computer settings are thwarted, preserving your preferences intact.
Beyond its robust security features, AnyViewer boasts numerous advantages compared to Remote Desktop. Notably, it excels in user-friendliness, proving easy to set up and navigate. Follow the steps below to initiate a swift and hassle-free start:
Step 1. Download, install, and launch AnyViewer on both computers.
Step 2. Go to Log in, and then click Sign up. Fill in the signup information. If you already have signed up on its official website, you can log in directly.

Step 3. Then you can see you successfully logged in to AnyViewer. Your device will automatically be assigned to the account you've logged in to.

Step 4. Log in to the same AnyViewer account on the two devices. On the local device, choose the remote device and click One-click control to achieve unattended remote access.

- ★Tips:
- Elevating your account to a Professional or Enterprise plan unlocks enhanced privileges:
- Expand your unattended remote access capabilities by assigning more devices.
- View an expanded list of currently connected devices for a comprehensive connection history.
- Ensure enhanced privacy by connecting to another computer in privacy mode, blocking screen visibility and remote input.
- Streamline management of large device volumes within an enterprise by creating dedicated groups.
- Monitor multiple devices in one window with screen walls.
- Optimize efficiency and save time through mass deployment strategies.
Conclusion
This post primarily offers tips on how to secure Remote Desktop on Windows 10, 11. Configuring all settings ensures a more secure Remote Desktop Connection. Alternatively, opt for the secure RDP alternative, AnyViewer, which guarantees safety through Elliptic Curve Cryptography (ECC) encryption. With features such as a One-click connection and privacy mode, AnyViewer goes the extra mile in safeguarding user privacy.
