
How to Connect Mac to External Monitor
Discover everything you need to know about connecting your Mac to an external monitor. From choosing the right cables to configuring display settings, this guide helps you create the perfect multi-screen setup, whether for work, creativity, or remote access using AnyViewer.
By Ellie / Updated on November 10, 2025
Can you connect a Mac to an external monitor?
Ever wondered how to connect a Mac to an external monitor for better productivity or entertainment? Whether you’re a creative professional editing videos or someone who just loves a dual-screen setup, connecting your Mac to an external monitor can completely transform your workflow. It’s not just about having more screen space; it’s about creating a workspace that enhances focus, creativity, and comfort.
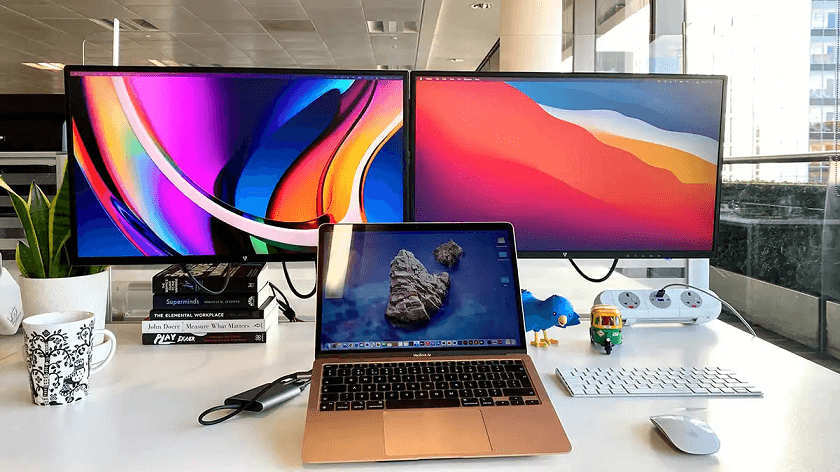
Mac computers, from the sleek MacBook Air to the powerhouse Mac Studio, are designed to support external displays with ease. Yet, figuring out which cable to use or how to configure the settings can sometimes be confusing, especially with Apple’s frequent port changes. Don’t worry, this guide will take you step by step through everything you need to know about how to connect Mac to external monitor, optimize the display, and troubleshoot any issues.
Whether you have a modern M-series MacBook or an older Intel Mac, you’ll find all the answers here to get your external display setup running perfectly.
Types of external monitors you can use with a Mac
When it comes to external monitors, Macs are versatile. You can connect almost any monitor, whether it’s an Apple Studio Display or a third-party 4K screen. The key is compatibility and resolution support.
Apple Displays, such as the Studio Display and Pro Display XDR, are tailor-made for Mac users. They integrate seamlessly, offering automatic brightness adjustment, perfect color calibration, and built-in speakers.
Third-Party Monitors, on the other hand, give you flexibility and affordability. Brands like Dell, LG, Samsung, and ASUS offer monitors that work great with Macs. The only thing to keep in mind is the connection interface. For example, if your monitor only supports HDMI and your Mac has Thunderbolt ports, you’ll need an adapter.
If you’re a video editor or graphic designer, go for 5K or ultrawide displays that offer better color accuracy and workspace. For everyday users or office setups, a 27-inch 4K display usually provides the perfect balance of clarity and cost.
Essential cables and adapters for connecting a Mac
Cables and adapters are the unsung heroes of any good Mac display setup. Apple loves to keep things sleek and minimal, but that often means fewer ports, and sometimes, more dongles. Knowing how to connect MacBook to external monitor properly starts with understanding the right cables to use.
Let’s start with the most common types:
- USB-C / Thunderbolt 3 or 4: Modern Macs (2016 and later) mainly rely on USB-C or Thunderbolt ports. These cables can transmit power, data, and video simultaneously, making them the go-to choice for newer monitors. If both your Mac and monitor support USB-C, a single cable can do it all, plug-and-play.
- HDMI: Many external monitors and TVs still use HDMI as the standard video interface. Some Macs, like the Mac mini and newer MacBook Pros, come with built-in HDMI ports. If yours doesn’t, a simple USB-C to HDMI adapter or cable will bridge the gap.
- DisplayPort and Mini DisplayPort: Older Macs often used Mini DisplayPort or Thunderbolt 2 for external monitors. You can easily convert these to HDMI or DisplayPort with the right adapter.
- DVI or VGA: These are legacy connections mostly found on older monitors. If you’re working with one of these, you’ll need an adapter (like USB-C to VGA). Keep in mind that these options don’t always deliver the best image quality.
Always check your Mac model’s technical specifications on Apple’s official website before buying cables or adapters. This ensures you get the right version, for example, not every USB-C cable supports high-resolution video. Choosing a certified Thunderbolt 4 or HDMI 2.1 cable ensures crisp 4K or 5K output without flickering or lag.
Step-by-step guide: How to connect Mac to external monitor
Let’s walk through how to connect a Mac to an external monitor, whether you’re using a MacBook, iMac, or Mac Mini.
How to connect a MacBook Air or MacBook Pro to a monitor
If you’ve ever wondered how to connect external monitor to MacBook Pro, this section has you covered. Connecting a MacBook Air or MacBook Pro to an external monitor is a game-changer for productivity. Whether you’re working on graphic design, editing videos, or simply craving more screen real estate, the setup process is straightforward, as long as you have the right cables and settings.
For Modern MacBooks (with M1, M2, or M3 chips):
Most newer MacBooks use USB-C (Thunderbolt 3 or 4) ports for everything, charging, data, and video output. To connect to an external monitor:
Step 1. Identify your monitor’s input (usually HDMI, DisplayPort, or USB-C).
Step 2. Use a USB-C to HDMI cable if your monitor supports HDMI, or a USB-C to DisplayPort cable for DisplayPort monitors.
Step 3. Plug one end into your MacBook and the other into the monitor.
Step 4. Power on both devices, and macOS should automatically detect the display.
For Older MacBooks (pre-2016 models):
Older MacBook Pros might use Mini DisplayPort or HDMI connections. Simply use the appropriate cable or adapter. Apple’s Mini DisplayPort to HDMI or VGA adapters work perfectly for this.
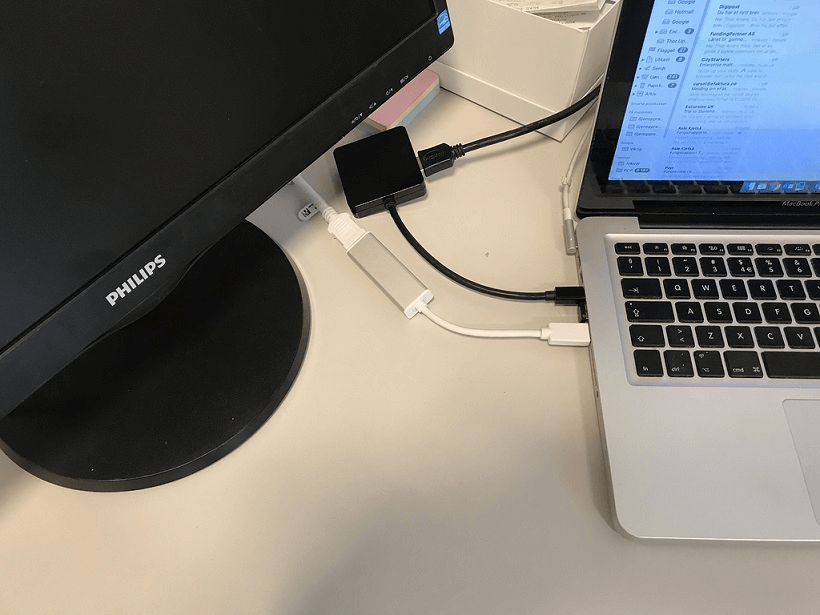
For MacBooks with a Single USB-C Port (like early MacBook Air models):
You’ll need a multiport adapter or docking station. These hubs let you connect power, HDMI, and USB accessories simultaneously, preventing you from losing your charging port while using an external display.
Once connected, open System Settings >Displays to arrange, extend, or mirror your screens. You can even drag the menu bar icon to make the external monitor your primary display.
If you want to close your MacBook and still use the monitor, connect your charger, external keyboard, and mouse, then shut the lid. This activates clamshell mode, turning your setup into a full desktop experience.
How to connect iMac or Mac Mini to external displays
Unlike MacBooks, desktop Macs are built to handle external monitors effortlessly. However, each model comes with its own setup quirks.
For iMacs:
Many users don’t realize that iMacs can act as source devices for external monitors. Simply connect the monitor via the iMac’s Thunderbolt or HDMI port (depending on the model).
To extend your workspace:
Step 1. Plug in the external monitor.
Step 2. Go to System Settings > Displays.
Step 3. Choose “Extend Display” to create a dual-screen setup.
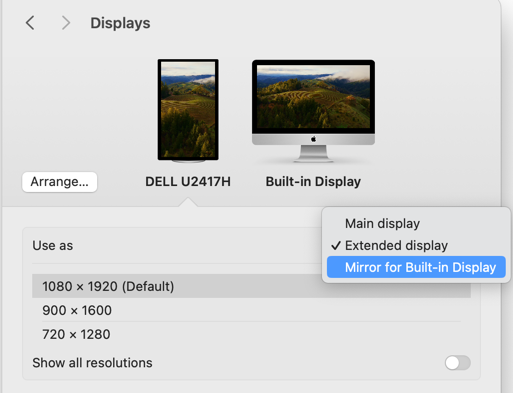
Note: Some older iMacs can also function as external displays themselves using “Target Display Mode,” but this only works with select models (like iMacs from 2009–2014).
For Mac Minis:
The Mac Mini is a powerhouse in a small box, but it needs external monitors to function. Most Mac Minis support two or more monitors simultaneously via HDMI and Thunderbolt ports.
Example setup:
- Use HDMI for one display.
- Use a Thunderbolt-to-DisplayPort or Thunderbolt-to-HDMI cable for the second.
This makes Mac Minis excellent for multi-monitor workstations.
Pro Tip:
Always check your Mac’s official Apple specs to confirm the number of displays it supports. For instance, an M1 Mac Mini supports only two displays, while the M2 Pro model supports up to three.
How to connect a Mac to TV as an external display
If you’d rather use your TV as a large monitor, here’s how to connect MacBook to external monitor through HDMI or AirPlay. Whether wired or wireless, your TV can easily serve as an external display for streaming, presentations, or work.
Option 1: HDMI Cable
The easiest and most reliable way is a direct HDMI connection.
Step 1. Connect a USB-C to HDMI cable from your Mac to your TV.
Step 2. Switch your TV to the corresponding HDMI input.
Step 3. Open System Settings > Displays on your Mac to adjust resolution or scaling.
Option 2: Wireless via AirPlay
If you have an Apple TV or an AirPlay-compatible smart TV, you can go wireless:
Step 1. Click the Control Center icon on your Mac’s menu bar.
Step 2. Select Screen Mirroring and choose your TV.
Step 3. You can mirror your Mac’s screen or use the TV as a separate extended display.
Fixing Overscan Issues:
Sometimes, the Mac’s display doesn’t fit perfectly on the TV screen. To fix this, go to Displays > Options > Underscan/ Overscan, and adjust until the image fits perfectly.
How to adjust display settings on Mac
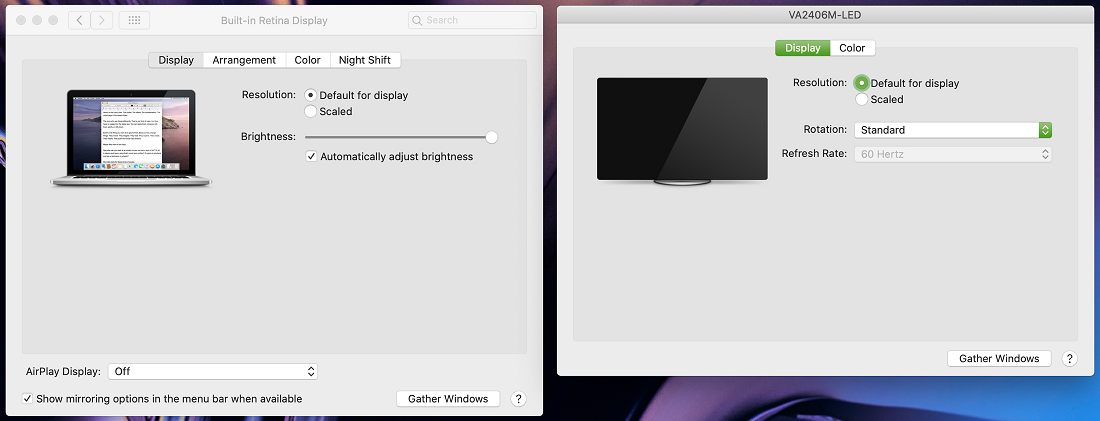
Once your monitor is connected, it’s time to fine-tune your display settings. macOS gives you full control over how your screens look and behave.
Head to System Settings > Displays to access options like:
- Resolution: Choose “Default for display” for automatic optimization or “Scaled” for manual adjustment. Designers often prefer native resolution for sharper visuals.
- Refresh Rate: Some monitors offer higher refresh rates (like 120Hz). Select the highest available for smoother motion, especially useful for video editing or gaming.
- Color Profile: Macs allow precise color calibration. Use the “Color” tab to pick presets or create custom profiles, essential for photographers and editors.
- Night Shift and True Tone: These settings reduce eye strain by adjusting color temperature based on ambient light. Enable them for a more comfortable experience, especially in low-light environments.
You can even rotate your display orientation, perfect for programmers or writers who prefer a vertical screen.
Experimenting with these settings ensures your monitor not only works correctly but also feels just right for your eyes and tasks.
Troubleshooting connection issues
Sometimes, things don’t go as smoothly as expected. If your Mac doesn’t recognize the monitor, don’t panic; most issues have simple fixes.
- Check the Basics: Ensure both the Mac and monitor are powered on. Verify that the cable and adapter are securely connected. Try unplugging and reconnecting both ends.
- Use a Different Cable or Port: Cables can fail or may not support video output. If you’re using USB-C, make sure it’s rated for video transfer (not just charging).
- Detect Displays Manually: Go to System Settings >Displays, then hold the *Option key, and you’ll see a “Detect Displays” button. Click it to refresh connections.
- Restart Your Mac: A simple reboot often resolves display detection issues.
- Update macOS: Sometimes a software update includes improved compatibility for external displays.
- Reset NVRAM or SMC: For Intel-based Macs, resetting NVRAM or the System Management Controller can fix stubborn issues.
If your display still doesn’t show up, try connecting it to another computer. This helps you determine whether the problem lies with the monitor or the Mac.
AnyViewer: Connect to a Remote Mac with Multiple Monitors

If you often switch between devices or need to access your Mac remotely, AnyViewer makes it simple and seamless, even across multiple monitors. This professional remote desktop software allows you to control your Mac from anywhere, whether you’re using another Mac, a Windows PC, or even an iPhone or iPad.
AnyViewer supports multi-monitor display, meaning you can view and control all connected screens simultaneously or focus on a specific one with just a click. It’s ideal for users who rely on multiple displays for design, coding, or data analysis and want the same experience when working remotely.
What sets AnyViewer apart is its robust performance and advanced security. With end-to-end ECC-256 encryption, two-factor authentication, and high-speed connections, your remote sessions remain both smooth and secure. Plus, features like file transfer, real-time chat, and one-click unattended access make it a versatile solution for business and personal use alike.
Whether you’re troubleshooting remotely, managing files, or extending your Mac workspace virtually, AnyViewer ensures a stable, secure, and high-quality remote connection every time.
Conclusion
Understanding how to connect Mac to external monitor gives you the freedom to design the perfect workspace. Whether you’re using a MacBook, iMac, or Mac Mini, adding an extra display boosts productivity, enhances multitasking, and delivers a more comfortable visual experience.
By choosing the right cables, configuring your display settings, and using reliable tools like AnyViewer for remote multi-monitor control, you can take your Mac setup to the next level, whether you’re at home, in the office, or working remotely.
In short, mastering your Mac’s external display capabilities unlocks a world of flexibility and efficiency. Once you’ve experienced the difference, there’s no going back to a single screen!
