
Can’t Use Remote Desktop Full Screen Shortcuts Because of No Break key [Fixed]
This post mainly introduces five ways to enter full screen mode when can’t using Remote Desktop full screen shortcuts because there’s no Break key.
By Ellie / Updated on December 13, 2024
Can’t use Remote Desktop full screen shortcut because there’s no Break key?
I have a thin notebook with a small screen. There is no Pause/Break key on its small keyboard. In other words, I cannot use the Ctrl+Alt+Break key combination to switch to full-screen mode in Windows Remote Desktop. I now want to know how to enter the current Remote Desktop Connection full screen mode when there’s no Break key?”
- Question from Reddit
Microsoft Remote Desktop has been popularly used in remote work. But when using a thin and light laptop with a very small screen, you will always find it embarrassingly that it does not have the Pause/Break key, causing the Ctrl+Alt+Break in Remote Desktop to be unavailable and the full-screen mode to be impossible. Based on this, this tutorial deliberately summarizes 5 ways to solve this problem.
Five ways to enter the remote desktop full screen mode when there’s no Break key
The reason why Microsoft Remote Desktop cannot enter full screen mode is that some laptops (especially thin and light notebooks) blindly pursue portability, but sacrifice the size of the screen and keyboard, resulting in the removal of some infrequently used keys, such as the Pause/Break key.
How to adjust the Remote Desktop Connection to full screen has become a problem for many novice users. Next, 5 different methods will be listed to replace RDP full screen shortcut when there’s no Break key.
- ✍Use other keys to replace the Break key
- ✍Use the on-screen keyboard
- ✍Use an external keyboard
- ✍Change Remote Desktop Connection display settings
- ✍Change the saved connection file
Method 1. Use other keys to replace the Break key
When you can’t use Remote Desktop full screen shortcut because there’s no Break key, you can use another key instead to achieve the same effect. The hot keys for full screen on different notebook brands in Remote Desktop are as follows:
- Dell laptop: Ctrl+Alt+Fn+F12
- Lenovo laptop: Ctrl+Alt+Fn+B
- HP laptop: Ctrl+Alt+Fn+PageDown
Note: Laptops from different brands or from the same brand but different series have different keys used to replace Pause/Break. It is recommended to obtain further support from your laptop brand.
If you really don’t know the replacement keys for your laptop and don’t want to get technical support from the brand, you might as well press Ctrl+Alt+Fn+F1/F2/F3... Try F1 to F12, in turn, to find a key with the same effect as Pause/Break.
Method 2. Use the on-screen keyboard
When a key on your keyboard does not work, you can the on-screen keyboard to substitute the real keyboard.
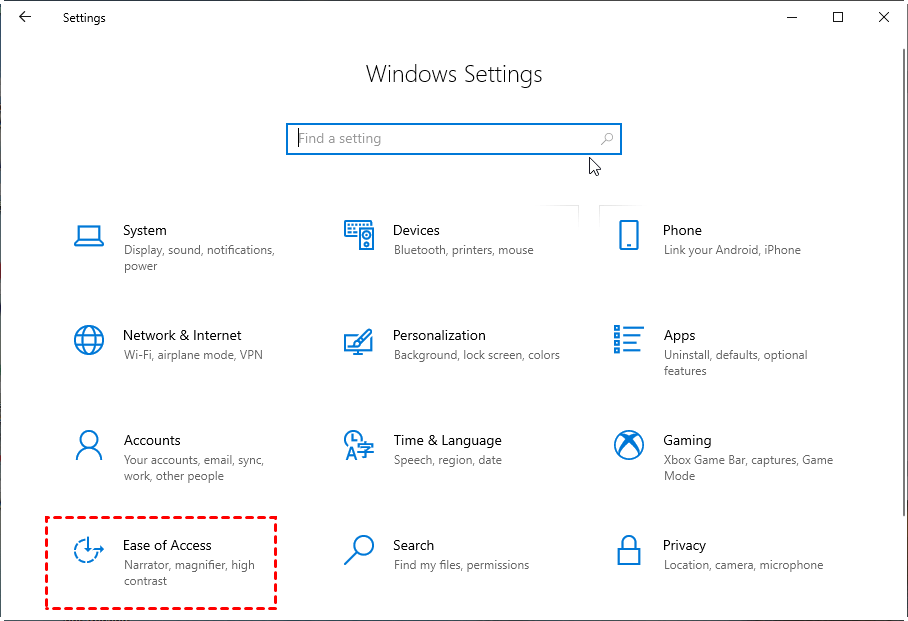
Step 1. Click the Start icon in the lower-left corner of the desktop, click Settings in the menu, and find the Ease of Access option on the Windows Settings.
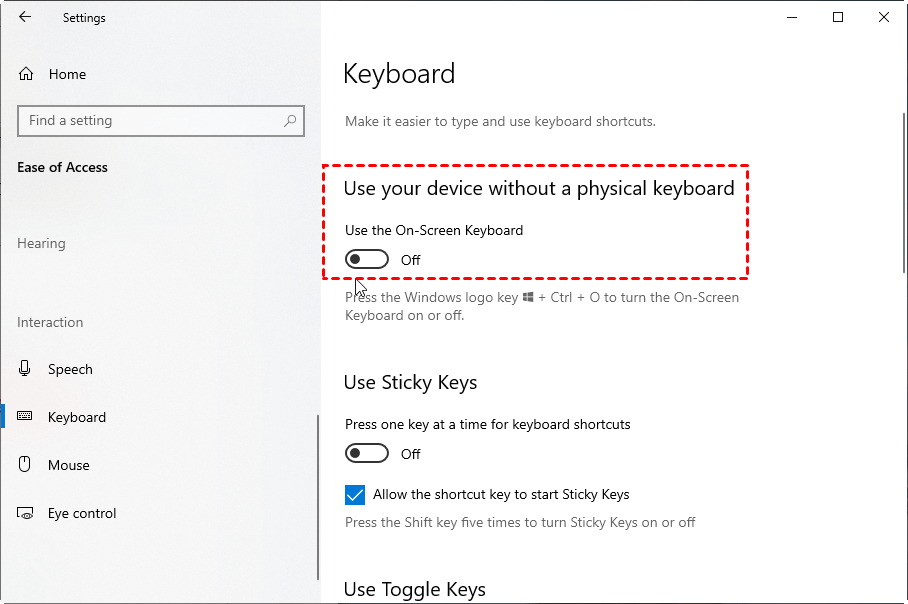
Step 2. Click Keyboard, then find and turn on Use the On-Screen Keyboard.
Method 3. Use an external keyboard
For users whose laptop has incomplete keys, an external keyboard is a good choice. An external keyboard can provide you with more choices. If you want to maintain portability, you can choose a Bluetooth keyboard. If you want to use it to play games, you can choose a mechanical keyboard. But the disadvantage of using an external keyboard is that this may cause you additional costs.
Method 4. Change Remote Desktop Connection display settings
In fact, you can change the display settings of Remote Desktop Connection to make it enter the full-screen mode directly when it is successfully connected.
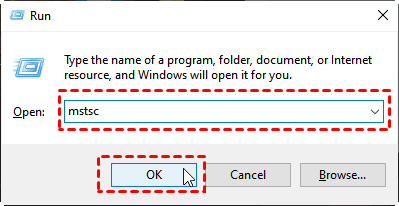
Step 1. Press Win + R, enter “mstsc” and then press Enter to open Remote Desktop Connection.
Step 2. Click Show Options and then switch to the Display tab. In the Display configuration section, drag the button to the far right until you see the Full Screen displayed below. Then switch to the General tab and save the connection settings.

Method 5. Change the saved connection file
In addition to changing the display settings, you can also change the settings file saved by Microsoft Remote Desktop to achieve the same full-screen display effect.
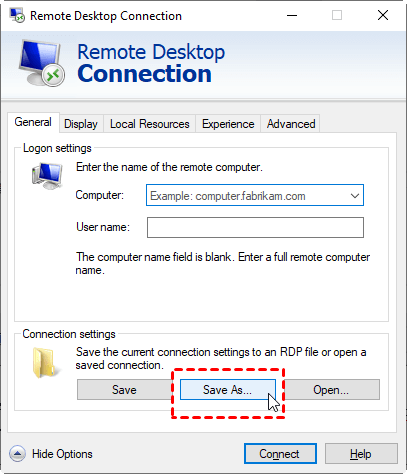
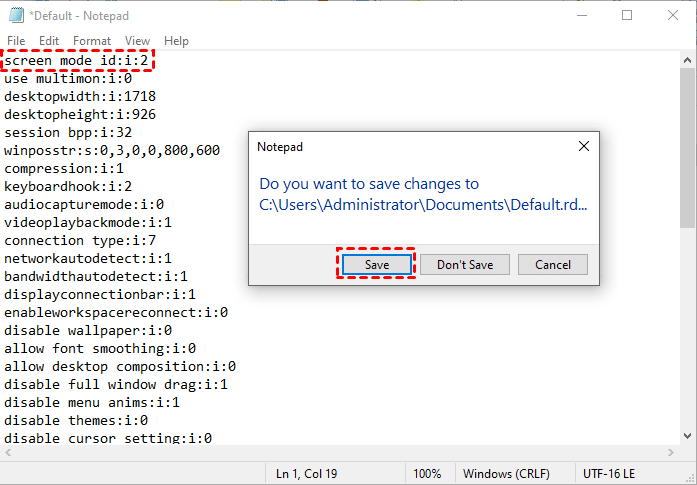
Step 1. Open Remote Desktop Connection and click Show Options. In the General tab, click Save As to save all the settings of the current connection (including the connected user name and IP address) in the specified location.
Step 2. Find the connection settings file you saved, right-click it, and select Open with notepad. Change the screen mode id:i:1 to screen mode id:i:2, and then save the changes.
How to exit Microsoft Remote Desktop full screen mode
The above content mainly introduces the method of entering the full-screen mode of Microsoft Remote Desktop, so how to exit the full-screen mode of Remote Desktop? There are three methods:
- Ctrl+Alt+Pause/Break key combination can be used to enter the full-screen mode, and can also be used to exit the full-screen mode.
- Alt+Tab key combination can be used to switch between windows and exit the full-screen mode.
- You can also click the minimize option in the connection bar at the top of the Microsoft remote desktop screen to exit the full screen mode.

AnyViewer: Easily enter full screen mode without Break key
If you think the solutions provided above to can’t use Remote Desktop full screen shortcut because there’s no Break key are too complicated, or you may sometimes even encounter RDP full screen not working problem, you can try to use the free third-party remote desktop software AnyViewer. It has the following advantages over RDP:
- It doesn’t require an IP address or computer name to achieve a remote connection, while RDP requires.
- It doesn’t require the two devices to be under the same network, while RDP requires. Otherwise, users of RDP need to set up port forwarding.
- It supports almost all versions of Windows, including Windows 11/10/8.1/8/7 and Windows Server 2022/2019/2016/2012 R2, while RDP doesn’t support Windows 10/11 Home.
More importantly, with AnyViewer, you can easily enter and exit full screen mode during the remote connection. Let’s see how this happens. First, follow the steps below to remotely connect to another computer with AnyViewer.
Step 1. Download, install and launch AnyViewer on both computers. Go to Log in, and then click Sign up. (If you already have signed up on its official website, you can log in directly.)

Step 2. Fill in the signup information.

Step 3. Then you can see you successfully logged in to AnyViewer. Your device will automatically be assigned to the account you've logged in to.

Step 4. Log in to the same AnyViewer account on the two devices, then click One-click control to achieve unattended remote access.

- Notes:✎...
- You can upgrade your account to a Professional or Enterprise plan. Then you'll have the following rights:
- Assign more devices to achieve unattended remote access to more devices.
- Connect to another computer in privacy mode, which means you can black the screen and block the mouse and keyboard of the remote computer.
- Transfer files at a faster speed. Transfer speed for a free account is 500 KB/s, and for a paid account is up to 10 MB/s.
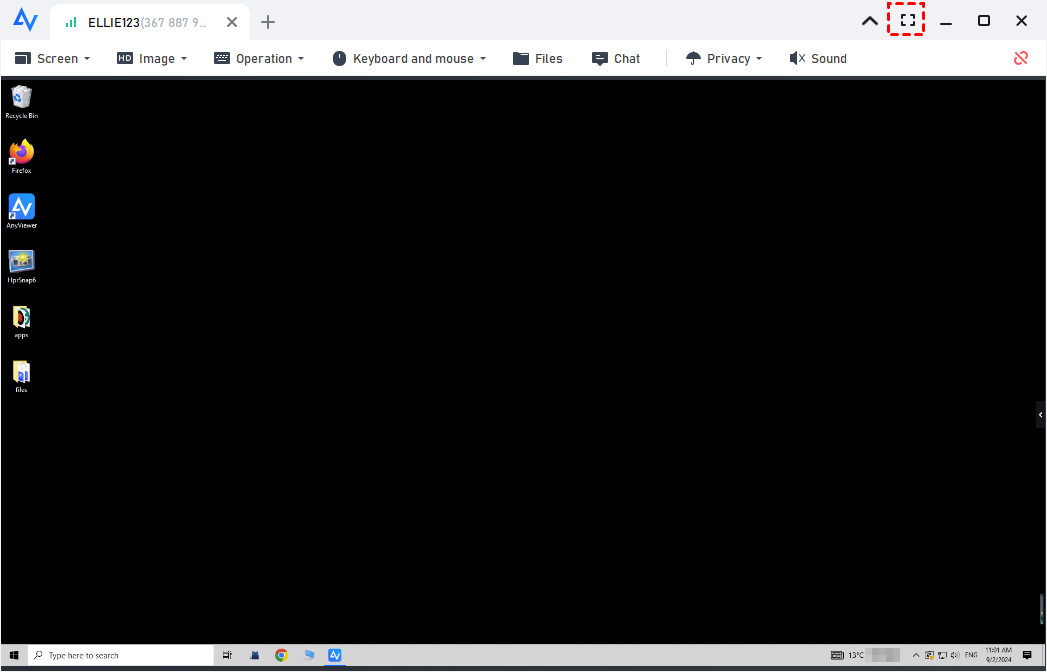
After successfully connecting to another computer, you can see there’s a toolbar on the middle top of the screen. Click the maximize option, then the remote screen will enter full screen mode right away.
Conclusion
If you can’t use Remote Desktop full screen shortcut because there’s no Break key, try one of the five solutions listed above. It is recommended that you use the free yet professional third-party remote control software AnyViewer. With it, you can easily enter or exit full screen mode even during the remote session.
