
Windows 11, 10 the Attempted VPN Tunnels Failed: How to Fix
It’s common to get the VPN tunnels failed error (error code: 800) when you use VPN to connect to a computer. To fix the error effectively, try solutions listed in the post.
By Ellie / Updated on December 13, 2024
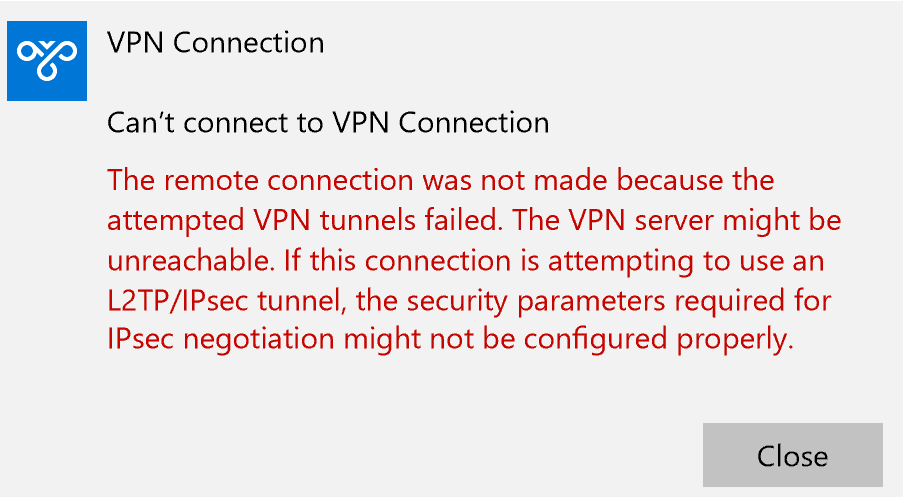
Help! The attempted VPN tunnels failed
“My colleague is trying to use their VPN to connect to our client through the default Virtual Box Windows 10 settings. When he tried to connect, he got an error message: The remote connection was not made because the attempted VPN tunnel failed. The only feasible fix we tried was to reinstall Windows 10, but this is obviously not a long-term solution. Any ideas and suggestions to fix attempted VPN failed in Windows 10 will be appreciated.”
How do I fix the attempted VPN tunnels failed?
VPN is used widely for connection. The attempted tunnels failed error, error code 800, is common during VPN connection on Windows 11/10/8.1/8/7. When VPN tunnels fail, it means that there are firewall/antivirus software restrictions, network failure, VPN setting error, or the router firmware is too old. Based on the four types of VPN tunnel failure causes, we summarize 12 tested solutions.
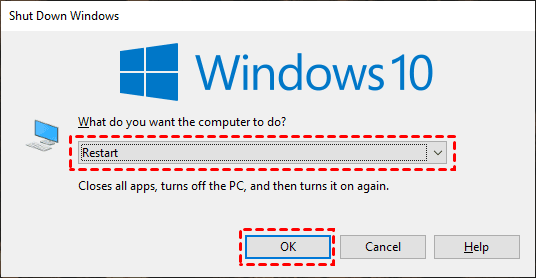
Solution 1. Restart the computer
Restarting the computer is a commonly-used method, which can usually solve most problems, including attempted tunnels failed on VPN.
Press Alt + F4 to open the Shut Down Windows window, select Restart option in the drop-down menu, and then click OK to restart the computer.
Solution 2. Check the Internet connection
When your Internet connection is too slow or fails to connect normally, VPN cannot establish a connection normally, which may lead to this problem. To do this, you need to check whether the Internet is working properly.
Step 1. Press Win + R to open the operation dialog box, enter “ping 8.8.8.8 -t”, and then click OK.
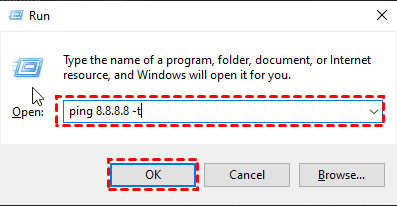
This command can be used to verify the connection between the IP address and Google DNS to determine whether your computer is normally connected to the Internet, where “-t” means the Ping time.
Step 2. You can see the result in the Command Prompt. If the connection result of Ping time is displayed, it means that the Internet connection is normal.
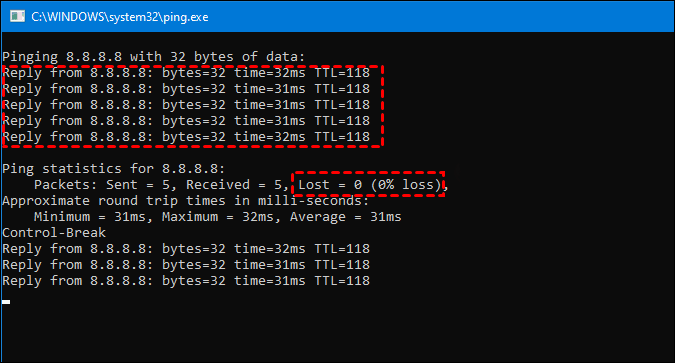
The command prompt displays the Packet Loss Rate in percentage, but it is not intuitive. Therefore, you can use Ctrl + Pause Break to display the Ping time to check the Packet Loss Rate. If the packets you receive is fewer than that provided by the Internet service provider, you can report the problem to the Internet service provider for further assistance.
Solution 3. Connect to a regular server
Due to certain differences in the functions provided by different VPN companies, the Remote Connection was not made because VPN tunnels failed problem may occur in some cases. To fix this problem, you can try to connect to a regular server to solve the problem. Please note that this solution is only effective if the problem occurs using your private VPN application.
Method 4. Disable the firewall/antivirus software
In some cases, Windows Defender Firewall may block VPN connection requests, resulting in this problem. Therefore, we need to disable it temporarily to check whether the problem still exists.
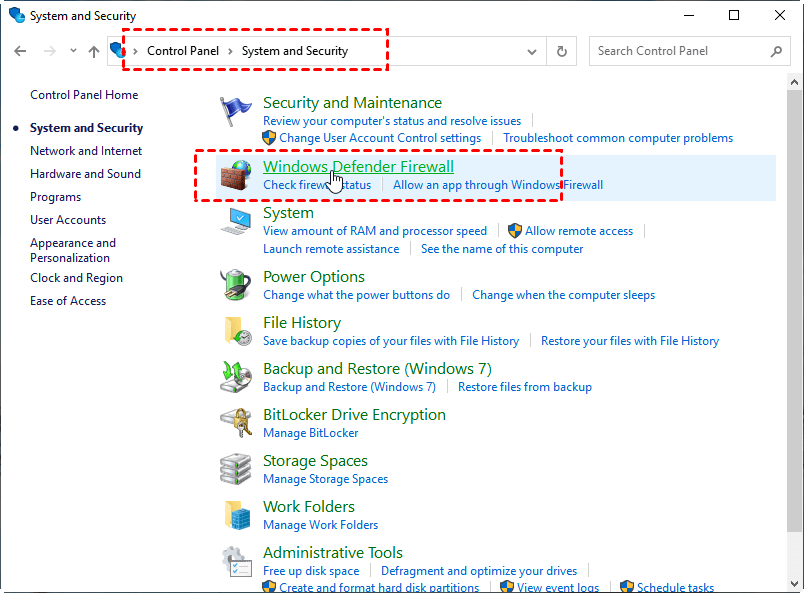
Step 1. Press Win + R to open the operation dialog box, enter control panel and then click OK to open the Control Panel.

Step 2. Find and click System and Security on the main interface of the control panel, and then select Windows Defender Firewall.
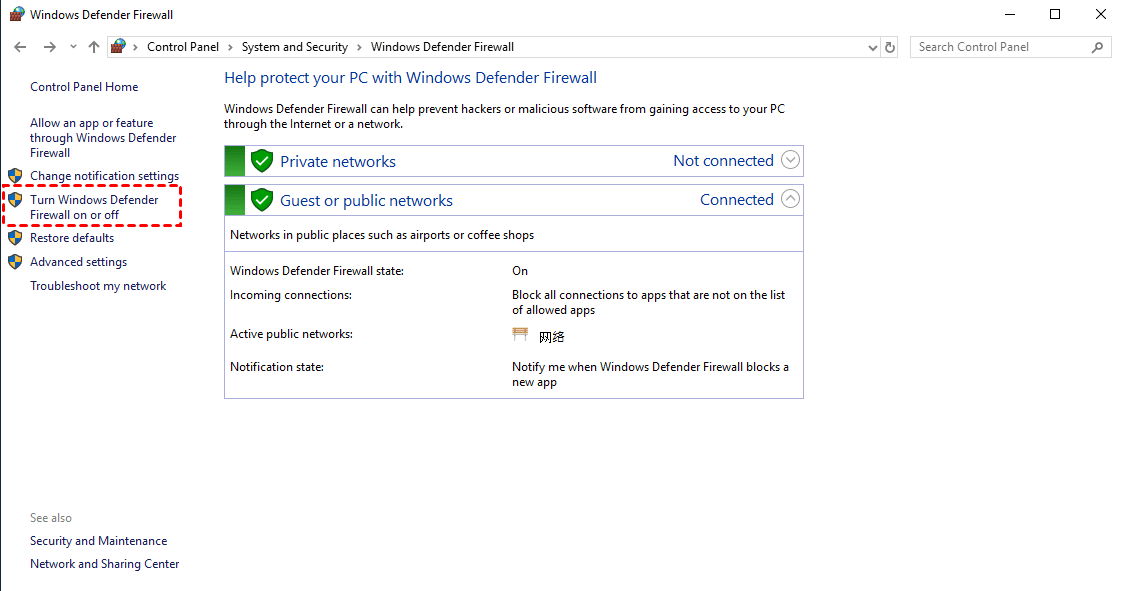
Step 3. Find and click Turn Windows Defender Firewall on or off in the left sidebar.
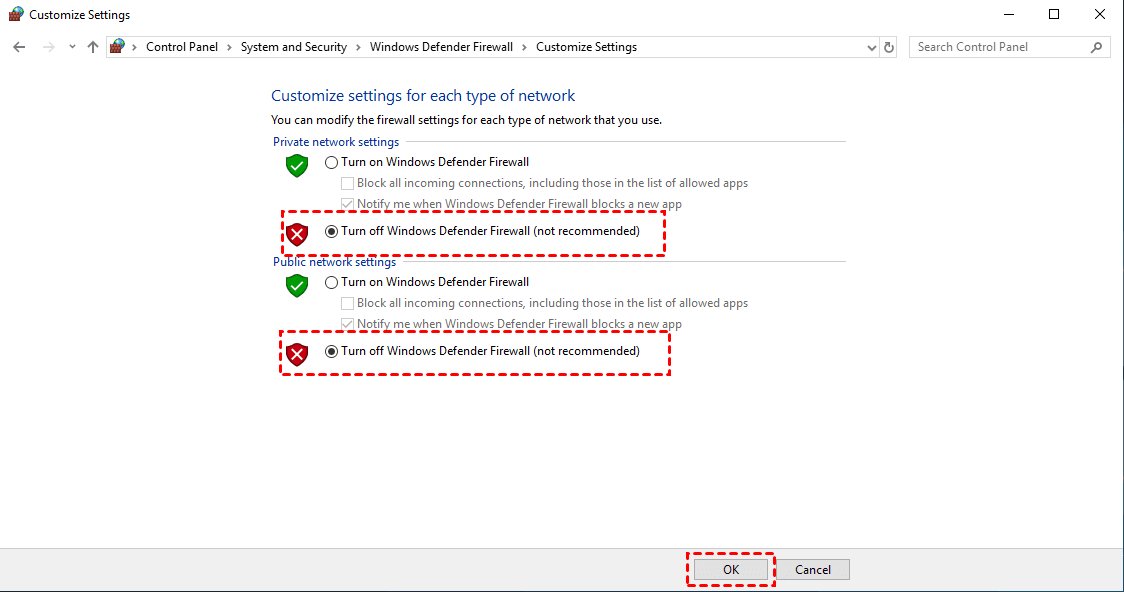
Step 4. Select Turn off Windows Defender Firewall under the Private network settings and the Public network settings respectively and then click OK.
Note: If you’ve installed third-party antivirus software on your Windows computer, it is recommended to disable it. Because in some cases, third-party antivirus software also restricts VPN connections, causing this problem.
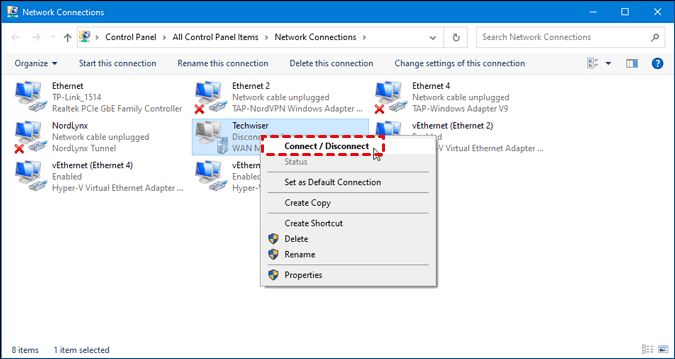
Solution 5. Change the VPN connection method
Incorrect Windows settings will cause you some trouble and affect the normal VPN connection. You can open the Network Connections window, which stores all the networks you have set up, including VPN, then connect to the VPN this way.
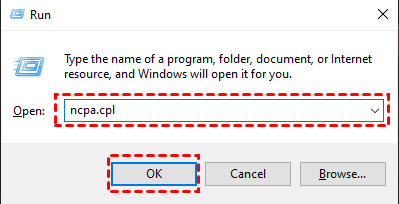
Step 1. Press Win + R to open the run dialog box, enter ncpa.cpl and click OK.
Step 2. Find the VPN you want to connect to in the Network Connections window, right-click the VPN, and select the Connect/Disconnect option in the expanded menu.
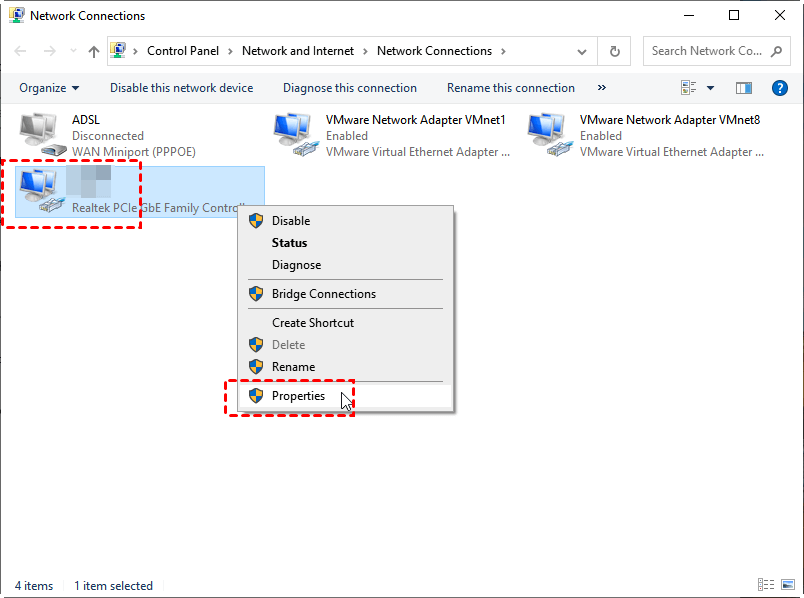
Solution 6. Change the default DNS server
Your Internet service provider will provide a set of DNS servers, usually, there’s no problem. But if there are some errors related to the Internet connection on your computer, it may cause the attempted VPN tunnels failed problem. For this reason, you can solve the problem by changing the default DNS server.
Step 1. Press Win + R, then enter ncpa.cpl and click OK to open the Network Connections window. Right-click the network connection you are currently using, and select Properties from the expanded menu.
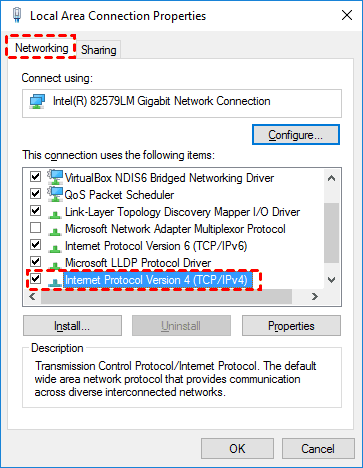
Step 2. In the Networking tab, select the Internet Protocol Version 4 (TCP/IPv4), and click the Properties below.
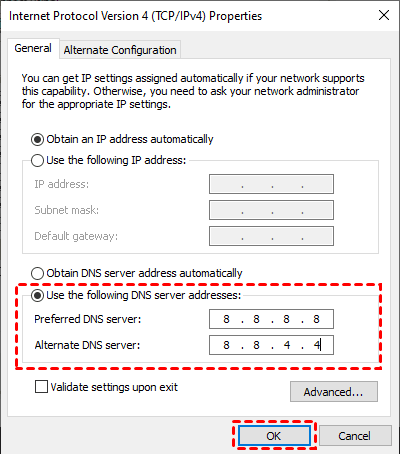
Step 3. Click the "Use the following DNS server addresses, enter 8.8.8.8 in the Preferred DNS server, enter 8.8.4.4 in the Alternative DNS server, and click OK.
Solution 7. Flush the DNS Cache
If you cannot solve attempted VPN tunnels failed by changing the default DNS server, you can consider flushing the DNS Cache to clear the old cached data, which will help solve the problem.
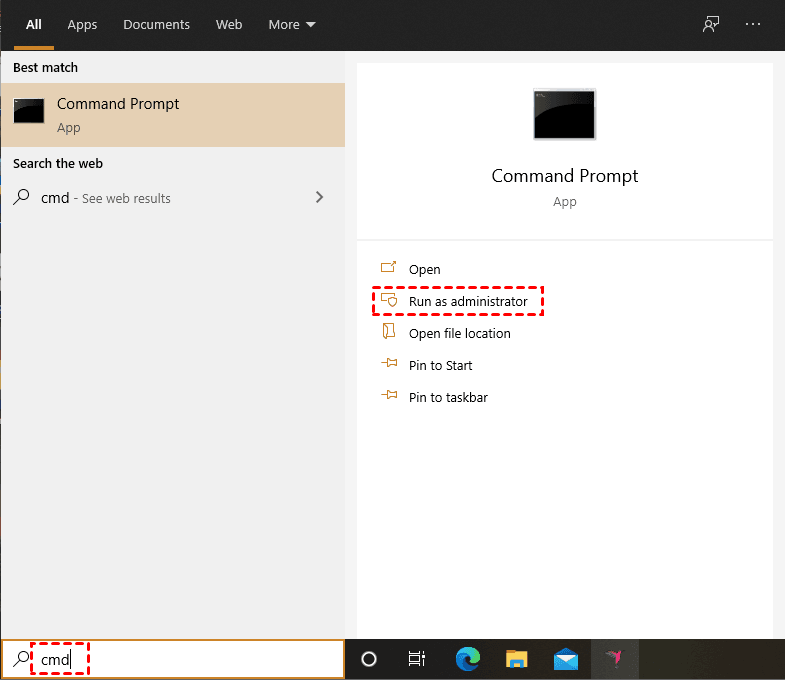
Step 1. Search for cmd in the search box, and select Run as administrator in the right window.
Step 2. In the Command Prompt window, enter ipconfig /flushdns and press the Enter to execute the command.
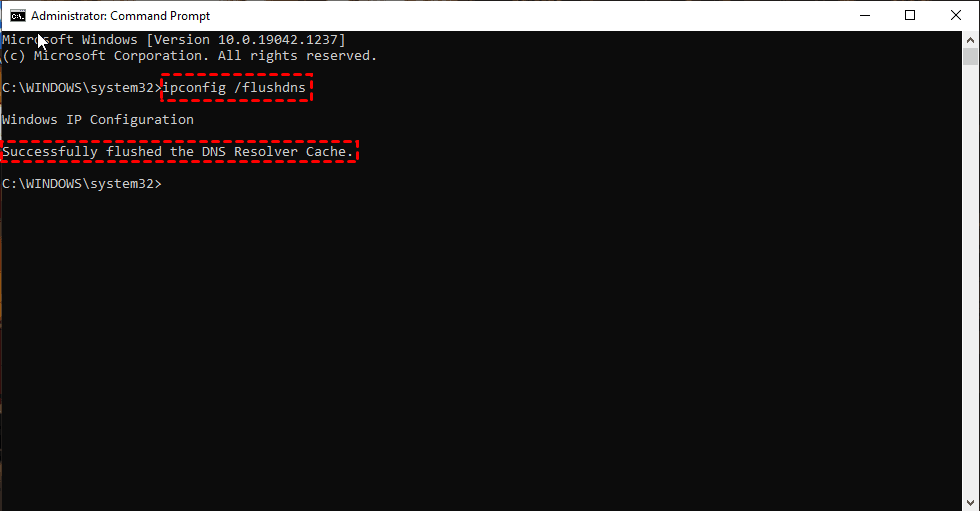
When you see “successfully flushed the DNS Resolver Cache”, it means that the DNS Cache has been flushed successfully. At this time, restart the computer and try to connect to the VPN again.
Solution 8. Check the VPN service
When a VPN application is installed on your computer, specific VPN service will be automatically added. If the service is not running in the background all the time, you will not be able to connect to the VPN server. Therefore, you need to verify that it is running in order to solve the problem.
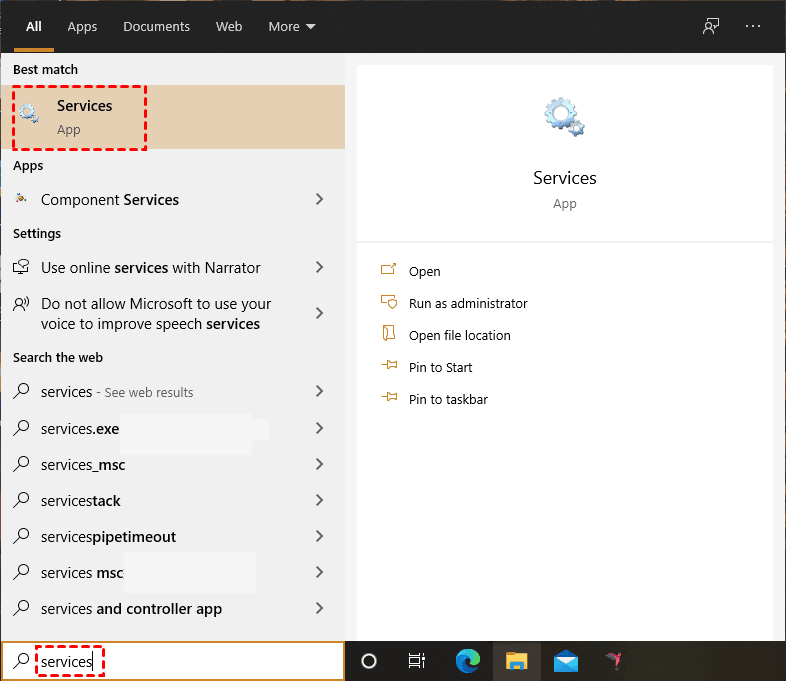
Step 1. Open the search box in the lower-left corner of the taskbar, enter services and click to open it.
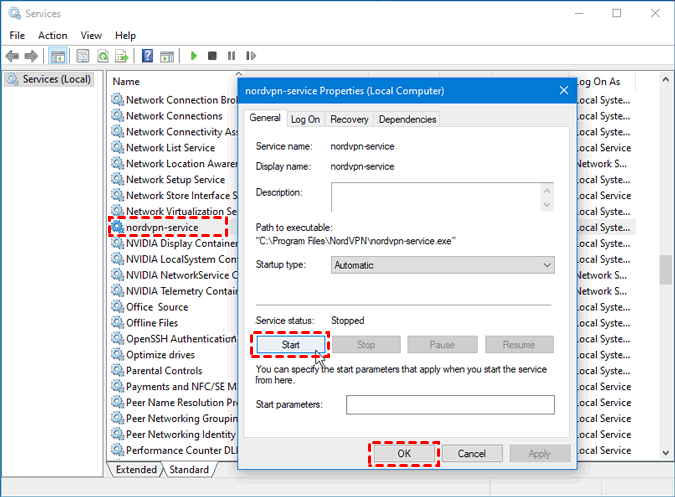
Step 2. In the Services window, search for the corresponding service of your VPN application. Taking NordVPN as an example, the corresponding service is nordvpn-service. Double-click to open the service. Find the Service status column, click the Start button, and then click OK.
Solution 9. Change VPN proxy settings and type
If your VPN is using a proxy, it is recommended to temporarily disable it, otherwise, it may cause this problem. In addition, you also need to set the corresponding configuration file according to the VPN type. If you select the wrong VPN type, it may also cause this problem.
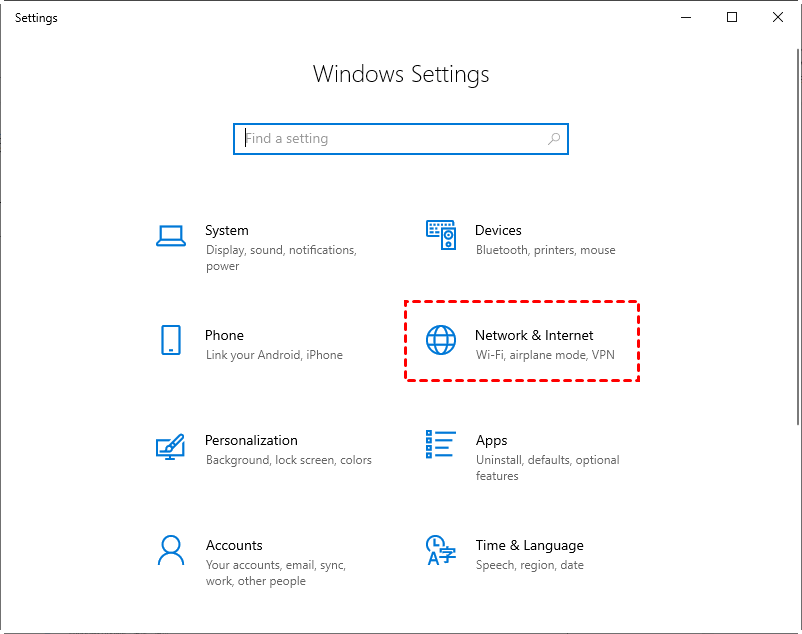
Step 1. Press Win + I to open Windows Settings, find, and click Network and Internet.
Step 2. Switch to the VPN tab in the left sidebar, and click Advanced Options under the VPN on the right window.

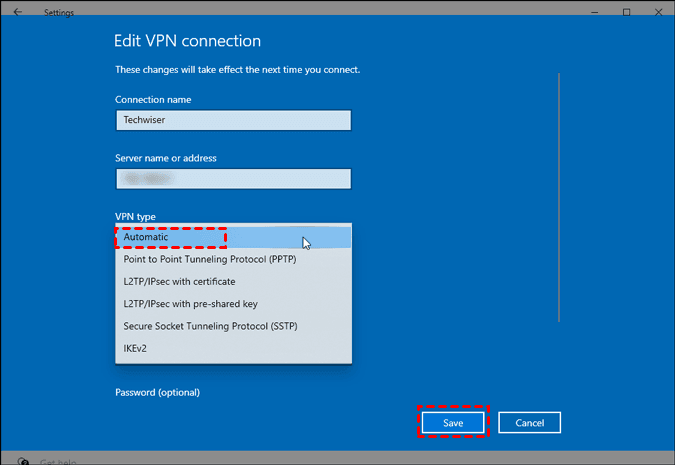
Step 3. Click the Edit button, select Automatic in the expanded VPN Type drop-down list, and then click Save.
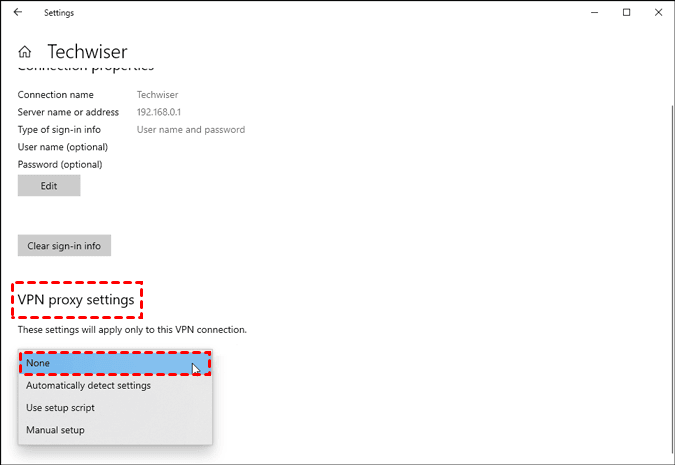
Step 4. Select None from the VPN proxy settings drop-down menu.
Note: If you know the VPN tunnel type, you can also directly change it to the corresponding tunnel type. But you need to pay attention to the following:
- If you choose PPTP type, make sure that the PPTP port (TCP 1723) and GRE port (47) are not restricted by the firewall.
- If you choose L2TP/IPsec type, make sure that the port UDP 1701 is not restricted by the firewall.
- If you choose SSTP type, make sure that the correct machine certificate exists on the server and a valid client certificate exists on the client machine.
- If you choose IKEv2 type, make sure that the IKE port is not restricted by the firewall, that is, UDP port 500 and UDP port 4500.
Solution 10. Delete the VPN profile and add it again
New problems, such as the attempted VPN tunnels failed issue, may occur as a result of Windows upgrades, virus assaults, software updates, and other factors. To resolve this issue, delete the original VPN setup profile and re-add it.
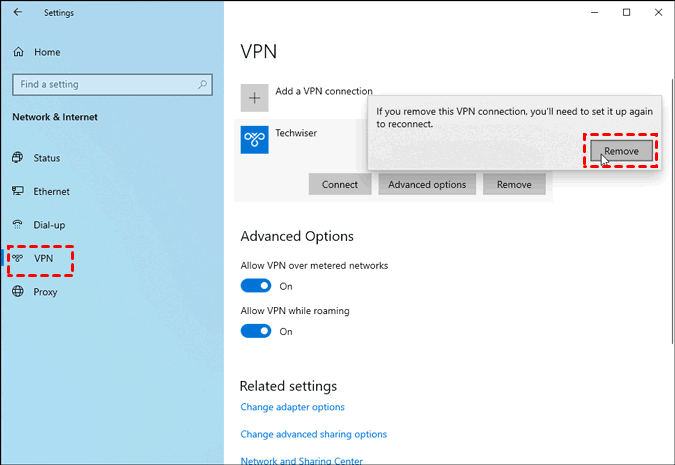
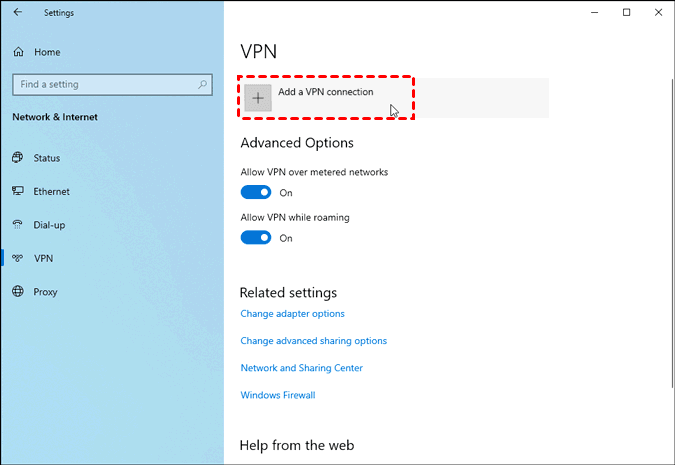
Step 1. Press Win + I to open Windows Settings, find, and click Network and Internet. Switch to the VPN tab in the left sidebar, find and click the VPN configuration file, and select Remove.
Step 2. On the VPN tab, click Add a VPN connection, and enter the required information, including VPN configuration files, connection name, server name, etc., and then click the Save.
Solution 11. Perform a clean boot
In fact, third-party applications or services interfere with the normal operation of Windows to a certain extent, which may cause VPN error 800. Therefore, you can consider starting the computer in a clean mode.
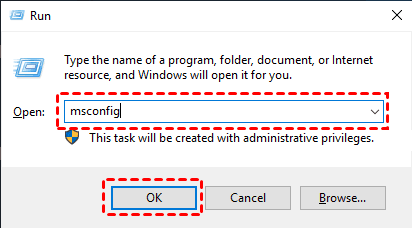
Step 1. Press Win + R to open the run dialog box, enter msconfig and click OK to open the System Configuration.
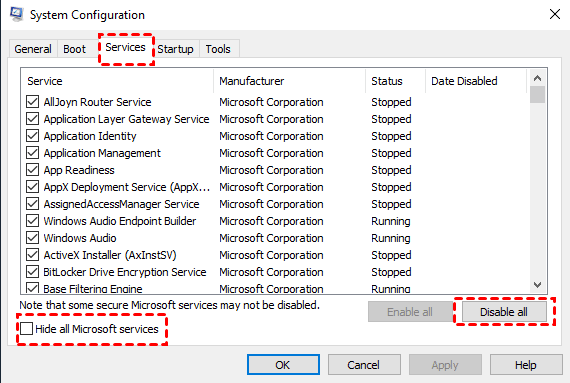
Step 2. Switch to the Services tab, check Hide all Microsoft services, and click the Disable all.
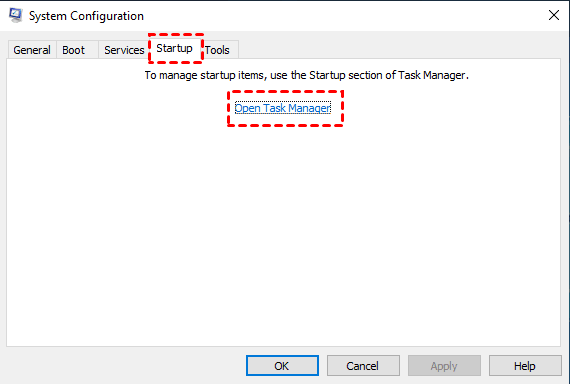
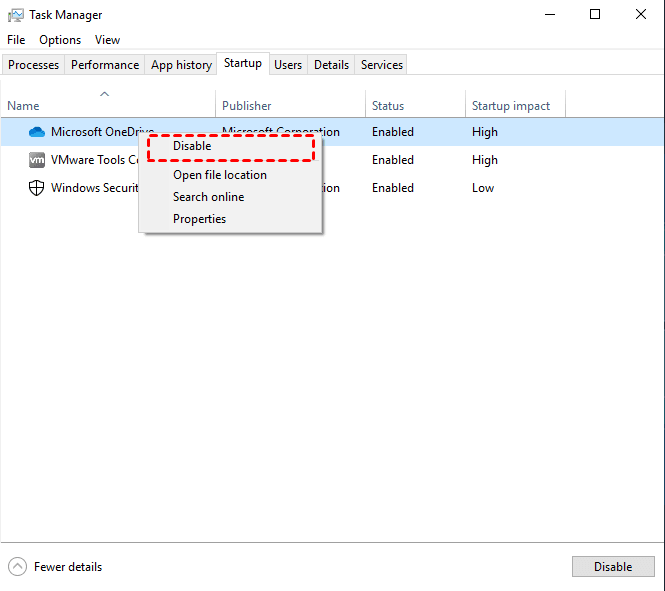
Step 3. Switch to the Startup tab and click Open Task Manager.
Step 4. In the list of enabled applications, select each item in turn, right-click and select Disable.
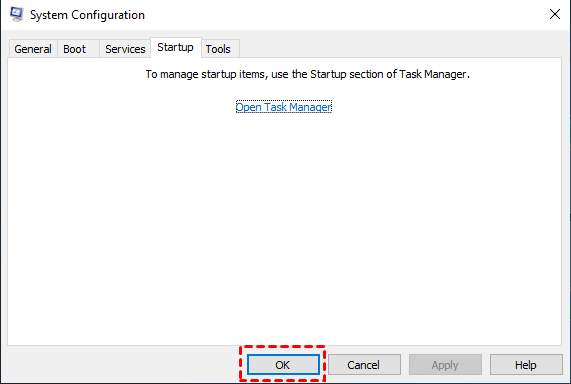
Step 5. After disabling all applications, return to System Configuration, click OK and restart the computer.
Solution 12. Update router firmware
If the VPN works normally for a long time and the error appears suddenly, you should consider whether the router firmware needs to be updated. If the router firmware is not updated for a long time, it may lead to poor compatibility between the local router and VPN and affect the VPN connection. Therefore, you can update the router firmware with the help of your local network administrator.
If none of the above 12 solutions can help you solve the problem, you can use AnyViewer, the free third-party remote control software, to replace Microsoft Remote Desktop and VPN, so as to avoid the problem from the root.
Easy way to avoid the VPN attempted tunnels failure on Windows 10/11: AnyViewer
As a completely free third-party remote control software, AnyViewer is very easy-to-operate yet professional. It is compatible with multiple Windows versions, including Windows 10/11/8.1/8/7 and Windows Server. AnyViewer can be a perfect alternative to Microsoft Remote Desktop and VPN.
It is easier in operation. It requires no IP address, user name and password of the remote computer to achieve remote control. It is secured by Elliptic Curve Cryptography (ECC) encryption, protecting your data. If you need to control another PC remotely, AnyViewer is definitely your best choice. Next, we will introduce how to use AnyViewer with two methods.
Part 1. For unattended remote access with one-click
Step 1. Download, install and launch AnyViewer on both computers. Go to Log in, and then click Sign up. (If you already have signed up on its official website, you can log in directly.)

Step 2. Fill in the signup information.

Step 3. Then you can see you successfully logged in to AnyViewer. Your device will automatically be assigned to the account you've logged in.

Note: If you have logged in to the same AnyViewer account on the two devices, then you can achieve a direct connection by clicking One-click control. If the two devices are not logged in to the same account, you can read the following steps to learn two more connection methods.

Part 2. Two connection methods of AnyViewer
Connection method 1. Send a control request
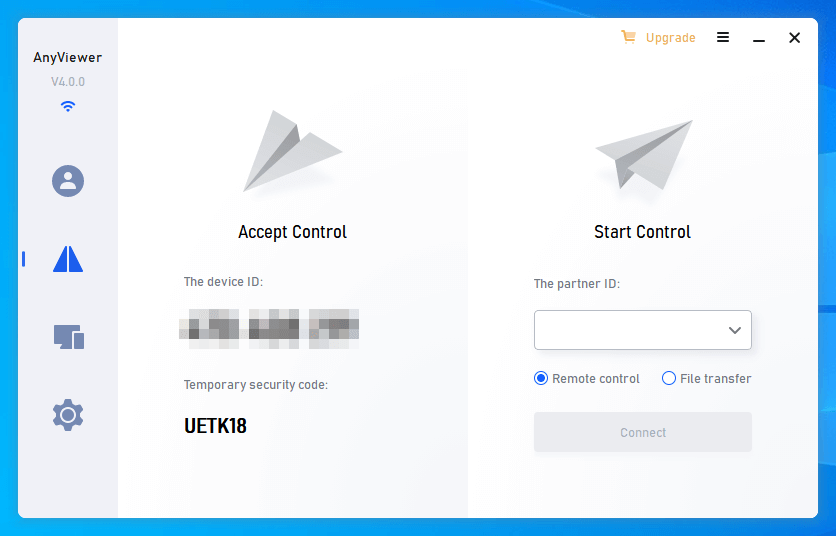
Step 1. On the client computer, input the device ID of the host computer and then click Connect.
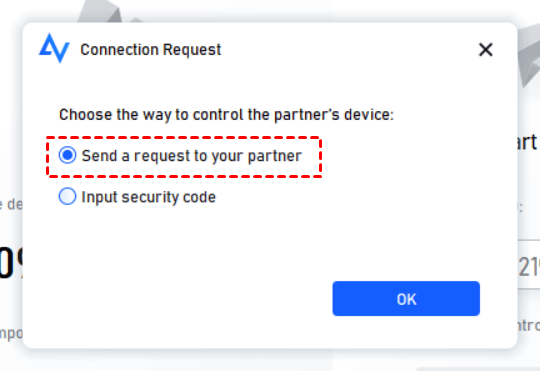
Step 2. Click Send a control request to your partner.
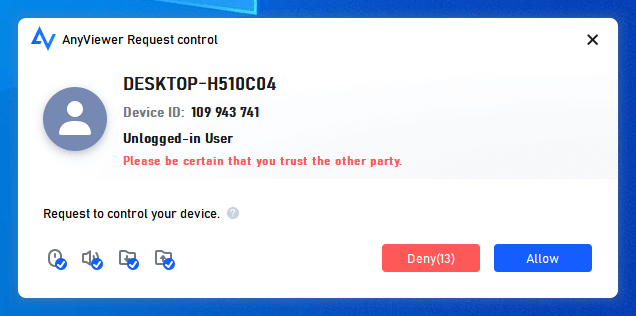
Step 3. On the host computer, click Allow to make the connection successful.
Connection method 2. Input security code
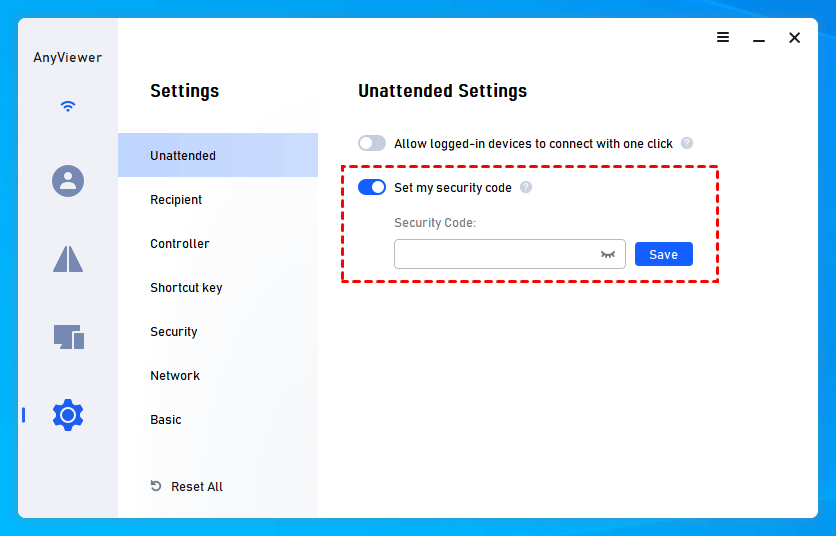
Step 1. On the host computer, go to Settings > Recipient. Tick the third option and then set the permanent security code.
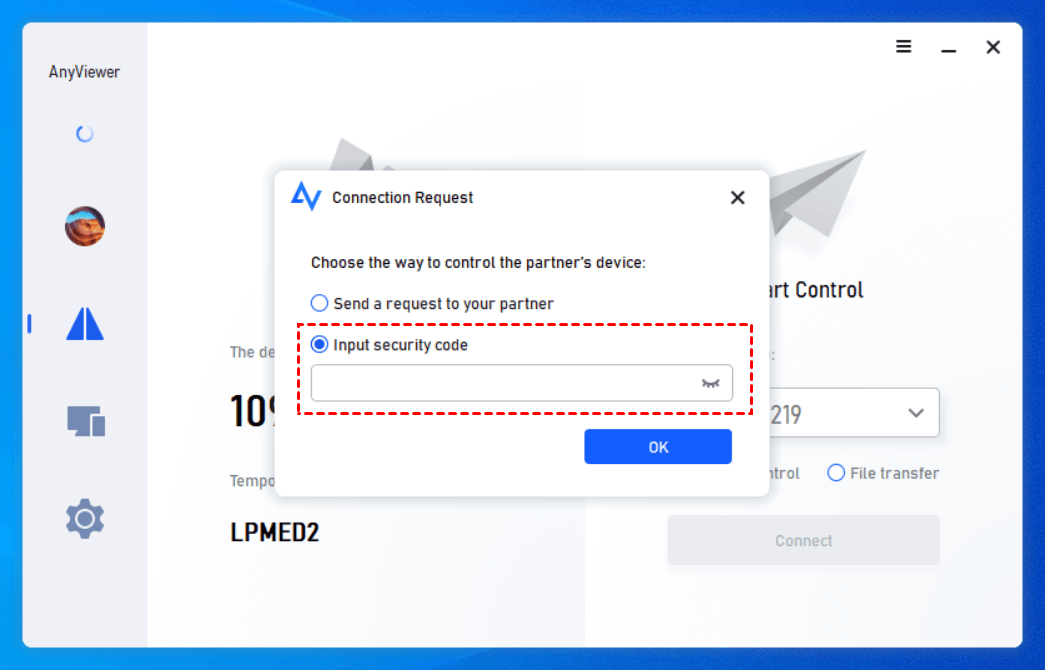
Step 2. On the client computer, input the device ID of the host computer and then click Connect. Choose Input security code and enter the code. Click OK to achieve remote access.
Conclusion
How to fix the Remote Connection was not made because the attempted VPN tunnel failed problem? Here in this post, we provide you with 12 solutions to fix this problem. But if the problem still exists after trying all the solutions, you might as well try the free third-party remote control software AnyViewer we recommended.
