
2026 Tutorial: How to Share Screen on Webex [PCs & Phones]
If you're looking for how to share screen on Webex, this article offers detailed tutorials for Windows and Mac. It also introduces a simple and free alternative for a hassle-free screen sharing experience. Keep reading to discover the secrets to seamless screen sharing on Webex.
By AnyViewer / Updated on December 26, 2025
How do I share my screen on Webex meeting?
In the realm of virtual collaboration, the ability to share your screen is a pivotal feature, enabling effective communication and seamless presentations. Cisco Webex, a powerhouse in the world of online meetings, offers a straightforward and efficient way to share your screen. Whether you're demonstrating an application, presenting content, or seeking technical assistance, Webex offers convenient features to easily share your computer screen. Apart from this, Webwx can also share your iPhone screen.
![]()
Many users face challenges with how to share screen on Webex. Fortunately, this article is here to address your concerns and provide a solution. In this comprehensive guide, we'll walk you through the step-by-step process of how to share a screen on Webex, ensuring you harness the full potential of this essential collaboration tool.
How to share screen on Webex [Windows & Mac & mobile phone]
How to screen share on Webex? Sharing your screen with Webex Meetings is a simple process. No matter what device you're using, you can easily share your screen in a Webex video meeting. This article will introduce you to how to use Webex for screen sharing on Windows and Mac devices, please continue reading.
Part 1. Windows
Before you start screen sharing on Webex Meetings from your Windows device, make sure you've initiated or joined an online meeting using the Webex Meetings app. Once you're actively engaged in a meeting, follow the simple steps outlined below.
Step 1. While you're in an active Webex meeting, tap the "Share Content" icon located at the bottom of the screen to access additional options.
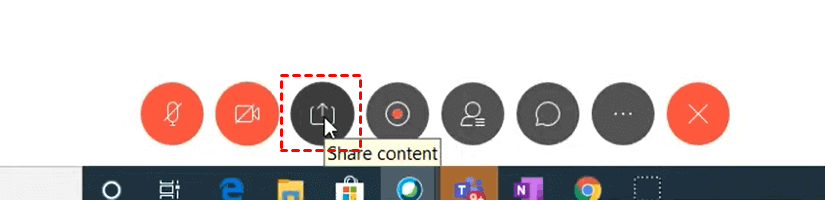
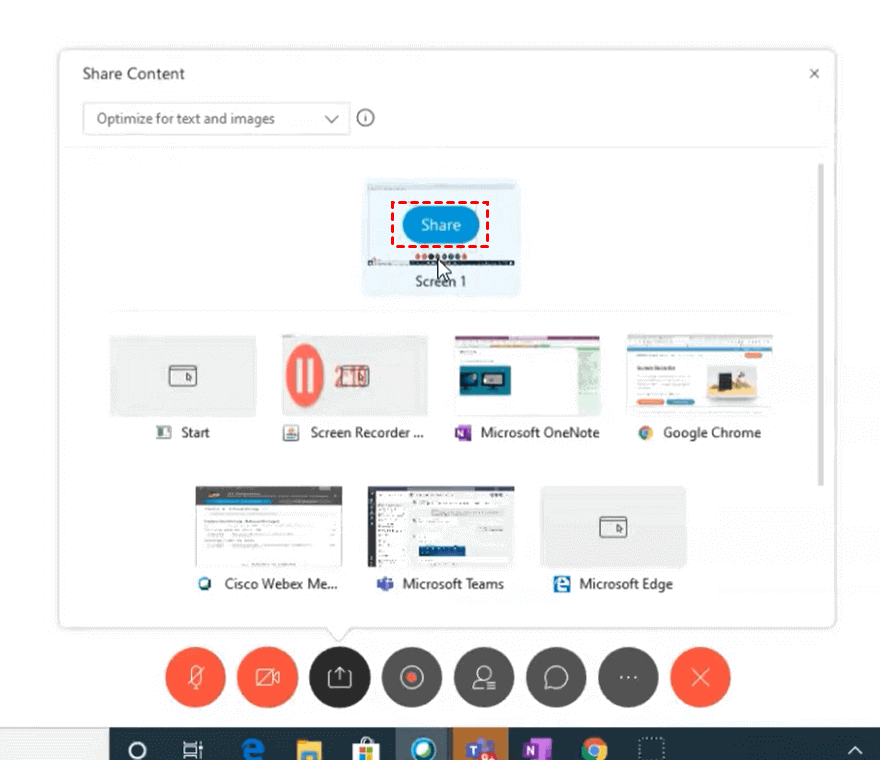
Step 2. Next, choose the specific screen or application you wish to share and click on the "Share" button.
Step 3. Now, you have successfully started sharing your screen.
Part 2. Mac
When sharing your screen on Webex Meetings from a Mac, start by launching or joining an online meeting through the Webex Meetings app. Once you are in an active meeting, follow the straightforward steps provided below.
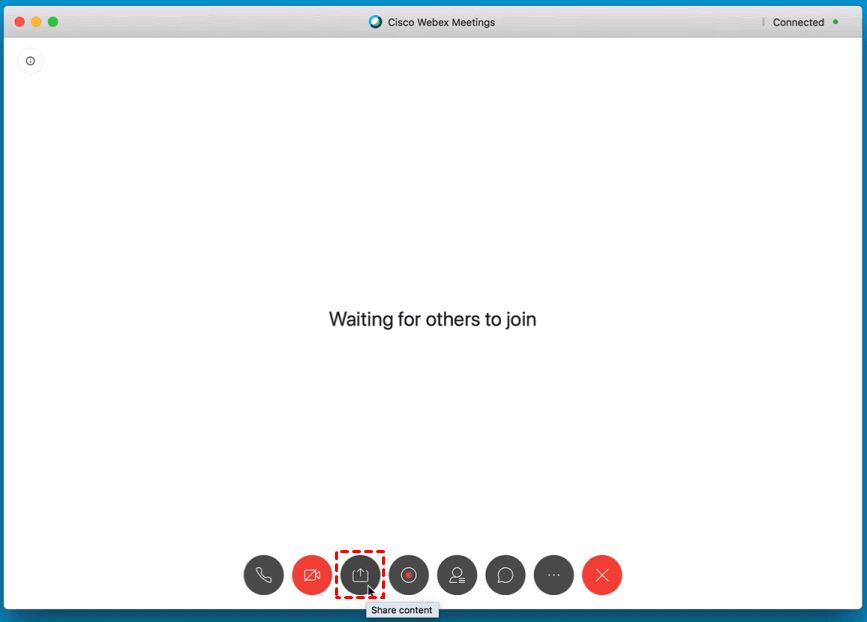
Step 1. In an active Webex meeting on your Mac, access additional options by tapping the "Share Content" icon at the bottom of the screen.
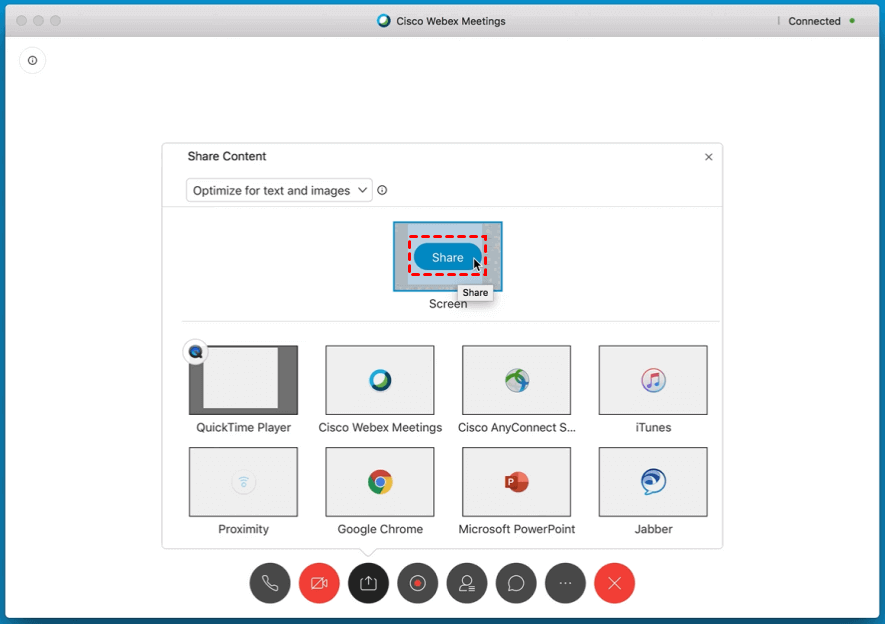
Step 2. To share your screen on Webex Meetings from your Mac, select the desired screen or application, and then click the "Share" button.
Step 3. Now you've successfully initiated screen sharing on Webex.
Part 3. Mobile phone [Android & iPhone]
How to share your mobile screen on Webex? Sharing your screen with Webex Meetings is a simple process. Ensure that you have initiated or joined an online meeting through the designated Webex Meetings app on either iPhone or Android. Once actively engaged in the meeting, follow the uncomplicated steps outlined below. The subsequent instructions will be demonstrated using an iPhone as an illustration.
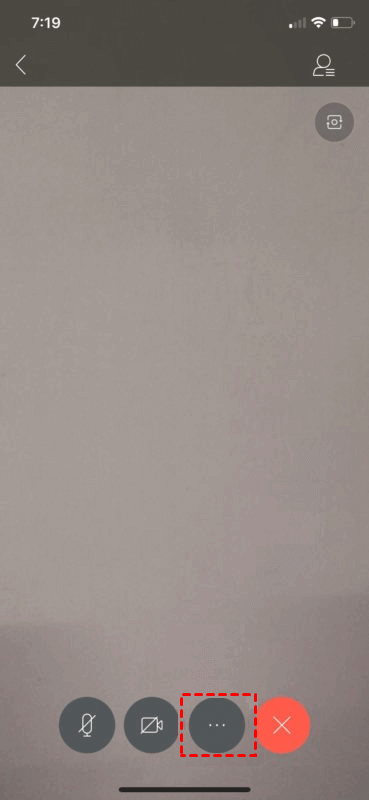
Step 1. In an ongoing Webex meeting, initiate the screen sharing process by tapping the "triple-dot" icon located at the bottom for supplementary options.
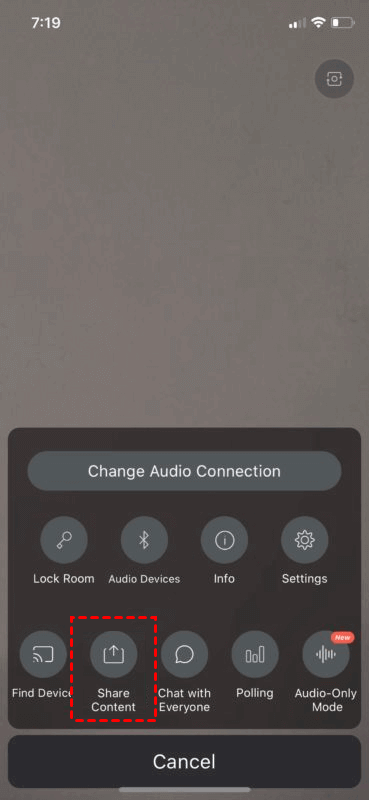
Step 2. Access the comprehensive screen sharing features by selecting "Share Content" from the ensuing menu.
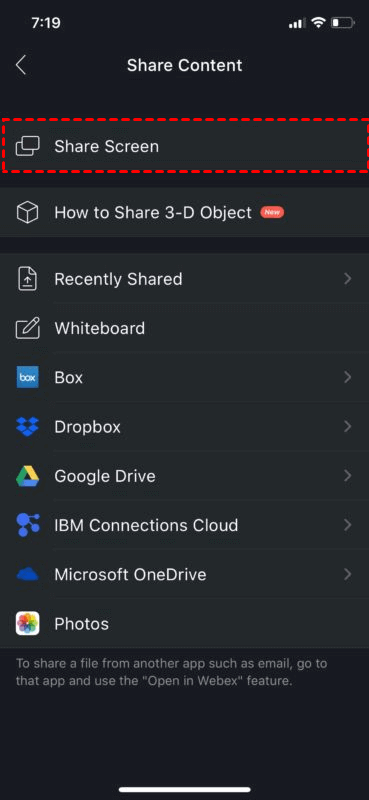
Step 3. Choose the "Share Screen" option, listed as the first choice.
Step 4. Commence the screen sharing process by tapping "Start Broadcast," showcasing your iPhone or iPad screen seamlessly.

AnyViewer: Best free Webex alternative for Windows
However, although Webex provides a free plan, it has higher limitations in terms of meeting time, number of participants, etc., which will have a great impact on the user experience. If you want more comprehensive features, you need to purchase a paid plan, which will bring higher costs to users. But fear not, we're about to introduce you to one of the top free alternatives to Webex for sharing your iPhone screen and Windows screen.
If you seek an alternative to Webex, AnyViewer emerges as a highly recommended option. This free, user-friendly, and secure remote desktop application simplifies remote access and support.
Say goodbye to hefty costs and embrace the free plans offered by AnyViewer, suitable for both personal and commercial use. Loaded with abundant features and permissions, AnyViewer provides a cost-effective solution that meets your needs without breaking the bank. Enjoy the efficient and economical benefits of AnyViewer.
Part 1. Share iPhone screen
Step 1. Install AnyViewer on both your computer and the iPhone you want to connect. After installation, launch the application.
Step 2. Initiate the application on your computer, navigate to the "Log in" section, and opt for "Sign up" to generate your AnyViewer account.

Step 3. On your iPhone, log in with the account created on your computer.
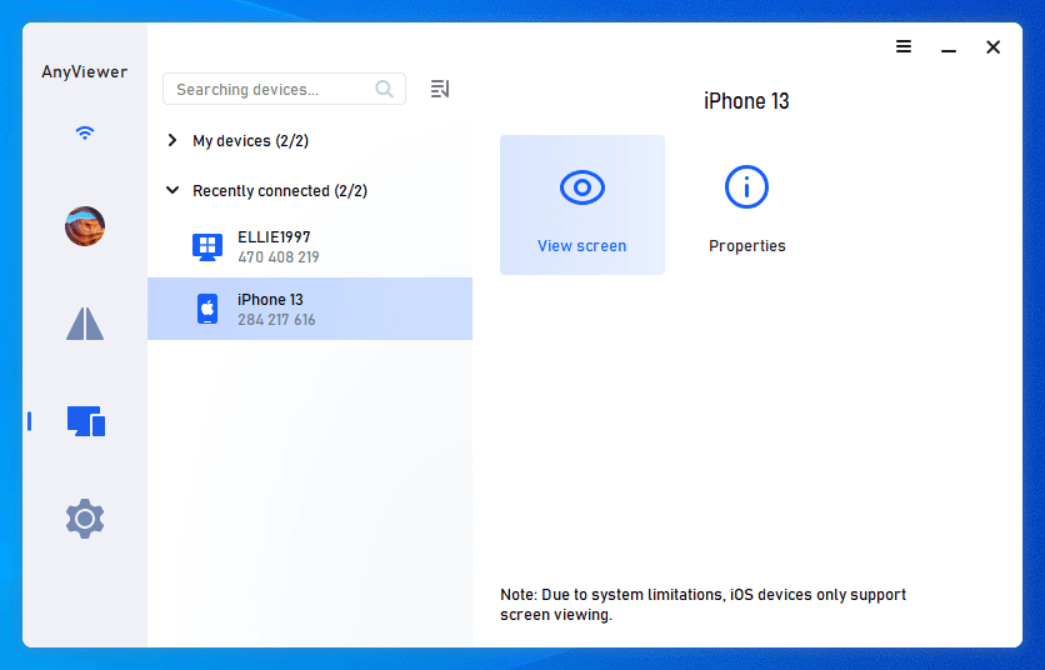
Step 4. Return to your computer, find your iPhone in the list, and start viewing the screen by clicking on "View screen."
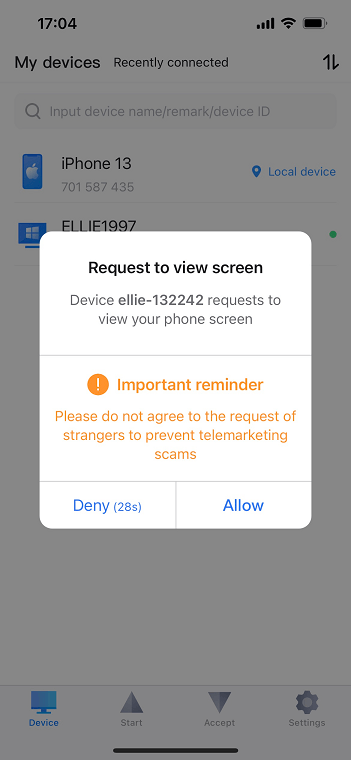
Step 5. On your iPhone, grant permission by tapping "Allow" when prompted, allowing the screen to be shared.
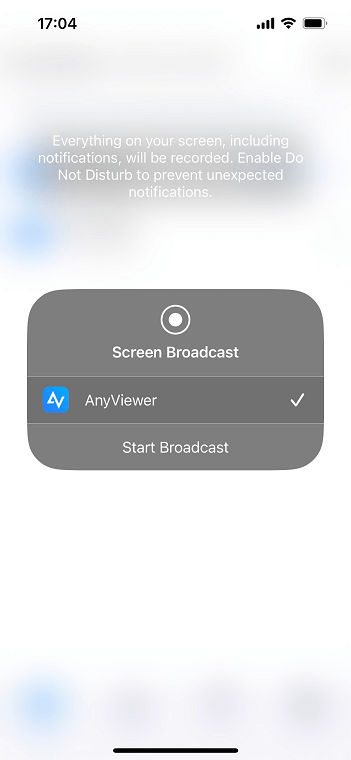
Step 6. Click "Start Broadcast" on your iPhone to begin the screen-sharing process.
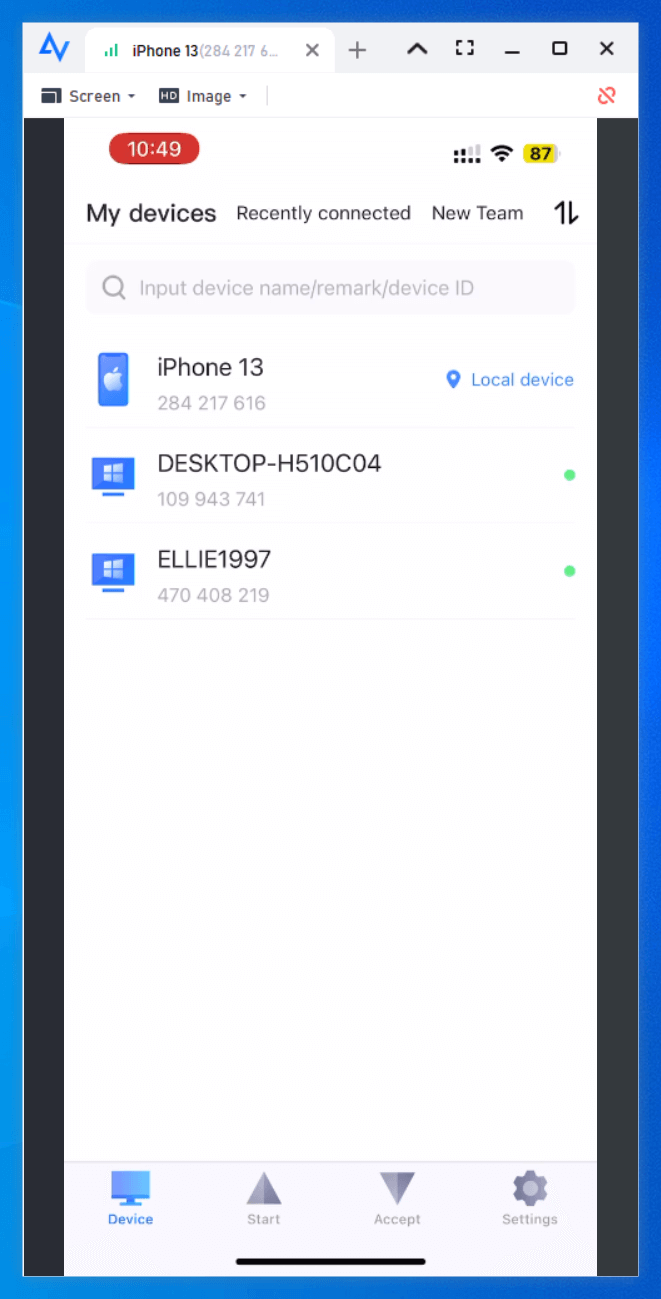
Step 7. Relish the ease of remotely viewing your iPhone screen on your computer. You can also adjust the image quality using the toolbar if needed. Explore the simplicity and efficiency of AnyViewer's screen-sharing features.
- ★Tips: To enhance your remote screen viewing capabilities and gain access to more iPhone devices, consider upgrading your account to a Professional or Enterprise plan.
Part 2. Share Windows screen
Beyond facilitating iPhone screen sharing with a computer, AnyViewer extends its capabilities to enable the sharing of a Windows screen with another Windows device. The subsequent steps outline how to share your Windows screen with another Windows device. The preparatory measures remain consistent with those outlined above: create an account and log in to the same account on both Windows machines.
Step 1. Upon a successful login, your device will be automatically linked to the account you logged into.

Step 2. On local Windows, go to "Device", select the target device, and click "View screen" to start viewing the screen of remote Windows.
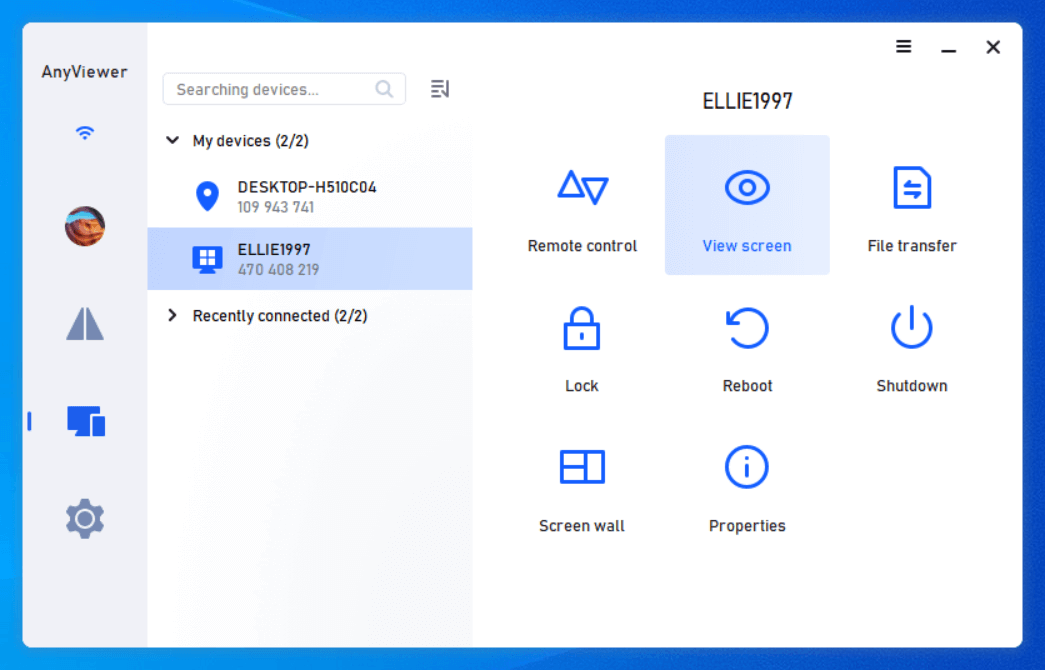
Step 3. Now you can successfully view the screen of the remote Windows on your local Windows.
Conclusion
How to share screen on Webex? By following these steps, you can confidently navigate the process of sharing your screen on Webex, enhancing your ability to collaborate, present, and engage in virtual meetings effectively. Whether you're a seasoned professional or new to online collaboration, leveraging the screen-sharing feature on Webex opens up a world of possibilities for seamless communication and collaboration.
Unhappy with the costly and complex nature of Webex? Say goodbye to those issues and opt for AnyViewer as your go-to solution. With its user-friendly interface and free model, AnyViewer provides a straightforward and efficient method for remote screen sharing. Enjoy a swift and secure solution without denting your budget. Switch to AnyViewer today!
