
3 Ways to Copy File to Remote Server on Windows via Command Line
This post introduces the top three ways to copy file to remote server on Windows via command line with detailed steps. Follow the detailed steps provided for each approach to get started efficiently.
By Ellie / Updated on December 13, 2024
How to copy a file to a remote server using the command line?
In the digital era, efficient data management is paramount, especially when it comes to seamlessly transferring files to remote servers. Windows users often find themselves in need of a straightforward method to copy files to a server using the command line.

Fortunately, Windows provides a powerful set of command-line tools that can simplify this process. This article will explore the process of copying files to a remote server using the command line, shedding light on various methods and recommending three prominent options: PuTTY, PsExec, and Robocopy.
How to copy file to remote server on Windows via command line[3 ways]
Copying files to a remote server using the command line can be achieved through several approaches, each catering to different needs and scenarios. The following is a detailed introduction to PuTTY, PsExec, and Robocopy.
Way 1. PuTTY: A versatile SSH client
PuTTY is a popular free terminal emulator for Windows that also includes a suite of networking tools. While PuTTY itself does not have built-in file transfer capabilities, it comes with a companion tool called PSCP (PuTTY Secure Copy Protocol) that allows for secure file transfers between Windows systems.
Here's a brief introduction to using PuTTY and PSCP to copy file to remote Windows server via command line:
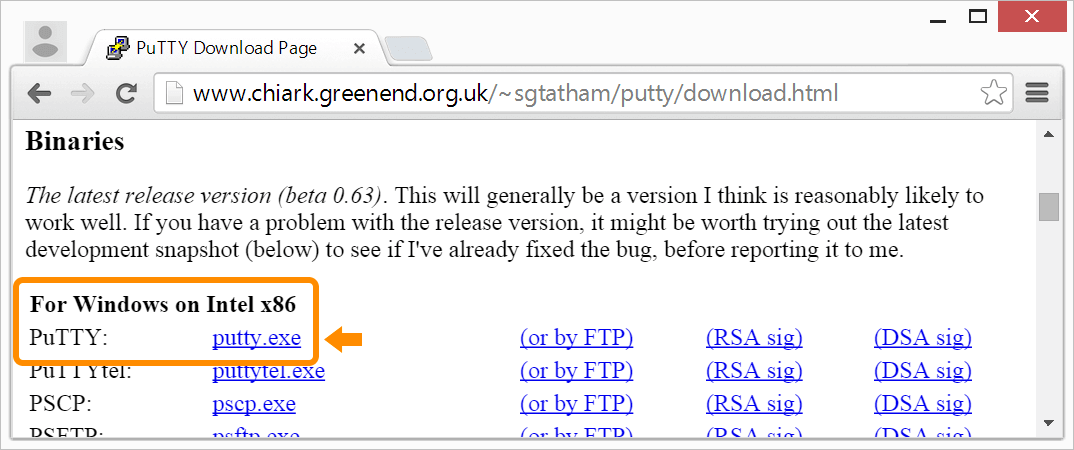
Step 1. Download PuTTY from the official website: PuTTY Download Page. Begin the installation of PuTTY by carefully adhering to the prompts that appear on your screen.
Step 2. Launch PuTTY by double-clicking the executable (e.g., putty.exe).
Step 3. Enter the IP address or hostname of the remote server. Specify the connection type (usually SSH). Then click Open.
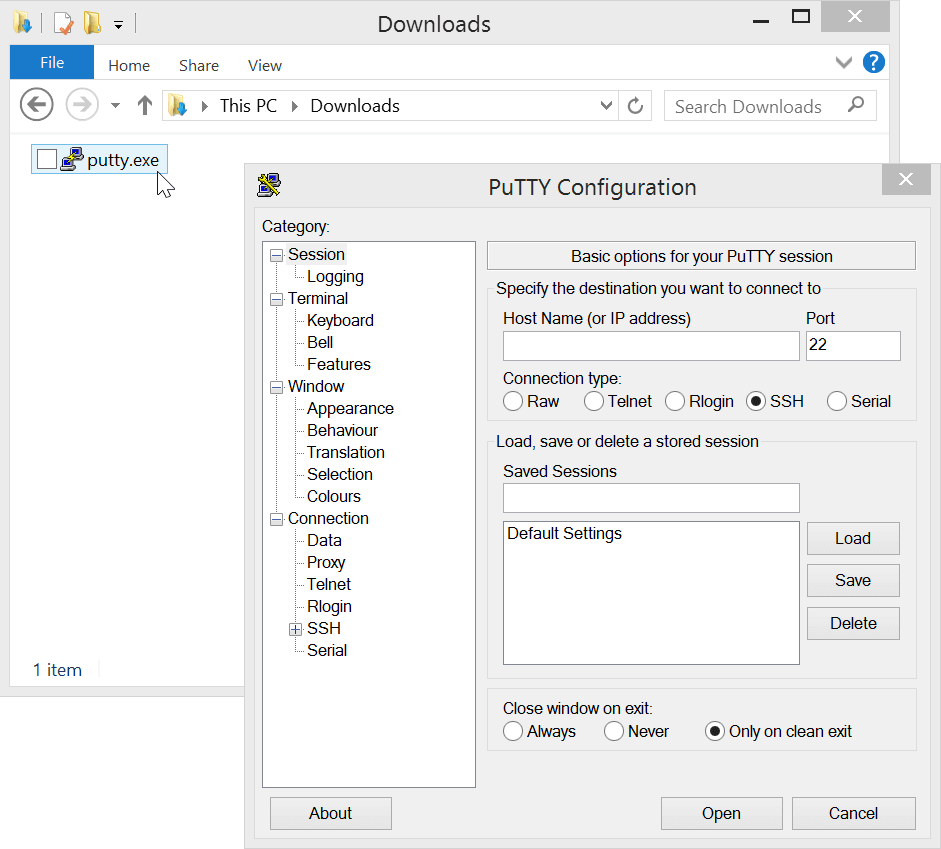
Step 4. Provide your username and password when prompted.
Step 5. Once connected, you'll have access to a terminal where you can execute commands on the remote server.
Step 6. PSCP is included in the PuTTY installation. If you installed PuTTY using the installer, PSCP should be available in the same directory.
Step 7. Open a command prompt on your Windows machine. To copy a file from your local machine to the remote server, using the following command:
pscp C:\local\path\file.txt username@remote:/remote/path/
Replace C:\local\path\file.txt with the path to your local file, username with your remote username, remote with the IP address or hostname of the remote server, and /remote/path/ with the destination path on the remote server.
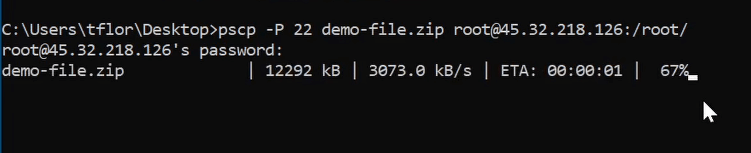
For example, if you want to copy a local file called demo-file.zip into the directory of a remote server called root with IP address of 45.32.218.126, send over port 22. Type in the following:
pscp -P 22 demo-file.zip [email protected]:/root/
Step 8. When prompted, enter the password for the remote computer.
Step 9. For transferring a file from the remote server to your local machine:
pscp username@remote:/remote/path/file.txt C:\local\path\

Way 2. PsExec: For remote execution & file copying
PsExec is a command-line utility developed by Sysinternals (now a part of Microsoft) that allows system administrators to run processes on remote systems. While PsExec itself doesn't provide direct functionality for remote file transfer, it can be used in conjunction with other tools to achieve this.
Here's a basic example of how you might use PsExec along with PowerShell to copy a file from one Windows machine to another:
Step 1. Begin by downloading PsExec on the computer designated for executing remote commands.
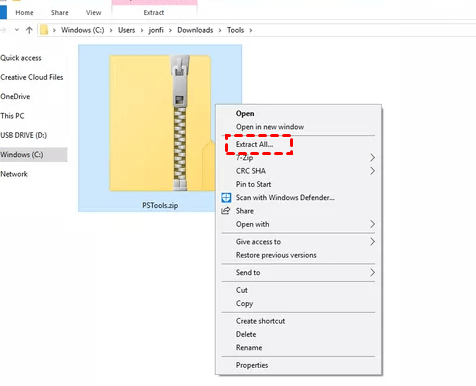
Step 2. Right-click on the downloaded ZIP file and opt for the "Extract All" option.
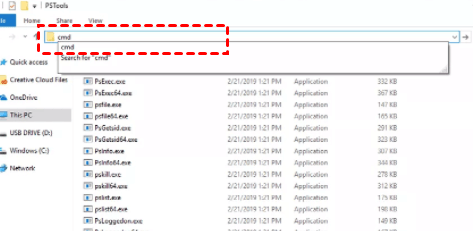
Step 3. Navigate to the directory containing the extracted file. Type "cmd" in the search bar and press Enter.
Step 4. The Command Prompt within that folder will now be accessible, allowing you to execute commands using PsExec.

Step 5. The following command shows a basic example of copying a file from a local machine to a remote machine using PsExec and PowerShell:
psexec \\RemoteComputer -s powershell.exe -command "Copy-Item -Path 'C:\Path\To\Your\File.txt' -Destination 'C:\Destination\Path\'"
- Replace RemoteComputer with the actual name or IP address of the remote machine.
- Adjust the file paths accordingly.
Way 3. Robocopy: Windows native command:
Robocopy (Robust File Copy) is a command-line utility in Windows that allows users to copy files and directories from one location to another. It is known for its robustness, speed, and versatility in handling various file copy tasks. While Robocopy is primarily designed for local file copying, it can also be used for remote file transfer by combining it with other tools such as PowerShell or by mapping network drives.
Here's a basic example of using Robocopy for Windows command line copy file to remote server:
Step 1. Before using Robocopy for remote file transfer, you may want to map a network drive to the remote location. This can be done using the net use command:
net use Z: \\RemoteComputer\SharedFolder /user:Username Password
Replace Z: with the desired drive letter, RemoteComputer with the name or IP address of the remote computer, SharedFolder with the shared folder on the remote computer, and Username and Password with valid credentials.
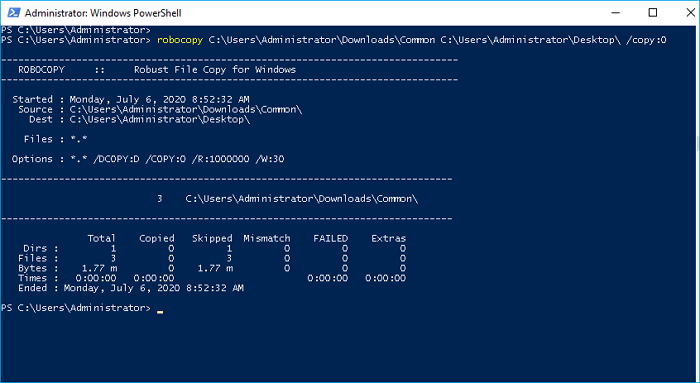
Step 2. Once the network drive is mapped, you can use Robocopy to transfer files. Here's a basic command:
robocopy C:\SourceFolder Z:\DestinationFolder /E /ZB /R:5 /W:5
- C:\SourceFolder: Path to the source folder on the local computer.
- Z:\DestinationFolder: Path to the destination folder on the remote computer (mapped drive).
- /E: Copy subdirectories, including empty ones.
- /ZB: Use restartable mode (allows resumable copying) and backup mode for copy security.
- /R:5: Number of retries on failed copies (default is 1 million).
- /W:5: Wait time between retries (default is 30 seconds).
Step 3. After the file transfer is complete, you can disconnect the network drive using the following command:
net use Z: /delete
Replace Z: with the drive letter that you used for mapping.
Bonus tip: Easier free GUI file transfer tool - AnyViewer
For users finding command lines challenging, it is suggested to opt for an easier solution: AnyViewer, a user-friendly free GUI file transfer tool. This professional-grade software simplifies the seamless transfer of files between computers, even if they are geographically distant. Boasting an intuitive graphical user interface, AnyViewer ensures a quick and straightforward initiation process for users.
Step 1. Download and install AnyViewer on both computers.
Step 2. On the remote computer, open AnyViewer, login, and explore the easy-to-use interface.

Step 3. Once successfully logged in, acquaint yourself with the user-friendly interface.

Step 4. On your local computer, go to "Device," find the target computer, and choose "File transfer."

Step 5. In the File Transfer section, select files and use the arrows for smooth movement.

Please be aware that while AnyViewer offers a free version suitable for smaller file transfers. For the effortless transfer of larger files, we recommend considering the Professional or Enterprise plan. By upgrading, you unlock a range of advantages:
- Individual files can reach an impressive size of 1TB.
- Enjoy a maximum file transfer speed of 10 MB/s.
- Facilitate efficient file transfers with support for 5 concurrent threads.
- There is no limit to the number of files that can be simultaneously transferred.
Closing words
In conclusion, efficiently copying files to a remote server on Windows via the command line is essential in the digital era. This article has illuminated three effective methods - PuTTY, PsExec, and Robocopy, with detailed steps for each. Whether utilizing PuTTY's SSH capabilities, PsExec's remote execution, or Robocopy's native robustness, users can choose the method that best suits their needs.
For those preferring a GUI-based approach, AnyViewer provides a user-friendly alternative for seamless file transfers between computers. Explore the diverse options presented here to enhance your file management capabilities on Windows.
