
Full Netsh Remote Computer Tutorial with Examples
This post is a full Netsh remote computer tutorial, including examples of using Netsh commands. Besides, it also introduces a GUI remote access solution if you find command lines difficult to cope with. Keep reading if you're interested.
By Ellie / Updated on December 13, 2024
What is Netsh (Network Shell)?
Have you encountered any troubles connecting to a network on a Windows computer? Perhaps you stumbled upon an unexpected alteration in registry keys due to a dubious software installer, or you suspect the presence of a virus and need to trace its activities. Fortunately, there's a handy tool called Network Shell (netsh) at your disposal.
![]()
Netsh is a powerful command-line utility that empowers you to configure and monitor diverse network settings on Windows machines and servers. By utilizing the Netsh command-line utility, you can effortlessly manage an array of network components. These components encompass not only network interfaces and Windows firewalls but also server roles and more on Windows Server-operated computers.
Examples of running Netsh on remote computer
Now that you have a solid understanding of Netsh and its benefits for network monitoring and configuration, let's delve into the process of executing Netsh remote computer commands.
To execute Netsh commands, you can utilize command-line consoles such as PowerShell or the command prompt on a Windows machine. However, as PowerShell serves as the successor to the command prompt, this tutorial will focus on running Netsh on remote computers specifically within PowerShell.
Let’s see some Netsh remote computer examples.
Case 1. Running basic Netsh utility commands
Before delving deeper into Netsh, it's important to familiarize yourself with the basic Netsh utility commands.
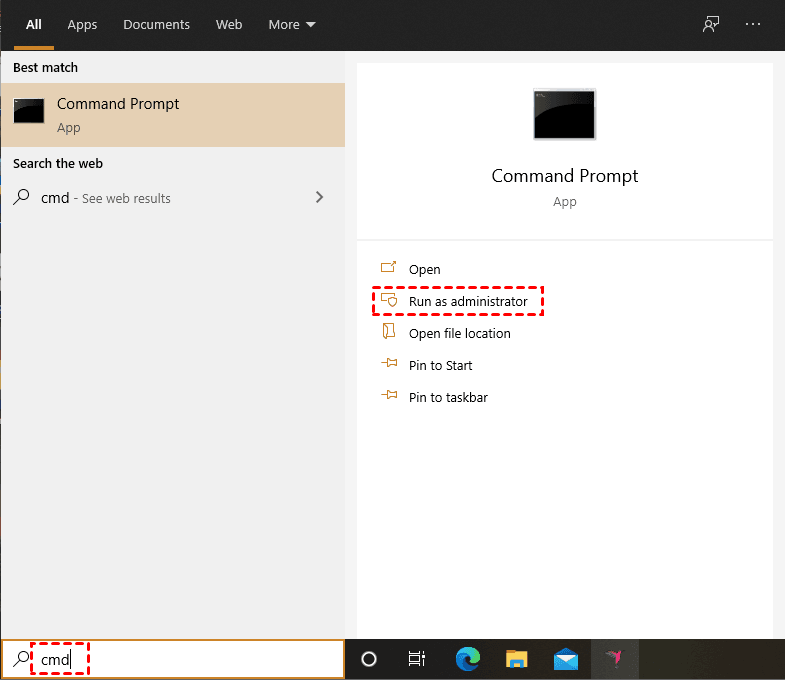
Step 1. Start by logging in to your Windows Server using the installed RDP client, which is the default option.
Step 2. Once logged in, open PowerShell as an administrator.
Step 3. Run the following netsh command to access the Netsh command-line session:
netsh
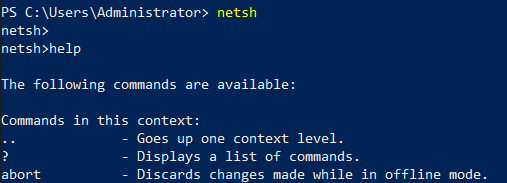
Step 4. Within the Netsh prompt, execute the help command to view the comprehensive list of commands available for use within the Netsh command-line session.
help
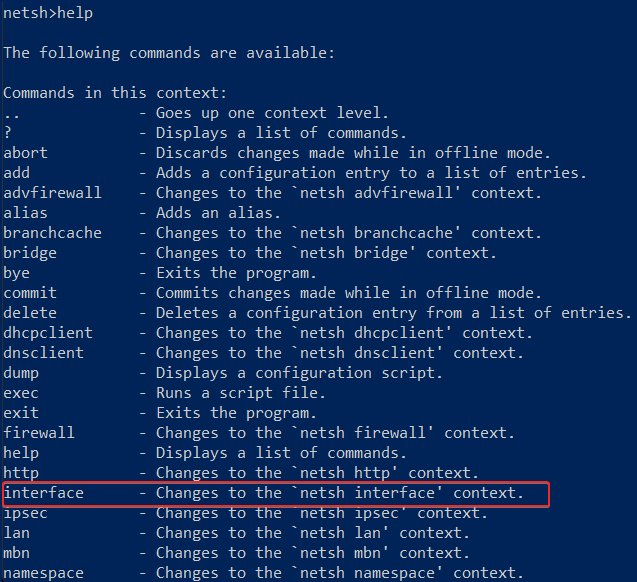
Feel free to select a command of your choice, but for the purpose of this tutorial, we will focus on the "interface" command.
Step 5. To display all the network interfaces currently available, run the following command:
interface show interface
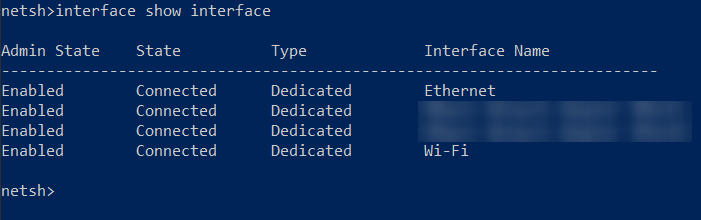
By following these steps, you will successfully navigate the Netsh command-line environment and retrieve information about the network interfaces.
Case 2. Using the remote functionality of Netsh
Netsh offers a built-in remote functionality that empowers you to issue commands to individual machines within the network. By leveraging the -r option, you can effortlessly specify the target remote machine where the desired command or script needs execution. Whenever necessary, login credentials can also be provided through the -u option for the remote machine's username and the -p option for the associated password.
To gain access to the Netsh Command-Line Interface (CLI) on a remote machine, adhere to the following steps:
Step 1. Launch a Command Prompt.
Step 2. Enter the subsequent command:
netsh -r hostname -u domainadmin -p password
Once you have established remote access, you can directly execute netsh commands. For example, to obtain the IP configuration, use the following command:
netsh -r hostname -u domainadmin -p password interface ip show config
In addition to the host name, the -r option also accepts the IP address or Fully Qualified Domain Name (FQDN) of the remote machines.
If you encounter connectivity issues with the remote machines, ensure the Remote Registry service runs on the target computer. If it is not running, Windows may display an error message stating "Network Path Not Found." Additionally, verify that File and Printer Sharing for Microsoft Networks is enabled in the network connection properties of the remote machine. Also, make sure that no firewalls are blocking the network traffic.
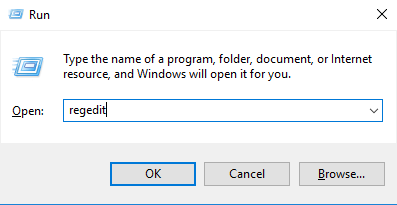
If you continue to experience connectivity problems, you can attempt the following Registry edit:
Step 1. Open regedit on the remote machine.
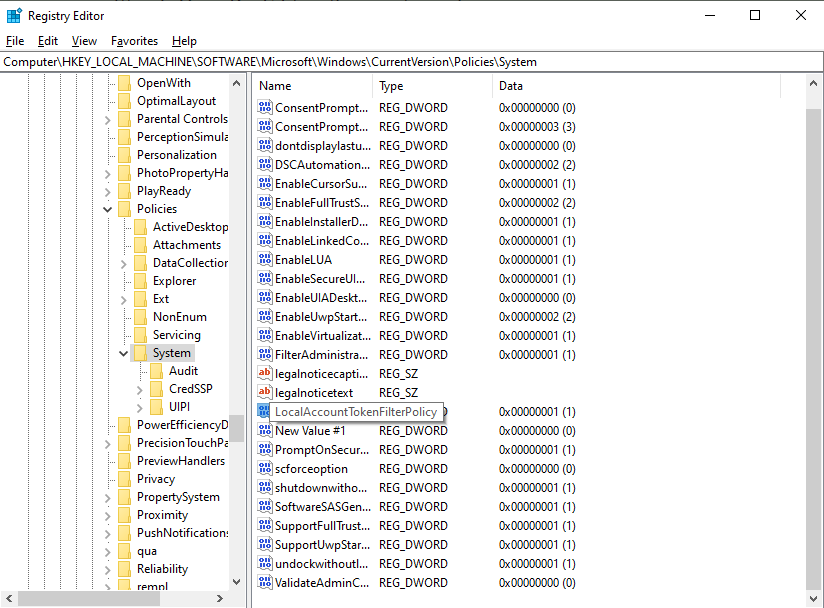
Step 2. Navigate to HKEY_LOCAL_MACHINE\SOFTWARE\Microsoft\Windows\CurrentVersion\Policies\System.
Step 3. Find a DWORD value named "LocalAccountTokenFilterPolicy" and set its value to "1". If it doesn't already exist, right-click the blank space and create a new DWORD value called "LocalAccountTokenFilterPolicy" and set its value to "1".
Step 4. Reboot the remote machine to apply the changes.
Case 3. Using Netsh via PsExec
While Netsh itself does not offer a straightforward way to manage multiple remote machines simultaneously, there are alternative options you can explore. One such option is utilizing the PsExec utility from Windows Sysinternals, which allows you to execute commands, including Netsh, on multiple machines simultaneously.
To get started with PsExec, follow these steps:
Step 1. Download PsExec and place it in a convenient folder.
Step 2. Open a Command Prompt and navigate to the folder containing PsExec.
Step 3. Use the following command to access the command-line interface (CLI) of a remote machine:
psexec hostname -u domainadmin -p password cmd
Substitute "hostname" with the name or IP address of the target remote machine, "domainadmin" with the relevant username of the domain administrator, and "password" with the corresponding password. In case the remote machine operates on Windows Vista or a newer version, it might be necessary to include the "-h" option to execute the process with elevated privileges.
Step 4. Once you have established remote access, you can execute Netsh commands directly. For example:
psexec hostname -u domainadmin -p password cmd exe /c netsh exe interface ip show config
This command will run the specified Netsh command on the remote machine.
Step 5. In situations where an interactive CLI is unnecessary and the command being executed does not generate output, you have the option to incorporate the "-d" flag within the PsExec command. By including this flag, PsExec will not wait for the process to finish. Conversely, if your intention is to enable program interactivity on the remote machine's desktop, you may want to explore the utilization of the "-i" option.
By leveraging the PsExec utility, you can effectively manage multiple remote machines and execute Netsh commands simultaneously.
AnyViewer: Remote network configuration with GUI
Experience a new level of convenience and productivity with AnyViewer, the ultimate remote desktop solution for seamless remote computer access and control. Say goodbye to limitations and embrace a world of possibilities as you effortlessly connect and manage your devices from anywhere, at any time. Compared to Netsh commands, AnyViewer has the following advantages when it comes to remote network configuration:
- GUI Interface: AnyViewer provides a user-friendly graphical interface for remote network configuration. This makes it easier for users, even those without extensive technical knowledge, to navigate and modify network settings on remote machines.
- Visual Feedback: With AnyViewer, users can see the network configurations in real-time, allowing for a visual understanding of the changes being made. This visual feedback aids in troubleshooting and ensures accurate configuration adjustments.
- Simplicity: AnyViewer simplifies the process of remote network configuration by offering intuitive controls and predefined settings. Users can easily modify network interfaces, firewall rules, and other network components through a straightforward interface.
Step 1. Download and install AnyViewer
Visit our website and download AnyViewer onto your computer. Follow the simple installation instructions, and within minutes, you'll have the power of remote control at your fingertips.
Step 2. Launch AnyViewer and create an account
Open AnyViewer and create your account. It's quick, easy, and free! This will be your gateway to establishing secure connections with your remote devices.

Step 3. Add remote computers
Log in to the same account on all computers that will be used for remote connection.AnyViewer will securely store these credentials for future use.

Step 4. Establish a connection
Select the desired remote computer from your AnyViewer My devices list and click "One-click control". AnyViewer will establish a secure connection, granting you full access to the remote computer's screen, files, and applications.

Step 5. Take control and collaborate
Once connected, you can effortlessly control the remote computer as if you were sitting right in front of it. Access files, troubleshoot issues, collaborate with colleagues, and enhance your productivity, all with the power of AnyViewer.
Conclusion
In this tutorial, you have gained knowledge of various netsh remote computer commands that allow you to manage your network configuration and identify any possible problems. The Netsh utility is a freely available tool that offers numerous features, whether you simply need to review your network setup or closely monitor its performance.
Armed with this newly acquired knowledge, you are equipped to monitor interfaces, execute trace commands and scripts, and even convert various IP address settings.
Furthermore, this article presents a user-friendly remote desktop solution called AnyViewer, designed to assist you in efficiently managing network settings from a remote location. If you find command lines cumbersome, consider exploring the convenience of AnyViewer without delay.
